Click the link below for the die shown on the card:
A daily papercrafting blog which features my handmade cards showcasing Creative Expression's products including my own line of cutting dies and embossing folders, Cosmic Shimmer, Ranger and more which use various techniques and ideas to hopefully inspire the creativity in you.
Tutorials
- Home
- My Ribbon Flower Tutorial
- Fancy Nestie
- Blossoms Five Flower Bud
- Blossoms Five Full Flower
- Easel Tutorial
- Wax Paper Embossing Folder Tutorial
- Caught In Crystal
- Shaving Foam Tutorial
- Quilt Card Tutorial
- Paved Pearl Technique
- Faux Leather Technique
- Plaited Ribbon Wreath Tutorial
- Paper Rose Tutorial
Thursday, 29 February 2024
You Are Such A Sweet Friend
Hi there my crafty friends! I started with a piece of Ocean card and used the Coronet Lace Border die set to add four black die cuts and glued them to the edges of the card to make a frame. I cut the Alice die in both white and black card. I offset the two die cuts, then I stamped the sentiment from the Sending Sunshine stamp set on a piece of white card. I cut the sentiment out with a Looped Circle, then I added a circular frame to it cut from the Double Stitched Circles. I added it to the middle of the Alice die. I added small white pearls to the borders as accents. The card was completed with white, ocean and black mats and layers. The finished dimensions are 7 1/2" x 7 1/2' in size. All for now. Sue x
Wednesday, 28 February 2024
Happy Belated Birthday
Hello bloggers! I selected a piece of white card and embossed it with the Tidal Sands embossing folder. Next I cut the Noble Looped Ovals in white and matted two of the sizes together. I cut the Layered Garden Roses in two shades of pink and cut the leaves and stems in two shades of green card. I assembled three large flowers and three buds and added them to the greenery. I added the flowers around the left edge of the Looped Ovals and extended the stems and buds to follow around the oval. I cut the Belated Birthday Wishes in blush pink card and black card. I shadowed the sentiment then glued it to the Looped Ovals. I added three pearls to the top and bottom right corner as accents. The card was completed with white mats and layers. The finished dimensions are 7 1/2" x 8 1/2" in size.
Since we now have a retail website to shop from, I am going to add a link to the main die in each card under the write up. So if you would like to purchase this die set from our new retail website (UK customers only right now), here is a link to it for you:
All for now, Sue x
Tuesday, 27 February 2024
Congratulations
Hello crafters! I selected a piece of Raspberry card for the background. I used the looped border from the Decorative Drapes Border die set and cut it in both the left and right sides of the card. I added a black backing piece behind it. I cut the Lena die with a piece of black card on top of a piece of white card (I really need to name this technique, any ideas?) I used the white copy to colour the floral end images with alcohol ink markers. I cut the middle die from the set in the same manner and coloured it with alcohol ink markers too. I added it to the Lena die with mounting foam. I cut the Lena die again bit in white this time and used it horizontally behind the coloured Lena die. I cut the Congratulations sentiment from the All Occasions Wordie Sheets and added it with mounting foam. I used micro beads in the centres of the flowers, they look black but they were clear and glued on top of the black card in the flower's centres. The card was completed with white and black mats and layers. The finished dimensions are 7 1/2" x 8 3/4" in size. All for now. Sue x
Monday, 26 February 2024
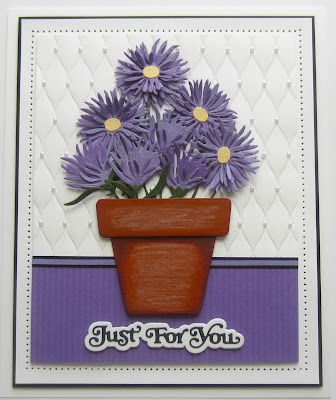
Just For You
Hello there my crafty friends! I selected a piece of white card and embossed it with the Padded Quilt embossing folder. On the bottom of the card, I added a wide strip of Amethyst card that I used a score board to add detail to it. I cut a thin border of black and amethyst card to go across the join. I cut the Flower Pot out of Cinnamon card twice. I cut the top of the pot off of the second die cut and inked the edges with Rusty Hinge distress ink and I also used a soft brown pencil then added it with mounting foam to the other pot. I inked the bottom of the pot as well, then used a white pencil in the middle of the pot and top edge. I cut the Layered Asters out of shades of purple and added yellow centres. I cut the stem and leaves in green and assembled all the flowers and arranged them in the pot. I cut the Just For You sentiment in black and added it on to a white shadow backing die cut and attached it below the Asters. I added small white pearls to the Padded Quilt background. The card was completed with white and black mats and layers. The finished dimensions are 7" x 8 1/2" in size. All for now. Sue x
Sunday, 25 February 2024
Just Because
Good Sunday morning all! I was having a play one day and came up with today's card. I used Peacock Feathers, Blueprint Sketch and Twisted Citron Distress inks randomly all over a piece of white card. Next I attached the mask (I cannot recall what it's called) over the coloured background an used white texture paste through it. I set it aside to dry overnight, then coated it with spray adhesive and sprinkled Frosted Sparkle Glitterbitz over all of it. Using the Round Corner Squares, I cut a multi-layered white frame and added it with mounting foam over the image. I cut the Just Because sentiment out of Cobalt blue card and added a black shadow to it. I glued it into place inside the frame. The card was completed with white and cobalt blue mats and layers. The finished dimensions are 8" x 8" in size. All for now, Sue x
Saturday, 24 February 2024
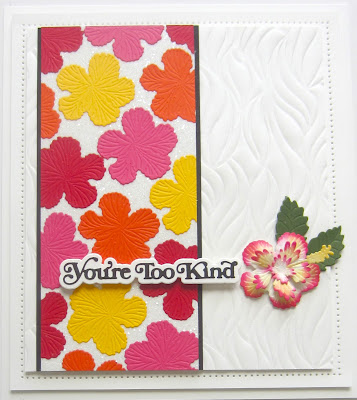
You're Too Kind
Hello crafters! I started today's card by cutting the Layered Hibiscus in yellows, reds and pinks. I cut a wide white panel and added some sticky adhesive sheet on to it. I peeled the backing paper off and attached the various hibiscus flowers to it. I used Frosted Sparkle Glitterbitz on the remaining sticky areas. I embossed a piece of white card with the Tidal Sands embossing folder and attached the panel to the left side. I made a single Hibiscus flower out of white card and I inked the flower with yellow in the centre and hot pink around the edges. I added a yellow stamen and some green leaves and added it to the right side of the card. I cut the You're Too Kind sentiment in black and added it to a white shadow backing piece the attached it to the card next to the single flower. The card was completed with white mats and layers. The finished dimensions are 7 3/4" x 8 3/4" in size. All for now, Sue x
Friday, 23 February 2024
Sincere Thanks
Hello bloggers! I reached into my pixied background stash for this one! I cannot take the credit for it, however, my Grandkids made this one on their last visit. I thought it was such a beautiful soft look that I just had to use it! They used a combination of Candy Pink, Aqua Lagoon and Rich Gold Pixie Powders. Using the Scalloped End Rectangles, I cut a wide white frame and added mounting foam to the back of it. I attached it to the centre of the card. I used the Layered Magnolias and cut them in white. I used a combination of Distress Inks on them including Picked Raspberry, Fossilized Amber and Antique Linen. I assembled the inked flowers and added them to a brown stem with green leaves and yellow buds attached. I used the flowers to sort of curl around the opposite corners of the frame. I cut the Sincere Thanks sentiment in black and glued it inside the frame. The card was completed with white mats and layers. The finished dimensions are 6 1/2" x 8 1/4" in size. All for now, Sue x
Follow my blog with Bloglovin
Thursday, 22 February 2024
Just For You
Hello crafters! I embossed a piece of white card with the Padded Quilt embossing folder. Using the Clipped Corner Rectangles, I cut a multi-layered frame with a wider white base and a thinner frame cut from Soft Lavender card on top. I added mounting foam to the back of the frame and added a piece of white card with a sticky adhsive sheet to it. I peeled the backing paper off and coated it with Frosted Sparkle Glitterbitz. I attached it to the embossed background with mounting foam. I cut the Layered Coneflowers in shades of purple and lilac. I cut the stems and leaves in shades of green. I assembled the flowers and arranged them inside the frame. I cut the Just For You sentiment in Amethyst card and added it to a white shadow backing piece. I added it underneath the frame with mounting foam. The card was completed with white mats and layers. The finished dimensions are 7 1/4" x 8 1/4" in size. All for now, Sue x
Subscribe to:
Posts (Atom)


