Wednesday 30 November 2022

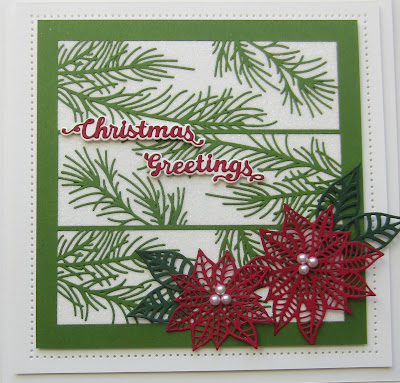
Christmas Greetings

Hello bloggers!  Here is a great card for Christmas and really quick and easy to make!  I cut the Pine Panel from the Holly and Pine Floral Panels set three times into a piece of green card.  I added a sticky adhesive sheet to a piece of white card, then peeled the backing paper off and attached it to the back of the panel card.  I used Frosted Sparkle Glitterbitz on all the remaining exposed adhesive.  Using the Poinsettia Trio die set, I cut two poinsettias.  I added them to the lower right corner of the card and added pearls to the centres and green leaves as  accents.  I cut the Christmas Greetings sentiment in red, then added it to the shadow die cut in white.  I attached them to the card with foam mounting tape.  The card was completed with white mats and layers.  The finished dimensions are 7 1/4"  x  7 1/4"  in size.  All for now, Sue x


                                                       Follow my blog with Bloglovin

Tuesday 29 November 2022

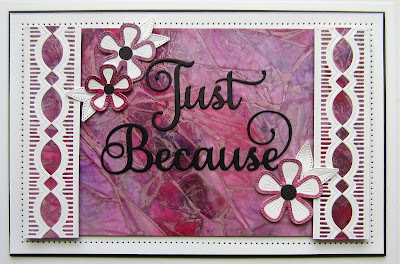
Just Because

Hi bloggers!  I had a dig through my background stash pile and found this pretty aubergine coloured piece to use for today's card. I used Aubergine Dream and Plum Twist Pixie Powders on it. I used the scalloped border from the Decorative Border die set and cut it four times out of white card.  I glued them facing each other on an extra bit of the pixie card.  I added mounting foam to the backs of both of them and added them to the sides of the background piece.  I cut the Noble Just Because out of black and glued it to the middle of the card.  Using the Pierced Layered Flowers, I cut all three sizes in white, then added the matching outline piece cut out of the pixied card.  I added black centres then attached them around the sentiment in opposite corners with white leaf accents.  The card was completed with white and black mats and layers.  The finished dimensions are 6 1/4"  x  9 1/2"  in size.  

Don't forget to scroll down to the post below this t see if your name is on the list of winners that was posted yesterday.  All for now. Sue x


                                                       Follow my blog with Bloglovin

Monday 28 November 2022

November Die Release Blog Launch Winners

 Hello crafters!  Thank you for all your support throughout the year and especially for this last blog launch of the year!  I really appreciate it!  Now onto the list of die winners!  Here they are:


Pierce Layered Flowers:  Carol Eaton!!!

Draped Jewelled Border:  Crafty Chris in Bournemouth!!!

Swirly Scrolls Background:  Crafty Jo!!!

Wrapped Pearls Frame: cr@fty  Heather T!!!

Noble Just Because:  Owlish!!!

Noble Sending Big Hugs:  Freedomlass!!!

Noble Missing You:  Little Largo!!!

Noble Hello Friend:  Barbara Gosden!!!


Congratulations all!  Please email me at americansue1@gmail.com to confirm your postal address and claim your winning die.  Please put the name of the die you won in the subject line of your email and don't forget to add your postal address too.  All for now. Sue x

Birthday Wishes

Hello crafters!  I selected a piece of Pixie Powdered card.  I used Emerald Green, Golden Mint and Pale Olive Pixie Powders on it.  I cut the piece into three sections and matted each of them with a black mat.  I added mounting foam to the sections then added them on to a piece of white card.  I cut the Leafy Rectangle out of both white and green card.  I used the green as a shadow behind the white die cut.  I selected several autumnal card colours then cut the extra leaves out of them.  I glued the leaves under each of the leaves in the die cut, then added the entire die to the shadow die cut in white.  I cut the Birthday Wishes Block Sentiment in white and black.  I used the white base then cut the die again out of the pixied card.  I used that sentiment and shadowed it in black then glued it onto the white base piece.  I added a thin black mat to the whole sentiment block, then added it to the Leafy Rectangle die.  The card was completed with white and black mats and layers.  The finished dimensions are 7 1/2"  x  9 3/4"  in size. 

Don't forget to check back later today to see if your name is on the list of die winners from the recent blog launch!  All for now Sue x


                                                      Follow my blog with Bloglovin

Sunday 27 November 2022

Hello Friend

 Hello crafters!  Clean and simple, this one is! I cut the Swirly Scrolls Background in white and then backed it in white.  I used the Hello Friend sentiment, but to create a pop of colour, I cut the sentiment in Orange, yellow and raspberry card.  I offset each of the sentiments slightly so each colour was showing.  I cut the shadow backing die out of white card and glued the sentiment to it, then attached it to the centre of the card.  The card was completed with white mats and layers.  The finished dimensions are 6 3/4"  x 8 3/4"  in size.  All for now, Sue x


                                                        Follow my blog with Bloglovin

Saturday 26 November 2022

Season's Greetings

 Hello bloggers!  For today's card I started with the Inner Scalloped Rectangles.  I cut one out of white and then used the fall away piece from it for the background.  I embossed it with the Falling Snow embossing folder.  I raised it by adding mounting foam to the back.  I used the Inner Scalloped die cut and backed it with a piece of tan card, then added the embossed background on top.  I used the The Robin Family die set and cut three birds out of tan card.  I used Festive Berries ink on their tummies.  I cut the greenery several times, then added Fluffy Stuff and heated it to look like snow.  I attached the greenery to the background, then added pine cones from the Pine Cone & Greenery die set.  I added two of the birds with mounting foam.  I cut the nest and eggs and added the third bird to it and attached it in the centre of the card.  I used the Season's Greeting sentiment cut in black and glued it to the top of the card.  The card was completed with white and black mats and layers.   The finished dimensions are 5 3/4"  X  10"  in size.  All for now, Sue x


                                                       Follow my blog with Bloglovin

Friday 25 November 2022

Sending Big Hugs

 Hello there my crafty friends!    I selected a white background and cut the scalloped border from the Decorative Border die set.  I cut one out of teal and the other one out of Ocean coloured card.  I glued them diagonally facing each other on a piece of sticky adhesive sheet.  I glittered it with Frosted Sparkle Glitterbitz the added them across the card.   I used the Pierced Summer Blossom die set cut out of Raspberry card and I assembled three flowers.  I seated them under the border and added white leaves and the used the Bauble Branch die cut in white as an accent.  I cut the Noble Sending Big Hugs in black and added it to the white shadow backing die cut in white.  I added the sentiment using  mounting foam to the top of the card.  The card was completed with white and black mats and layers.  The finished dimensions are 7 1/4"  x  8 1/4"  in size.  All for now,  Sue x


                                                        Follow my blog with Bloglovin

Thursday 24 November 2022

Joyful Greetings

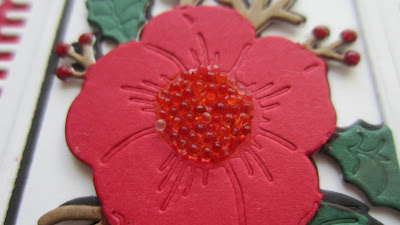
 Hello crafters!  I used the Nordic Tiles embossing folder to add a bit of texture to the white background.  Next I cut the Christmas Rose Floral Panel in brown and black.  I shadowed it with the black die cut then cut it two more times, once in green and once in red.  I cut the leaves out of the green version and glued them on to the brown base die cut.  I cut the three flowers out of the red die cut and glued them on to the brown base die cut. I added clear micro beads to the centres.   I added a white backing piece to it then cut the decorative bases.  I cut the outer base in red and then added the smaller base in white on top of it.  I attached the floral panel on top of the base, then attached it to the left side of the card.  I used two sentiments to create the one used on the card.  I cut the Noble Joyful in red and added it to a white base.  I cut the word "greetings" from the Christmas Greetings sentiment then added it to a white shadow base.  I attached it under the Joyful sentiment.  The card was completed with white mats and layers.  The finished dimensions are 8 1/4"  x  8 1/2"  in size.  All for now, Sue x


                                                      Follow my blog with Bloglovin