Saturday 31 October 2020

Enjoy The Ride

Happy Halloween crafters!  I have no Halloween dies so no Halloween card, unfortunately, but how about this simple carousel card?  I started by coating a piece of card with Lavender Glitter Kiss and allowing it to dry thoroughly.  I used the Circular Stars 3D embossing folder on it once dry.  I cut a diagonal corner off of it and added in piece of white card embossed with the same folder.  Next I cut the Carousel Base out of Wisteria card and added a white flag.  I stamped the Carousel Horse stamp in black and cut it out with the matching Carousel Animal die set.  I used Distress Markers to colour it, then glued it to the carousel base.  I added the base with mounting foam.  I cut the Enjoy The Ride sentiment in wisteria card from the Carousel Animal die set and glued it to the upper part of the card.  The card was completed with white and wisteria mats and layers.  The finished dimensions are 7"  x  8 1/2"  in size.  All for 
now, Sue x


                                                          Follow my blog with Bloglovin

Friday 30 October 2020

Happy Christmas


Hi bloggers!  Here's another Christmas card done with nontraditional sort of colours!  I started by covering a piece of card with the Moonlit Sea Luna Paste and allowing it to dry well.  Next I embossed it with the Stylized Poinsettia embossing folder.  I cut the Bauble Background out of white card and attached it to another piece of white card with a sticky adhesive sheet on it.  I used Frosted Sparkle Glitterbitz on the exposed adhesive areas.  I used the Bauble Edger set to cut the two sides of the background.  I added mounting foam and attached them to the sides of the embossed card.  I cut the centre die from the Deco Snowflake Background in white and added a white backing to it.  I added it to the centre of the embossed background with foam.  I cut the word Happy out of some leftover Luna Paste card and attached it to the centre oval.  I stamped the word Christmas and cut it out with the tag die from the Happy die/stamp combo set.  I added it with foam below the centre.  Using vellum, I cut three flowers from the Classic Poinsettia die set.  I used some Stellar Ice on the vellum to give them some bling, then assembled them and added them around my sentiment.  I accented the flowers with white Evergreen Branches.  The card was completed with white mats and layers.  The finished dimensions are 6 1/2"  x  8 1/2"  in size.  All for now. Sue x


                                                       Follow my blog with Bloglovin

Thursday 29 October 2020

You're Wonderful

Hello there my crafty friends!  I started this card by using the Paulette Edger set to cut into the card fourteen times across the card.  I reversed the direction of it each time to create a pleasing pattern.  I backed it in Blue Dusk card. then used the largest cutting die from the Joanie die set to cut an aperture in thee centre of the card.  I added mounting foam to raise the background, then added it to a piece of white card.  I cut the Joanie die in both white and black and shadowed it, then recessed it into the aperture opening.  I stamped my sentiment then cut two ovals, one white with the sentiment and one blue to mat it then attached it in the centre of the Joanie die.  I stamped and cut out the Jasmine Flower dies on white card.  I used glue on the petals then sprinkled them with Frosted Sparkle Glitterbitz, then assembled them.  I seated them in opposite corners and cut a Magnolia Corner to add leafy accents to them.  The card was completed with white, blue dusk and black mats and layers.   The finished dimensions are 
7"  x  8" in size.  All for now Sue x


Wednesday 28 October 2020

Merriest Christmas Wishes

Hi bloggers!  We are getting closer and closer so I hope you have gotten a start on your Christmas cards!  If not, how about this one for some inspiration!  I started by cutting the Jewelled Background All In One out of white card.   I used the matching Jewelled Edgers and cut a bit more detail into the background.  I cut one more Jewelled Background in Aqua and offset it behind the white one.  I used the edgers to cut the centre piece in white and added an aqua backing to it, then glued it to the centre of the background.   I added a white backing piece to the entire background.  I cut a wide strip of vellum and glued it across the card.  I cut the Merriest Christmas Wishes sentiment out of  Antique Silver card and added a silver mirror card shadow behind it then glued it to the vellum.  Using the Poinsettia Stem die, I cut three of the poinsettia flowers out of antique silver then added the backing in silver mirror card.  I added them in a cluster in the corner and cut some white leaves as accents.  The card was completed with white and silver mats and layers.  The finished dimensions are 7 1/4"  x  7 1/4"  in size.  All for now, Sue x


                                                        Follow my blog with Bloglovin

Tuesday 27 October 2020

So Sweet Of You

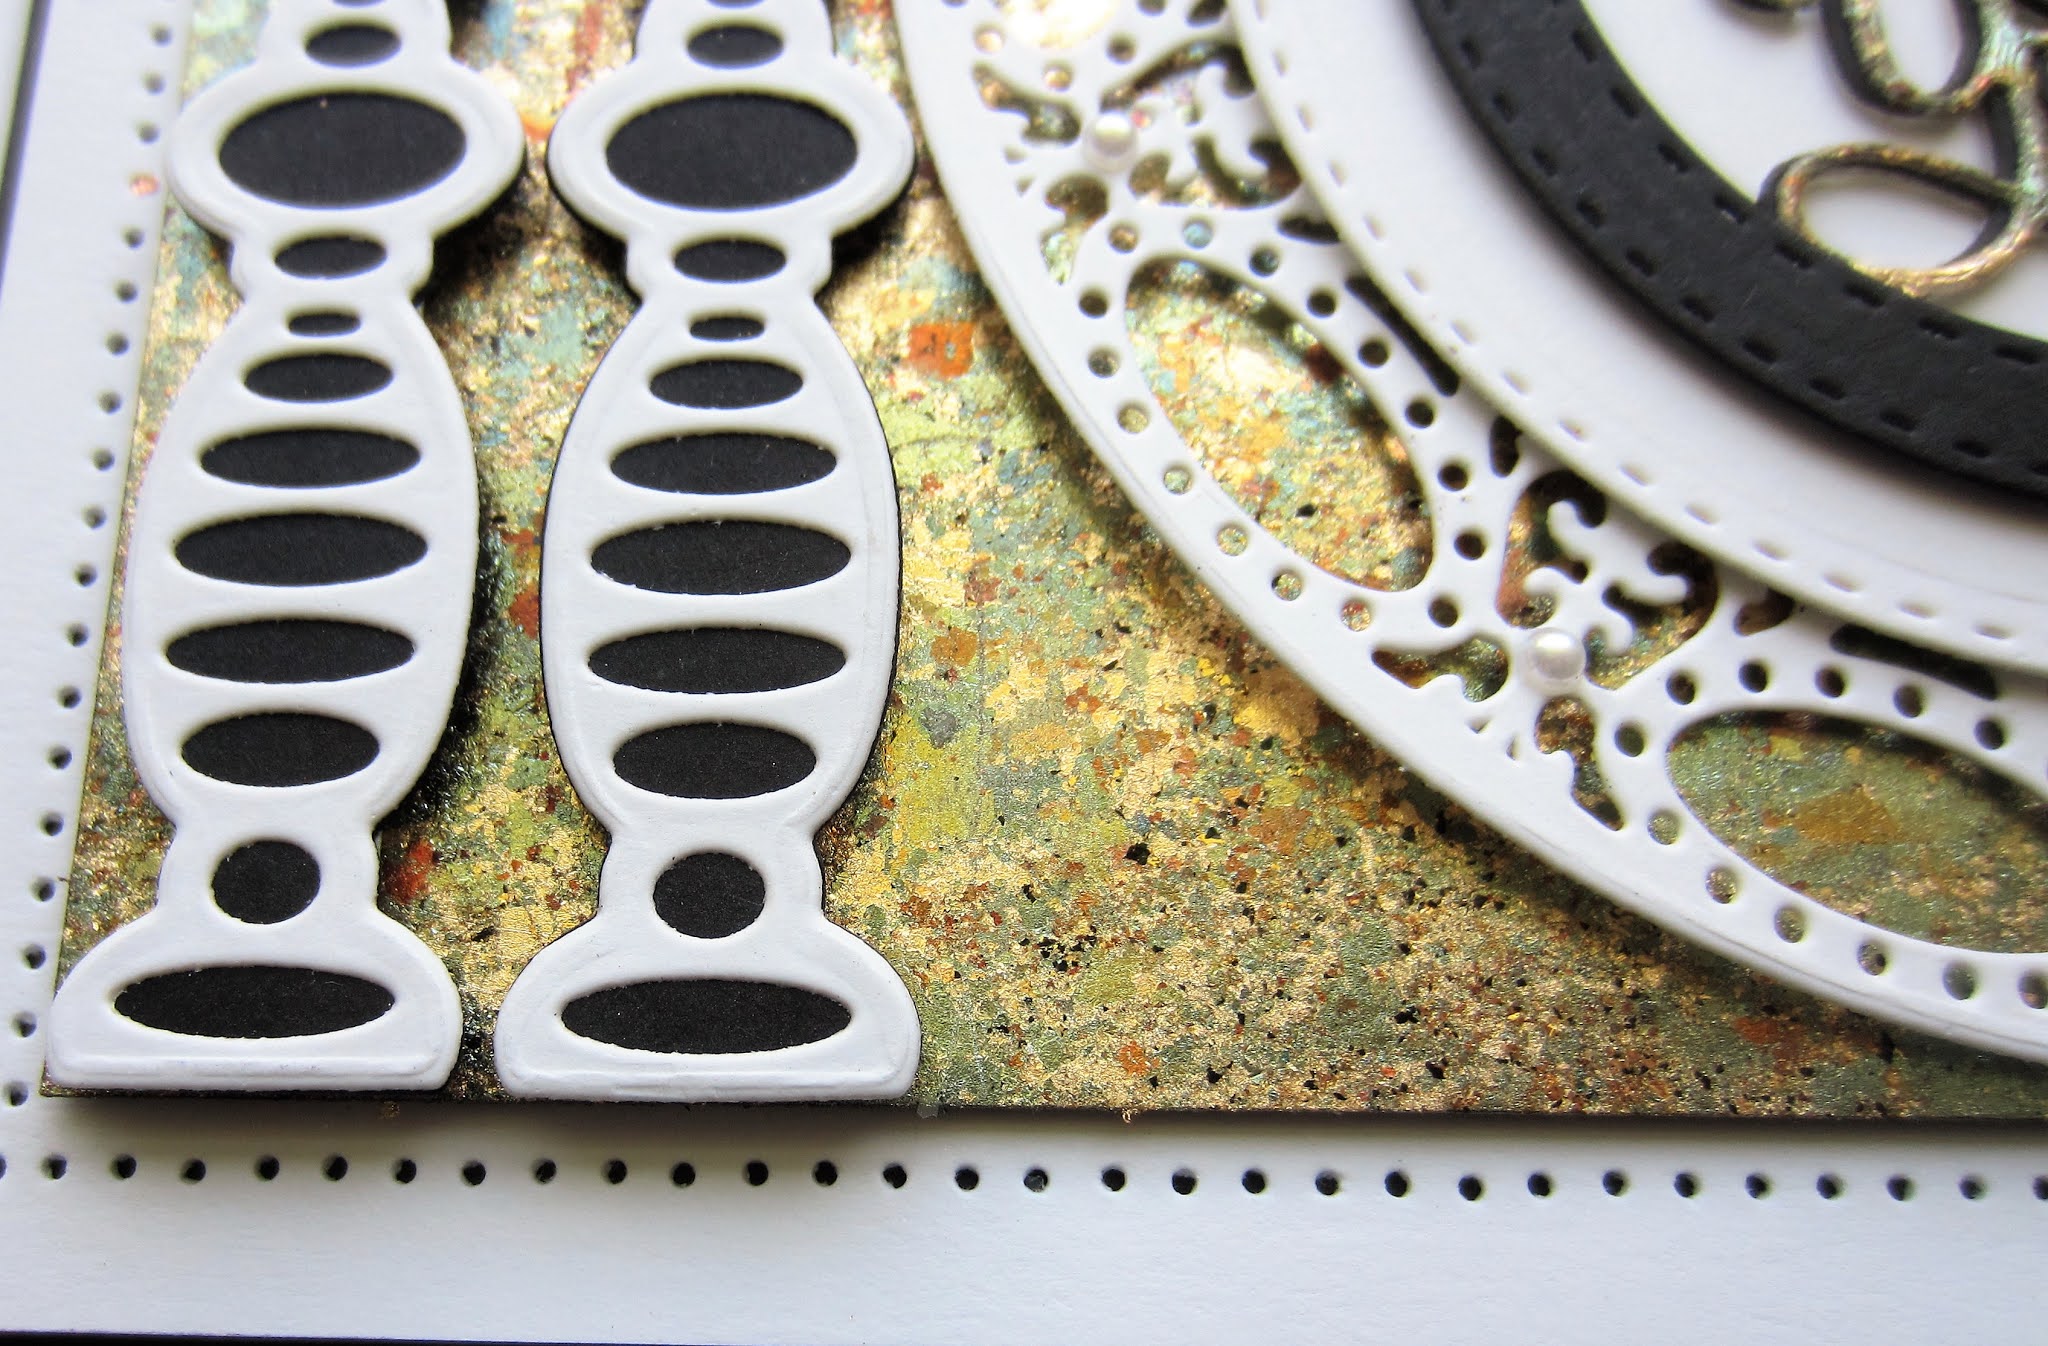
 Hello crafters!  I covered a piece of card with a sticky adhesive sheet.  I peeled the backing paper off and sprinkled Summer Meadow Gilding Flakes on it.  I used a piece of Rubitscrubit to move the flake around and then refine and remove the excess flakes.  Next I used the 
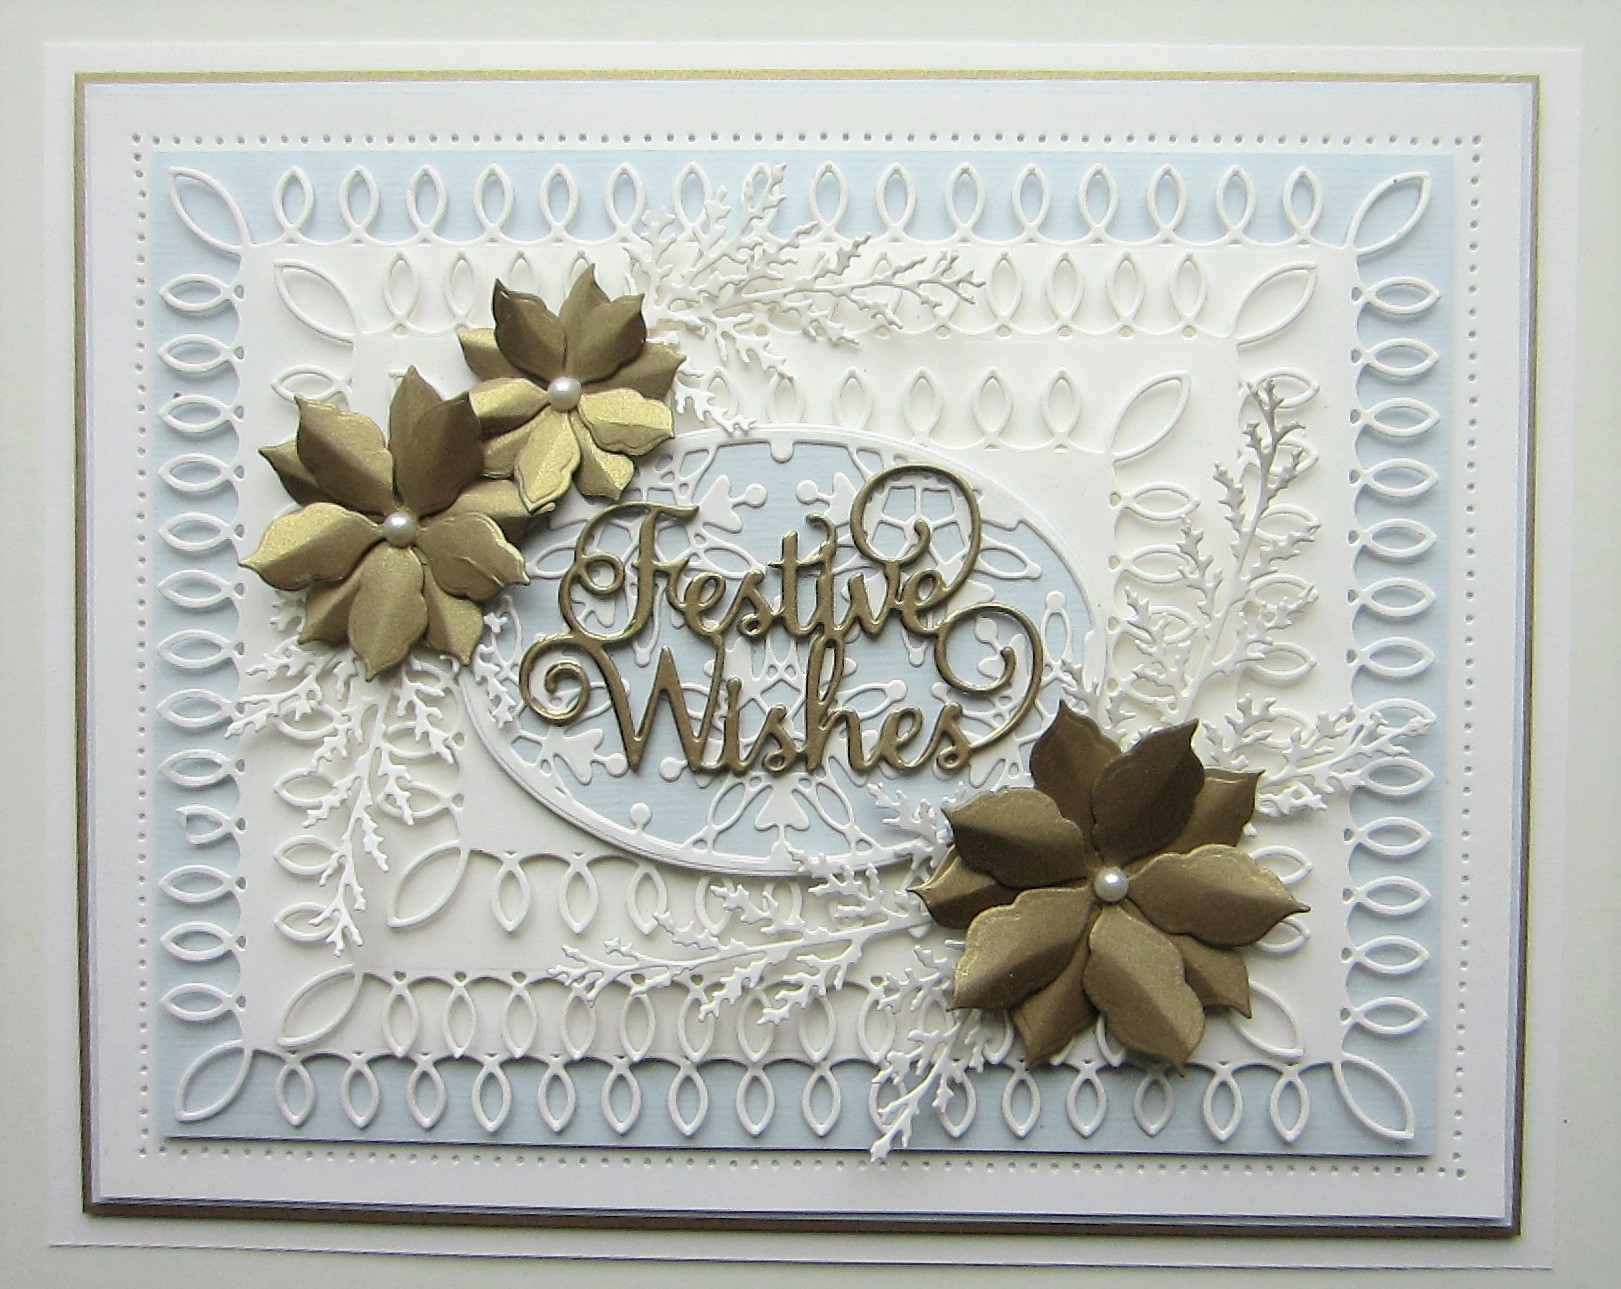
Theresa Edger set to cut four decorative edgers out of white and backed with black card.  I added them to the sides of the background with mounting foam to raise them.  I cut the Cecelia die in white and glued it to the centre of the card.  I cut a smaller circle out of black card using the Double Stitched Circles.  I cut the So Sweet Of You sentiment out of an extra piece of the gilding flake background, then added a black shadow behind it.  I glued it inside the circle.  I cut three small flowers from the Cherry Blossom Frame die set out of white card and patted glue on them, then sprinkled them with white glitter.  I added pearls to the centres then glued them to the top of the black circle as accents.  The card was completed with white and black mats and layers.  The finished dimensions are 6 1/2"  x  9 1/4" in size.  All for now, Sue x


                                                          Follow my blog with Bloglovin

Monday 26 October 2020

Festive Wishes

Hello bloggers!  Think pale blue, white and antique gold for today's card, not very traditional, but I just love it!  I started by cutting the Deco Snowflake out die in white and only cutting it partially.  I lined up the die again to extend it to make a larger background piece.  I cut the centre section using the die as it is and cut it in white.  The smaller top section was created by cutting the sie and making it smaller (I used the shorter side of the die as the longer side of the finished piece.  I stacked them all with foam and added them to a piece of Arctic blue card.  I cut the very centre of the Deco Snowflake die in white and added a blue backing to it and added it to the centre of the card.  The Festive Wishes was cut in Antique gold card and a gold mirror card shadow was added, then glued to the centre.  Using the Classic Poinsettia die, I made three flowers and added them around the sentiment.  Evergreen Branches cut in white were added as accents.  The card was completed with white, gold and arctic blue mats and layers.  The finished dimensions are 7"  x  9" in size.  All for now, Sue x


                                                       Follow my blog with Bloglovin