Sunday 31 March 2013

When I Count My Blessings


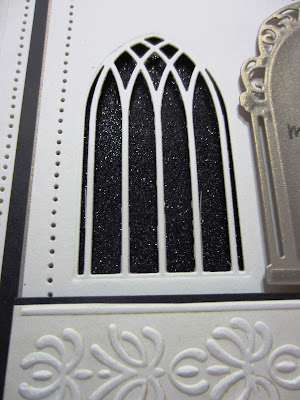
 Happy Easter everyone!   It is truly a first for me to see snow on the ground at Easter!  I didn't have any actually Easter cards to post today, but I thought this one would be appropriate.  I love the sentiment! The colours are taupe, soft gold and black for this one.   I started with a piece of taupe card and used the inner die from the Window D-Lite set to cut the shapes on either side of the main window.  This is a very detailed cut out so be sure to use wax paper so it releases easily.  Next I stamped my sentiment using a black archival ink pad on to soft gold card.  When ever you stamp on metallic card, the ink is never as dark though, but it works okay still.  I cut it out using the outside die from the window set.  I used just the lightest inking of black soot while it was still in the die.  It gives it a very vintage look.  I mounted the window in the centre on foam pieces for dimensions.  I cut a piece of black glitter card to use behind my side windows.  I pierced on three sides around the edge of this background piece.  Next I embossed some taupe card with the Pastorale embossing folder.  I used one of the side strips and cut it out and matted it with black to create my border on the bottom of the card.  I added a double taupe mat and pierced the inner layer to finish off a really simple design.  Finished dimensions are 7" x 8 1/4" in size.

Since it is Sunday, we have comment game winners to announce and loads of them this week too.

For the week, the winners are:
Jeanne Longden!!!
Chris Curry!!!
Hazel Young!!!

WE had two extra qualifying posts this week.  So for the post of March 24th, the winners are:
Crafty Ann!!!
Wilma Brown!!!
Sue Dunn!!!

For the post of March 29th, the winners are:
Jan Caven!!!
CraftingMarg!!!
Pauline 99!!!

Congratulations all!  Please email me at americansue1@gmail.com to confirm your address and claim your prize.  I hope everyone has a lovely Easter and we can look forward to Spring (at some point! LOL)  All for now, Sue x

For the post of March29th


Saturday 30 March 2013

Give Away Day!


Hi crafty ones!  Another Ornate Square card but this time, I have pared it with the Vintage Labels 2 die from JustRite Stamps.  I started with the background which I decide to letterpress.  To do this you just need to rub your ink pad all over the negative side of your folder.  I used the Venetian folder and Antique Linen with which to do this.  I closed my folder on my milk coloured card and ran it through the machine.  The ink was transferred to the floor of my design,  it is subtle but you can see it.  I cut the Ornate Square die in black and matted it on a piece of milk card and black card.  Next I stamped the Justrite Live, Love Laugh Vintage Labels Two stamp in black on milk card.  I lightly inked it through the die with Antique Linen distress ink.  I cut it out with the matching die and mounted it in the centre of my Ornate Square die.  I stamped my sentiment in the middle of the same stamp, but this time, I just cut around the inner line and mounted it on foam for dimension in the centre of my focal element.  I added some flatback pearls in black and some swirly black rhinestones to the top and bottom of the card.  I pierced the inner mat of my double milk coloured mat to finish my card.  If you would like to be in the drawing to win this card, just leave me a comment today!  I will post the name of the winner on Monday's post.  Finished dimensions are 7 1/4" x 7 1/4" in size.  All for now, Sue x


Friday 29 March 2013

Two Colourways


Hi my crafty friends! Sounds like sage advice to me, the card sentiment.  This is the card that Dean and I thought had a Moulin Rouge/Carnival/Can Can dancer feel to it!  It sort of does, I think, but that is some of it's charm too. I managed to snap off a few quick pics before they whisked it away to be sent out after my demo.  You'll have to tell me which colour way  you prefer!   I started with a piece of striped decorative card.  I used the swirl stamp from the Butterfly Dreams set (I really like that stamp!)  and stamped it all the way around the edge of the card with a clear perfect medium pad.  I heat embossed it with gold powder.  I covered the entire piece with a sticky self adhesive sheet, peeled off the backing paper (eventually!) and covered it with micro beads for a fun textural feel to it.  I stamped the large Labels 29 stamp from the Good Friends set, cut it out with the matching die and inked it with Tattered Rose distress ink.  I mounted it with foam in the centre of my beaded background.   Next I stamped my sentiment and cut it out with Vintage labels 2 and inked it with Tattered Rose.  I also cut the next size of the die as a mat and inked it lightly too.  I stacked them up to complete my focal element.  I used the Bitty Blossoms die set to create my floral elements.  I inked them with Tattered Rose as well for a coordinating look and rolled them to form the flowers.  I cut the leaves and inked through the die with clear perfect medium and gold embossed them.  I arranged them in the corner and tucked a piece of cream tulle in with them.  I pierced the milk coloured mat to finish it off.  Still love the sentiment!  Finished dimensions are 6 1/2" x 7 1/2" in size.


Thursday 28 March 2013

On Your Special Day

 Hi bloggers!  Hopefully the Die
D-lites that were ordered have arrived so I thought I would show one of my favourites from those samples.  I did have a great deal of fun with this gate, but this happens to be the only card that I made using it as an actual gate!  I decided on silver and white for my colour combo for this one.  I embossed a piece of white card using the Pastorale embossing folder by Couture Creations.  I cut out the two embossed strips from my card and backed them with a silver mat.  I taped them to either side of my white background card.  Next I cut two gates, one in white and one in silver.  I nipped away areas on the silver gate that I wanted to use as "iron" accents and glued them atop the white gate.  I glued the gate to the bottom of my card.  Next I stamped my sentiment and embossed it with silver detail powder.  I cut it out with the Petite Labels one die and used some brushed pewter distress stain on cut 'n dry foam to ink through the die.  Next I cut out the Medallion Seven D-Lite in white, I adhered it to a piece of silky adhesive sheet and just cut out the background around it.  I used the gunmetal polished silk glitter to fill in all the sticky areas that were exposed.  I burnished it well with my finger and cut it in half with my scissors.  I mounted each half behind my sentiment so it was peeking out from the back.  I mounted it on the border on the side.  I added some rhinestone swirls (from my stash) and then cut a Butterfly circle die out of white glitter card.  I used the small fall away butterflies from the circle as tiny accents on the background of my card.  I pierced the edges of my double white mat to complete the card.  Finished dimensions are 7 1/2" x 8 1/2" in size!  Don't forget to check out the sidebar today for the new auction card.  Thank you so much to everyone that has been getting involved and bidding, I really appreciate your efforts!  All for now, Sue x


Wednesday 27 March 2013

Friendship


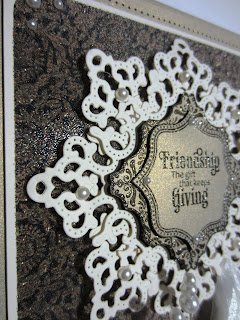
 Hi guys!  The Ornate squares are the star today.  I really enjoyed playing with this set and the matching stamps from JustRite.  What's not to like when you have a beautifully detailed die set and you can get matching stamps to accessorise so well!  I used a piece of paper from my stash that had a gold design on a dark background.  I covered it with sticky adhesive sheets and then micro beaded it for texture.  I wrapped my cream silky crush around the bottom and put a nice big bow at the bottom.  I finished my bow with a pearl embellishment and two pearl stick pins for accent.  Next I cut two of the large ornate square dies and put them together, but offset the pattern so it looks like it has eight arms instead of just four.  I stamped my matching die from the Ornate Happiness set on soft gold card and clear embossed it.  I cut it out with the matching die and then stamped it one more time.  This time, I hand cut the design around one of the inner lines.  I offset it on the other one, showing the nice edge pattern from it.  I added it to the centre of my card and finished off my focal element by adding some flatback pearls.  I added a double mat of soft gold card and pierced the inner mat.  A really nice card for a dear friend, don't you think!  Finished dimensions are 7" x 8 1/2" in size.  All for now, Sue x


Tuesday 26 March 2013

Happiness Is A Butterfly


 Hello all!  Something springy for today (we can all hope can't we! LOL)  Today's card showcases the French Rose background stamp from Justrite.  It is simply gorgeous, isn't it!  I decided to use part of it as the bold portion.  I stamped it and coloured it with coloured pencils and then edged it with Antique Linen distress inks for an aged look.  I cut the background along the flowers and swirls.  I used the background again, but this time, I very lightly stamped it on milk coloured card, just to get the hint of the text onto the background.  I used the swirl from the Butterfly Dreams and stamped it around  the edge and gold embossed it.  I stamped my sentiment (from the Butterfly Dreams set) and cut it out with the Vintage Labels two die.  I inked through the die with a Antique Linen and just a hint of Tattered Rose.  I mounted the sentiment in the middle on foam.  I used the butterfly from the set and stamped it and embossed it in gold.  I cut it out by hand as it doesn't match any die shape.  I added it to my background above the sentiment.  I added a double mat of soft gold card  and pierced the inner mat to finish it off.  Finished dimensions are 7" x 7" in size.  I posted the winners of the blog candy yesterday afternoon, so don't forget to scroll down and see if your name is listed!  Also, there are still ongoing card auctions on the right hand side of the blog.  As one closes, I post a new one so please be sure to have a look and send in a bid if you would like to be part of the charity auction!  All for now, Sue x


Monday 25 March 2013

Blog Candy Winners!

Hello again!  As promised, I have finally had a chance to get to drawing the blog candy winners.  It has sure come around quickly again!  Thank you so much for all your support on the blog as we seem to be adding more and more followers of late, welcome all!

 Without further ado, the THIRD place winner is......................................................
...........................................................................................................................
.............................................................................................................
.....................................................................................................
...........................................................................................
.................................................................................
.........................................................
.....................................
.........................
..............
........
Beth Griffin!!!

The winner of the SECOND place prize is..........................................................
..............................................................................................................
.......................................................................................
.......................................................................
....................................................
..........................................
................................
..................
............
.....
Sharon Kenny!!!

And now for the GRAND First place prize, the winner is...............................................
.......................................................................................................................
.........................................................................................................
..........................................................................................
.....................................................................
....................................................
.................................
..................
............
.....
Carol Clarke!!!

Congratulations to all!  Please email me at americansue1@gmail.com to confirm your address and claim your prize.  All for now, Sue x

Sunshine and Laughter

Hello my crafty friends!  Thank you for all your wonderful emails and support for yesterday's shows.  It always makes me feel like the work that I have put into the samples is truly appreciated when I see the cup full of emails.  For today's card, I have used Labels 29, but I had a bit of a play with it.  I started by simply embossing the white background using the Floral embossing folder by Creative Expressions.  Next I stamped the Floral Flourishes background on blue card and white heat embossed it.  I wanted to add a bit more texture to it, so I cut out a large labels 29 shape and then ran it through the Venetian embossing folder.  I used some Stormy sky ink direct from the pad across the top of my embossed piece.  I cut one more of the Labels 29 shapes in blue and cut it down the centre to use as a shadow.  I mounted it behind my white embossed, folder embossed piece in the corner of the card.  Next I stamped the large Labels 29 stamp from the Good Friends set in black ink on blue card.  I cut it out with the matching die and still wanted to add a bit more texture to it.  I stamped it with the Floral Flourishes background stamps and heat embossed it with clear powder.  You can see it well in one of the pics below.  I mounted it in the middle of my card and started in on my topper.  I used the stamps from the Live, Love, Laugh Vintage Labels Two set and simply stamped them both in black on white card and clear embossed them.  I layered them up in the middle with some mounting foam.  I made two of the Bitty Blossoms flowers by covering white card with a self adhesive sheet, cutting them, then micro beading them.  I used a pearl for the flower centres.  I added some Bella Rose swirl behind them as accents.  I tied a double white bow from silky crush ribbon, topped it with a pearl embellishment and stick pins as accents and added it to the corner of the card.  I matted it with blue card then white card and pierced around the edges.  Finished dimensions are 6" x 7 1/2" in size.  All for now, Sue x


Sunday 24 March 2013

A Book For A Friend

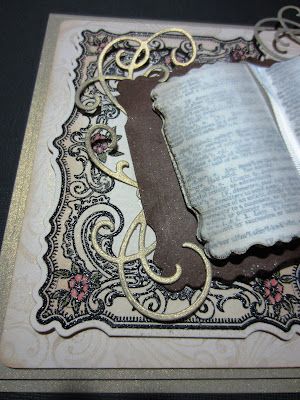
 Good Sunday morning!  I hope you're not snowed in or if you are, I hope you get to do some crafting at least!  Here is my favourite card that I made for today's shows.  The moment that I laid eyes on Labels 29, I thought "book" so it just had to be made!  I started with a piece of taupe card from the neutral card pack and stamped around the edges with the swirls from the Justrite Butterfly Dreams set.  I used a clear perfect medium pad to stamp with and then dusted it with gold mica powder, giving a soft shimmer to it.  I stamped the large Labels 29 matching stamp from the Good Friends set.  I coloured it with Distress markers and cut it out with the matching die.  I mounted it on the left side of my card with some mounting foam.  Next I started work on my "book" by cutting the largest size of the Labels 29 die set in brown card.  I moved down a die size and cut several pieces of vellum and several pieces of my old thrift store dictionary.  I alternated layers of the vellum and dictionary and folded them in half to create the pages of my book.  I stamped my sentiment on the top piece of vellum.  I inked the edges of the book pages with a bit of antique linen to give them an aged look.  I glued a piece of cream ribbon in place in the middle of the book to look like a bookmark.  I curled the pages of the book to give them a bit of dimension too.  I attached the book at an angle across my card.  Using the Bitty blossoms dies, I made an assortment of flowers, one I inked the entire flower with Tattered Rose and the remaining flowers, I merely inked the edges.  I cut several of the leaves and inked them with Forest Moss.  To add some interest, I cut several of the swirl from the Heartfelt Creations Bella Rose die set.  I used the swirls around the flowers and the book edge.  I matted the entire card in soft gold card to finish it off.  Finished dimensions are 6 1/2" x 8" in size.


Now for the comment game winners of the week.  They are:
Kimpy!!!
Ann House!!!
Val C!!!

There were two extra qualifying posts this week.  So the winners from Monday the 18th are:
Joanne Page!!!
TDQ Karen!!!
Clare W!!!

For the qualifying post of Tuesday the 19th, the winners are:
Linda Simpson!!!
Jules Ireson!!!
EnglishRose 897!!!

Congratulations!  You must email me at americansue1@gmail.com to confirm your postal address and claim your prize please.  Thank you for all your lovely comments on the blog!  I hope you can tune in today to see my shows at 12pm to 2pm and again at 7pm.  If you live outside the UK, you can watch them on your computer at  createandcraft.tv but remember the times listed are UK times and the shows are live.  All for now, Sue x


Saturday 23 March 2013

Best Friends Forever Sneak Peek

Hi bloggers!  As promised a sneak peek of one of the samples for Sunday's shows.  These shows are featuring the new JustRite stamps and matching dies and some of the new January CHA release dies as well.  Today's card showcases the Ornate Squares and the matching JustRite stamps.  This set is one of my favourites as it is detailed and deliciously nice to work with especially with the matching stamp designs (Ornate Happiness Squares set).  I decided to use the negative for this one as it was just too pretty to leave behind.  I cut the Ornate Square die out of the centre of some lovely decorative paper from my stash.  I added foam mounting pieces to the back for dimension.  Next I used the die to emboss the design into my soft gold card.  By the way, that card is on the shows on Sunday as I know several of you have been on the lookout for it lately.    I matched the embossed piece up with the aperture so it showed through nicely.  Next I stamped the smaller piece in the set, heat embossed it in gold and cut it out with the matching die.  I stamped my sentiment and gold embossed it and cut it out with a small circle die.  I mounted them in the middle of my aperture with foam for dimension.  I used some champagne coloured silky crush ribbon and tied it around the bottom of my card.  I tied a double bow and added it to the side.  I covered a round button with a piece of the matching paper from my background and used it in the centre of my bow as an accent.  I added a couple of crystal stick pins to complete the bow.  I matted the entire piece with soft gold card and paper pierced the inner layer.  I added some swirly pearls to the top and bottom to finish the card.  A bit opulent with all the gold, but still pretty for a number of occasions.  Finished dimensions are 7 1/2" x 8 1/2" in size. 
  Just a quick reminder of all the shows on offer this weekend.  Sam Poole is on today at 9am and 4pm with some brand new stamps she has designed (they are fab!).  I am doing tool shed from 12 to 2pm and then a 7pm show on  Sunday.  Dee Paramour is doing shows for Creative Expressions on Monday at 9am and 4pm too.  We thought that Julia Watts has earned a well deserved break after all her amazing shows this past week.  However, you certainly won't be without some really good crafty fun this weekend!
  I have also added some new cards to the charity auction for you to see.  As the auctions close, I have been adding new ones regularly.  I hope you will have a chance to take a look at them on the right hand side of the blog.  It is for a great cause.  All for now, Sue x