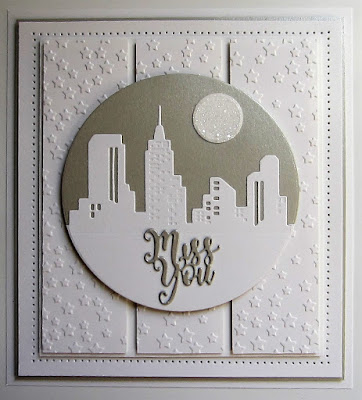
Hi crafters! It is the last day of the year and it is also my annual post for my "orphan" cards. You often hear me say that I really liked this card or that card in one of my posts, but these are my least favourite cards of the year! I can't really say why, but they just did not sing to me when I finished them! Sometimes it was just the colour wasn't what I expected or they were too much or even too boring. Everyone has their favourite cards and sometimes they just don't turn out like we thought they would. These are mine! I'm sure there were more, but I think I just didn't take any photos of some of them! And, even though they are my least favourite cards, they are still getting a day on the blog. I would love to hear what your comments are about them. Do you think any don't belong here? All for now, Sue x
A daily papercrafting blog which features my handmade cards showcasing Creative Expression's products including my own line of cutting dies and embossing folders, Cosmic Shimmer, Ranger and more which use various techniques and ideas to hopefully inspire the creativity in you.
Tutorials
- Home
- My Ribbon Flower Tutorial
- Fancy Nestie
- Blossoms Five Flower Bud
- Blossoms Five Full Flower
- Easel Tutorial
- Wax Paper Embossing Folder Tutorial
- Caught In Crystal
- Shaving Foam Tutorial
- Quilt Card Tutorial
- Paved Pearl Technique
- Faux Leather Technique
- Plaited Ribbon Wreath Tutorial
- Paper Rose Tutorial
Monday 31 December 2018
Sunday 30 December 2018
Thank You
Hi crafters! Another oldie but goodie! I started with a piece of French Navy card and embossed it with the Art Deco Shells embossing folder. I used Blue Teal Glitter Kiss over the top of it for a sparkly shine. I create a multi layered frame using the Double Stitched Rectangles with a white base and a thin French Navy frame on top. Next I cut the Ivy Garden circle in white and backed it in French Navy. I cut the centre of the Sophia die in white and cut it in half and added the pieces to the top and bottom of the Ivy Garden circle. I added it to the centre of the frame and then cut a blue circle for the base for the sentiment. I used the Thank You mini expression cut in white several times and stacked for dimension. I used the Passion Flower die set to make three flowers and added them in opposite corners of the frame as accents. Leaves and a white satin bows were used to embellish them. The card was completed with white and french navy card mats and layers. The finished dimensions are 7" x 8 1/4" in size. All for now, Sue x
Follow my blog with Bloglovin
Saturday 29 December 2018
Chalk Cloud Floral Frame Card
Hi crafters! I just love the way these Chalk Cloud Inks work with solid stamps! You can see that they work really well with the Floral Delight Frame too.
The finished dimensions are 7" x 8 1/4" in size. All for now, Sue x
Friday 28 December 2018
Thank You
Hello bloggers! Since it is the end of the year, I am going through my older files to see what cards I might have missed and I found this pretty one. I started by cutting the Diamond Squares Background out of wisteria card. I backed it with black card, then added a multi layered frame over it using the Double Stitched Squares. Next I cut two of the Flora die in white and offset them. I added them to the centre of the card with a black circle backing piece. I cut the centre of the Ivy Garden Background in wisteria and backed it in white. I used it as a base for my Thank You sentiment. I completed the card with white and black mats and layers. The finished dimensions are 7 1/2" x 7 1/2" in size. All for now, Sue x
Follow my blog with Bloglovin
Thursday 27 December 2018
For You
Hello crafters! It's a bit springlike for this time of year, but oh well! I cut the Summer Rose Frame twice out of green card and twice out of pink card. I nipped the frame apart and took the two larger for opposite corners and used the smaller side for the other corners. I cut out the pink flowers and glued them on top of the matching flowers which were part of the green card. Next I cut two of the Sophia die in white and offset them and added them to the centre of the frame. I used the Double Stitched Octagons to cut a thin pink frame. I used the inside die from the Sophia die cut in white as a base for the frame. I cut the sentiment in pink and glued it to the centre. The card was completed with white on white mats and layers. The finished dimensions are 8" x 8" in size. All for now, Sue x
Follow my blog with Bloglovin
Wednesday 26 December 2018
You Are a Sweet Friend
Happy Boxing Day! I found this one in a older file and thought it should have it's day on the blog before the year is up! I started with the Linear Leaf Background and cut it in coconut white card and extended it. I cut five black strips and four white strips of card and glued them in alternating colours to the back of the background. I created a white and black multi layered frame using the Double Stitched Rectangles and attached it over the background. I cut the Julia die in white and backed it in black. I cut the sentiment from the Mix & Match Friendship Sentiments in red and glued it in the centre of the Julia die. I made a small flower using the Petite Dianthus set and edged it with Festive Berries and glued it to the bottom of the Julia die. White and black mats and layers were used to complete the card. The finished dimensions are 7 1/2" x 8 3/4" in size. All for now, Sue x
Follow my blog with Bloglovin
Tuesday 25 December 2018
The Last Of The Christmas Cards
Merry Christmas all! I hope you have a wonderful day today and if you are reading this, thank you for sparing a few minutes to pop by the blog! The last of all the Christmas cards are here today. It is quite a long post to scroll through, but hopefully you will find some that bring a smile to your face! All for now. Sue x
Follow my blog with Bloglovin
Subscribe to:
Posts (Atom)