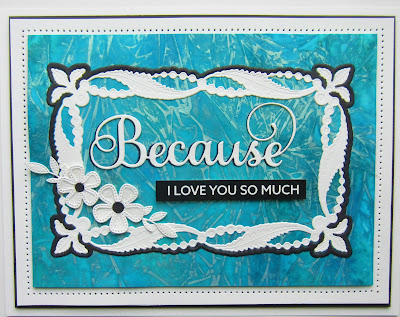
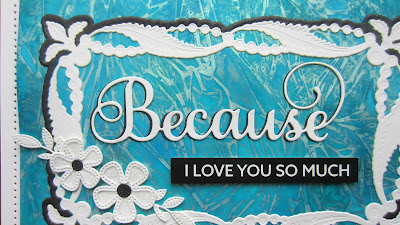
Hello crafters! I selected a piece of card that I used Beyond Blue Pixie Sparkles on, then covered with a piece of cling film and st aside to dry. Next I used the Wrapped Pearls Frame and cut it in white. I used the die set again but only cut the outside die to create a thin black frame. I glued it to the background around the frame. I cut the Noble Just Because die in both white and black. I shadowed only the word Because with the black die cut and glued it to the inside of the frame. I added a preprinted sentiment from the Love Wordies. Using the Pierced Layered Blossoms, I cut the base flowers in white card covered with a sticky adhesive sheet. I peeled the backing off of the flowers and added a white outline die then glittered it with Frosted Sparkle Glitterbitz and added black centres to them. I attached them in the lower left corner of the frame with white leaves as accents. The card was completed with white and black mats and layers. The finished dimensions are 6 3/4" x 8 3/4" in size. All for now, Sue x
A daily papercrafting blog which features my handmade cards showcasing Creative Expression's products including my own line of cutting dies and embossing folders, Cosmic Shimmer, Ranger and more which use various techniques and ideas to hopefully inspire the creativity in you.
Tutorials
- Home
- My Ribbon Flower Tutorial
- Fancy Nestie
- Blossoms Five Flower Bud
- Blossoms Five Full Flower
- Easel Tutorial
- Wax Paper Embossing Folder Tutorial
- Caught In Crystal
- Shaving Foam Tutorial
- Quilt Card Tutorial
- Paved Pearl Technique
- Faux Leather Technique
- Plaited Ribbon Wreath Tutorial
- Paper Rose Tutorial
Tuesday, 31 January 2023
Monday, 30 January 2023
Thank You
Hi crafters! This colourful card was started by cutting the Daisy Rectangle Frame in white. I cut the extra flowers in custard, soft salmon , coral and old rose card. I added the flowers behind the floral outlines in the frame. Next I cut a rectangular frame in white using the Double Stitched Rectangles. I added it a white backing to it with mounting foam, then I added it to the centre of the frame. I cut a larger white frame using the Double Stitched Rectangles. I cut more of the extra flowers in the same colours and added them around the larger frame, alternating the colours. I cut the Thank You Block Sentiment in old Rose and just used the sentiment and glued it inside the small frame. The card was completed with white mats and layers. The finished dimensions are 7 1/4" x 8 1/2" in size. All for now, Sue x
Sunday, 29 January 2023
Hello Friend
Good Sunday morning all! I embossed a piece of white card with the Dotty Flourish embossing folder for some texture in the background. I cut the Clipped Corner Rectangle using soft salmon card and attached it to the background. I cut the Hello Friend Noble sentiment in black and glued it to the Clipped Corner die cut. using the Layered Posy die set, I made four flowers using soft salmon and coral card. I assembled them and attached two flowers in two opposite corners. I added some greenery as accents using two colours of green card. The card was completed with white and black mats and layers. The finished dimensions are 6 3/4" x 8 1/2" in size. All for now Sue x
Saturday, 28 January 2023
Wish Big
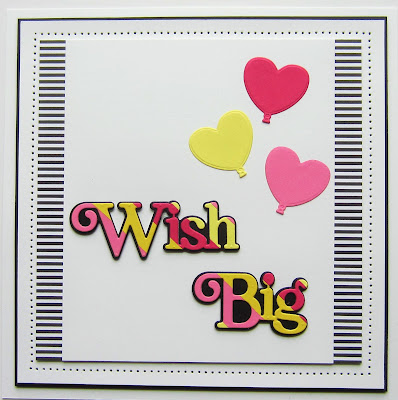
Hello bloggers! Today's card is a quick card that I made with leftover pieces from other cards for the most part. I started with a piece of white card and added two striped pieces using the Monochrome Paper Pad to the sides. Next I cut the Wish Big sentiment out of a piece of card that I attached thin strips of pinks and yellows to from my leftover scrap bin. I cut the sentiment on the diagonal and added it to a black backing piece then glued it to the card. I added three floating heart balloons from the Birthday Balloons die set . The card was completed with white and back mats and layers. The finished dimensions are 7 1/4" x 7 1/4"in size. All for now, Sue x
Friday, 27 January 2023
Just For You
Hi crafters! Here is a simple card using the new layered flower dies. I started by cutting the Wood Plank Background in white for texture. Next I cut the Flower Pot out of Slate grey card. I cut the pot twice and cut the top off of the second die cut. I used Weathered Wood ink to highlight the edges and around the top of the pot. I added the top with mounting foam. Next I cut the Layered Daisies. I selected two shades of pink card and cut all the flowers and assembled them. I used two shades of green to cut the stems and leaves and assembled those then added the flowers to them. I arranged them and attached them to the card, then added the flower pot to the card. I glued clear micro beads into the centres of all the flowers. I cut the Just For You sentiment in pink and added it to the flower pot. The card was completed with white and slate grey mats and layers. The finished dimensions are 6 1/2" x 7 1/2" in size. All for now, Sue x
Thursday, 26 January 2023
Missing You
Hello crafters! I selected one of my Midnight Blue Pixie Powdered backgrounds to use for this card. I used the Shadow die from the Missing You sentiment and cut an aperture in the middle of the card. I added mounting foam to the back to raise it and added a white backing card to the back. Using the Decorative Border die set, I cut four of the triple square borders in white and added black backings to them. I had to extend them a bit but they are easy to line up and extend. I attached them to all four sides and mitred the corners with my scissors. I cut the Missing You sentiment in black and recessed it into the aperture opening. I cut several of the Pierced Summer Blossoms in white and used Blueprint Sketch Distress ink and edged all of the flowers before assembling them. I added them around the sentiment with white leaves as accents. The card was completed with white and black mats and layers. The finished dimensions are 7 3/4" x 9" in size. All for now, Sue x
Follow my blog with Bloglovin
Follow my blog with Bloglovin
Wednesday, 25 January 2023
You Are So Special
Hi bloggers! I used the Beaded Cornice die and cut it twice out of white card and twice out of black card. I used the black die cuts as shadows behind the white ones, then glued them to the sides of a piece of custard card. I cut the Daisy Rectangle Frame in white and added it to the centre of the card, For the sentiment I cut the You Are So Special Block Sentiment in both white and black gloss card. I matted the block sentiment piece with black gloss card then used the sentiment from the black gloss die cut and paper pieced it back into the white die cut. The card was completed with white and black mats and layers. The finished dimensions are 7" x 9" in size.
I want to let you know that Jamie Rodgers is doing three shows today on HobbyMaker using the new Layered Flower dies from the release last week. His shows are on at 7am, 3pm and 5pm. I know that Jamie will have some brilliant demos to share with you! All for now, Sue x
Tuesday, 24 January 2023
Forever Friends
Hello crafters! I have gone back to my scrap box for today's card. I selected some custard, gold and black card pieces and cut them into 1/2" strips. I alternated the colours onto another piece of card covered with a sticky adhesive sheet. I used the Clipped Corner Rectangles and made a multi-layered frame with a wider white base and a thinner antique gold frame on top. I added mounting foam to the back of the frame and attached a piece of white card as a backing. I cut the Layered Daffodils out of white and custard card and assembled them then added them to several leafy green stalks. I cut the sentiment from a Wordie sheet and added it at the bottom of the flower. The card was completed with white and black mats and layers. The finished dimensions are ???? in size.

Now for the winner of the entire set of sixteen dies in the January release is...................................................................................................................
Marion Scott!!!
Congratulations! Please email me at americansue1@gmail.com to confirm your postal address and claim your prize. All for now, Sue x

Subscribe to:
Posts (Atom)


