Sunday 31 July 2022

Can't Wait To See You

Good Sunday morning all!  I started with one of the newer stencil called Waves and taped it to a piece of white card.  I used a plastic palette knife and spread Clear Texture Paste through the mask.  While the mask was still in place, I sprinkled Beyond Blue and Teal marine Pixie Sparkles over it.  I lightly spritzed some water over it to activate all the powders, then waited a few minutes and removed the stencil and set it aside to dry thoroughly.  Once dry, I cut a white multi-layered frame using the Round Corner Squares.  I attached it over the background using mounting foam.  Next I cut three dolphins from the Neptune die set and added them with foam to the background.  I cut the Can't Wait To Sea You sentiment from the Underwater Life Frame die set in black and glued it to the lower corner inside the frame.  I completed the card with white mats and layers.  The finished dimensions are 7 1/4"  x  7 1/4"  in size.  All for now, Sue x


Saturday 30 July 2022

Sending Hugs

 Hello bloggers! For today's card, I created a caught in crystal background.  I used Cosmic Lacquer on a piece of clear acetate.  I used my finger to spread it all over the acetate, then sprinkled Midnight Blue Pixie Powders all over it.   I used  my finger again to mix all the powder with the clear lacquer and spread it all across the acetate.  I scrunched up a piece of white tissue, then opened it back up, but kept the wrinkles and laid it on top of the piece.  I used a wad of kitchen roll to tamp down the tissue paper then set it aside to dry overnight.  Once dry, I backed it with a piece of white card (that makes the colour pop).  I cut the Button Flower Floral Panel in white and nipped the leaves out of the frame.   I glued it to the left side of the card, then made a flower using the Magnolia Corner flowers.  I glued it at the bottom of the leaves, then added some leaves from the Pinwheel Floral die set below it.  I cut the side view butterfly from the Magical Butterflies set and glued it to the upper right corner.  I cut the butterfly again and added another wing to make it look more dimensional.   I cut the Sending Hugs sentiment in black and glued it onto the shadow backing cut in white.  I glued the sentiment in the right corner.  The card was completed with white mats and layers.  The finished dimensions are 7 1/2'  x  8 1/2"  in size.  All for now, Sue x


                                                       Follow my blog with Bloglovin

Friday 29 July 2022

Twinkle

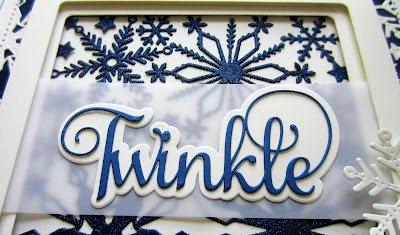
Hello crafters!  I started today's card by cutting the Snowflake Background out of blue card and white card.  I covered a piece of Cobalt blue card with a self adhesive sticky sheet.  Using the  snowflakes from the white die cut, I nipped them away and arranged them around the outside edge of the card on the sticky sheet.  I used Canadian Blue Polished Silk Glitter on the remaining adhesive areas.  Next I made a multi-layered white frame using the Round Corner Squares.  Next I cut a smaller piece of white card as a backing and used the blue die cut and coated the die cut with spray glue then dusted it with the same blue glitter.  I added a white backing to it then attached the frame over it.  I seated the frame in the centre of the card.  I cut a wide strip of vellum and cut the Twinkle sentiment out of blue card.  I added it to the shadow backing piece in white and glued the sentiment to the vellum strip and attached it across the frame.  I added one small white snowflake as an accent.  the card was completed with white and blue mats and layers.  The finished dimensions are 8 1/4"  x  8 1/4"  in size.  

The list of die winners for the recent blog launch was posted yesterday afternoon, so don't forget to scroll down to the post below this one to see if your name is on the list.  We still have several unclaimed dies!  All for now, Sue x


                                                       Follow my blog with Bloglovin

Thursday 28 July 2022

July Die Release Blog Launch Winners

 Hello my crafty friends!  Thank you so much for all your support on the blog and throughout this latest die release launch, I really appreciate it!  Now it's time for the list of the winners!

Here they are:  

Poinsettia Scalloped Border:  Robin Sachs from Riverside!!!

Wreath Frame:  Rose in Chester!!!

Blustery Frame:  Susan Foster Croydon!!!

Winter Greetings:  Crewe Trish!!!

Christmas Village:  Netty the runner!!!

Dashing Through The Snow:  Sandy h (Hull)!!!

Oval Wreath Frame:  Carol T!!!

Merriest Christmas:  Barbara V!!!

Poinsettia Floral Panel:  Aunty Sue!!!

Christmas Rose Floral Panel:  theresa w in Berks!!!

Holly & Pine Floral Panel:  freedomlass!!!

Peace On Earth:  Christine Bentley!!!

Snowflake Panel:   Marlene O!!!

Heart Scalloped Border:  Kittydavies47@gmail.com!!!

Scalloped Ovals:   Cr@fty Heather T!!!


Congratulations all!  Please email me at americansue1@gmail.com to confirm your postal address and claim your die.  Please put the name of the die you won in the subject line of your email.  Thanks to everyone for all the lovely comments.  All for now, Sue x

Happy Birthday

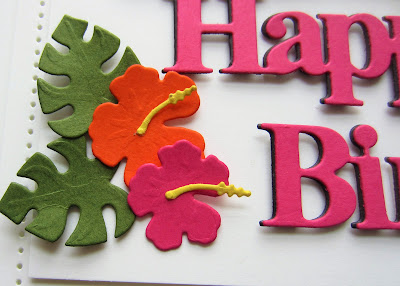
Hello bloggers!  I just love this cute little guy!!  I selected a piece of white card to use for the background.  I cut a wide white frame using the Double Stitched Squares and added mounting foam to the back to raise it.  I inked a piece of white card with Crushed Olive Distress ink, sprinkled some water on it and removed some of the colour to look like raindrops.  I added the Delicate Fronds cut in green card and white vellum to cover the entire area.  I attached the square frame to it then added it to the top of the card.  I cut the Toucan in black, yellow and orange.  I used the yellow die cut as the base and cut away the body from the black die cut, leaving the area around the head and glued it to the base.  I cut the beak on the orange die cut and glued it to the base.  I added the black on the beak and the eye with a marker  I used a white pencil on the beak as a highlight.  I seated the toucan in the lower right corner of the frame with some leaves and a Hibiscus from the Tropical Flora set.  I added some more leaves and a Hibiscus in the upper left corner of the frame.  I cut the Noble Happy Birthday sentiment in both raspberry and black.  I shadowed it and glued it below the white frame.  I added two more Hibiscus and some leaves to it.  The card was completed with white mats and layers.   The finished dimensions are    7 1/4"  x  9 1/2"  in size.  

Don't forget to check back later this afternoon for the list of winners from the recent Christmas release blog launch.  You are definitely going to want to check that list to see if you are one of the lucky winners!!!  All for now, Sue x                                                    


                                                       Follow my blog with Bloglovin

Wednesday 27 July 2022

Best Wishes

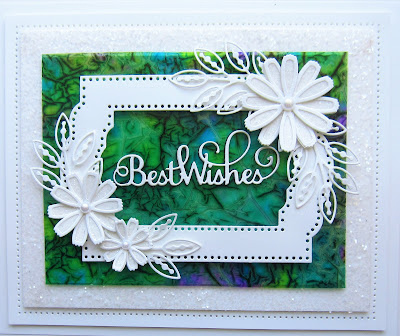
Hi crafters!  I selected a piece of caught in crystal that was in my background stash.  I used Green Emerald, Purple Violet and aqua Lagoon Pixie Powders on a Cosmic Lacquer base on clear acetate.  The piece was covered with scrunched up in white tissue paper and set aside to dry overnight.  I backed it with a piece of white card which brings the colours out.  I used the Scalloped End Rectangles cut in white.  I added mounting foam to the back and attached it to the background.  I used the Cosmos Flowers to accent.  I cut the solid flowers out of a piece of white card covered with a sticky adhesive sheet.  I cut the outline flowers out of white card, then assembled the two pieces and coated the remaining exposed adhesive with Frosted Sparkle Glitterbitz.  I seated the flowers in opposite corners, then used the leaves from the Pinwheel Florals die set around them.  I cut the Best Wishes sentiment in white and glued it in the frame.   I put strips of double sided tape around the edge of a piece of white card. I sprinkled Frosted Sparkle Glitterbitz over it, then added the background to the centre of it.  I completed the card with white mats and layers.  The finished dimensions are 7 1/4"  x  8 3/4" in size. 

Just a quick note to let you know that Jamie Rodgers is on Hobbymaker today at 1pm and 5pm and then on Thursday at 6am and 7am for those early birds!  He will be demonstrating his new Teabag Folding Collection both days!
All for now, Sue x


                                                      Follow my blog with Bloglovin

Tuesday 26 July 2022

Twinkle

Hello crafters!  I just realised that I made a mistake during the launch and thought I had put up a picture of the Poinsettia Floral Panel when in fact, it was the Christmas Rose Floral Panel!  The flowers were red so my mind just saw poinsettias, so sorry!  Here is the Poinsettia Floral Panel die set!  I cut the Poinsettia Scalloped Border in white and left it attached to the white backing piece.  I added an Old Rose card beneath it.  I cut the Poinsettia Floral Panel out of Old Rose card and green card.  I used the green die cut as the base and then cut out the flowers from the old rose die cut and glued them on top of the base. I backed it with a piece of white card covered with a sticky adhesive sheet.  I peeled the backing off and attached the floral panel to it, then coated the remaining adhesive with Frosted Sparkle Glitterbitz.  I cut both backing pieces from the set in white and layered them and added them to the right side of the border die cut.  I used the Poinsettia Trio set and cut two poinsettias in white and added a few leaves as accents.  I used the large Twinkle die and cut it in Old Rose card, then glued it to the top of the card.  The card was completed with white and old rose mats and layers.  The finished dimensions are 8 1/4"  x  9 1/2"  in size.  All for now, Sue x


                                                       Follow my blog with Bloglovin

Monday 25 July 2022

Twinkle

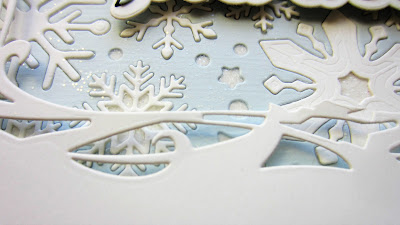
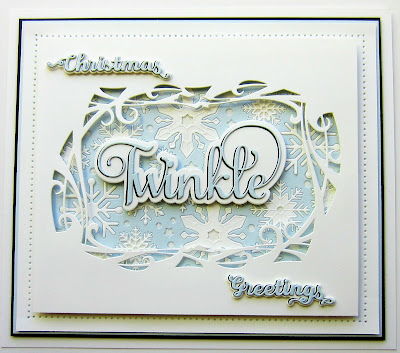
Hi bloggers!  I thought I would share one of the cards made with the Blustery Frame die set.  I used a piece of white card and cut the Blustery Frame into the card twice.  I slightly overlapped the die when I cut it the second time so it made the inside of the frame about twice the size.  The small pieces of card that were cut through on the second cut were just nipped away with scissors to tidy up the opening.  Since the frame is a bit irregular, you don't really notice them!  I added mounting foam to the back of the card to raise it.  Next I used the Snowflake Panel and cut it into a piece of Arctic Blue card.  I cut the panel again out of white card and then paper pieced the white snowflakes into the arctic blue card.  I attached it to a piece of white card with a sticky adhesive sheet then used Frosted Sparkle Glitterbitz on the remaining exposed adhesive.  I added the top piece over it so it showed through the frame opening.  I cut the Christmas Greetings out of blue and black and backed them with a white shadow backing and attached them above and below the frame opening in opposite corners.  I cut the large Twinkle die out of blue, added a black shadow then glued it onto the shadow die which I cut in white.  I added it to the inside of the frame.  The card was completed with white, blue and black mats and layers.  The finished dimensions are 7 1/4"  x  8 1/4"  in size.  All for now, Sue x


                                                        Follow my blog with Bloglovin