Thursday 31 October 2019

Stella's Border

Hi there guys and welcome back!  The last post of our first day is dedicated to Stella's Border.  Isn't she pretty when used repeatedly across your card in a background style?  Even with an aperture cut from the centre, you can still see how beautifully she will work for so many of your cards and other crafty projects.  The matching borer to the Stella die has the same gorgeous undulating swirls going the full length.  You can easily nip them apart to use with your floral elements too.  If you like the look of this one, just leave a comment on this post and let me know.  We will begin day number two at our usual 6am time.  I would love it if you are able to join me back here then!  all for now, Sue x

                                                        Follow my blog with Bloglovin

Stella

Hello crafters!  Welcome back!  This is our only Frame and Tag in the release, but she's a beauty!  Here is Stella, with her beautifully undulating swirls creating a flowing circular shape.  I think you will be seeing so much of this one as I was constantly using it as a real go to when making samples!  With 5 dies in this set, the options are many.  As shown here in this clean and simple styled sample, you can really see how stunning it will be to use Stella on any of your card creations.  If you like the look of this one, just let me know in your comment.  You never know, your name may be the one drawn out as the winner and what is better than winning something free, right?  We have one final post today for you.  It will be popping up online at 6pm for your enjoyment.  Can't wait to see you back here then!  All for now, Sue x


Moonlit Owl


Hi bloggers!  As a great accompaniment to the Wise Old Owl set, I present to you the Moonlit Owl.  Both sets have great "owl" sayings, and this set has a flying owl, full moon and quarter moon, tree stump and a smaller branch.  Everything in the two sets will mix and match together to give you even more options for your owl themed cards and projects too.   You might also notice that I have used the same new 3D embossing folder on this sample.  I really think it is going to be a favourite among the release of new folders, just saying! I also forgot to mention in the previous post but I have added the Pinterest button to the bottom of each post so you can save your favourite cards and dies to your boards for later inspiration.  I would absolutely love it if you do!  Just a quick comment left on this post is enough to get you a chance to win this set too.  The next post will be online at 3pm today.  I would love it if you can join us back here then!  All for now, Sue x


                                                        Follow my blog with Bloglovin

Wise Old Owl

Hello bloggers!   It is time for the last die release of the year!  Like September's, it is a bit smaller but has some really great themes included.  As always, I will be giving away one set of each of the dies.  You just need to leave a comment to be included in the drawing.  Please make your name memorable so there is no confusion when the winners are drawn and posted.  The best way to do this is to add a funny alias (ie, crazy cat lady) or add the name of your city to your name (ie, Sally in Solihull), something to that effect.  The winners will be drawn and posted on the afternoon of Nov. 11th.
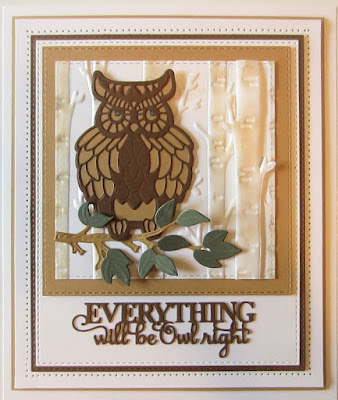
   I thought I would start off this launch with a fun set called Wise Old Owl.  I have been asked so many times to do some owls and finally got the chance!  This set has a bold owl, two "owl" sayings and a large branch included.  Just a little sneak peek at one of our new 3D embossing folders that is being released too!  If you like this one, just leave a comment on this post.  I will be back at 12 noon for the next post.  All for now, Sue x
                                                       Follow my blog with Bloglovin

Wednesday 30 October 2019

You Are The Best

Hello crafters!  It's wisteria and white for today's colour combo.  I started by embossing a piece of wisteria card using the 3D folder called Rose Bed.  I added a thin square frame over it in white using the Double Stitched Squares.  Next I cut three of the Mallory die in white.  I crisscrossed two of them, then cut the third one in half in the centre.  I cut it down a bit smaller and put the two halves back together with tape on the back.  I added it to the crisscrossed dies horizontally.  I cut the You Are The Best sentiment in both wisteria and black card.  I used the black as an offset shadow behind it and glued it in the centre of the dies.  I added small pearls to disguise the cut line joint.  Using the Cosmos Flower set, I created three wisteria flowers using the outline dies from the set.  I assembled the flowers and attached them in opposite corners, adding white leaves as accents.  The card was completed with white, wisteria and black mats and layer.  The finished dimensions are 8" x  8" in size. 

Tomorrow is the blog launch of the November die release.  It all kicks off here at 6am and I am really hoping you can join me here then!  All for now, Sue x


                                                      Follow my blog with Bloglovin

Tuesday 29 October 2019

You Add Colour To My World

Hi bloggers!  It is time to show off the Plumage Background and Proud Peacock die sets!  I started by cutting the Plumage Background into a piece of Ocean card.  While it was still in the die, I inked through it with Blueprint Sketch Distress Oxide ink.  I backed it with Royal Blue card.  I used the Double Stitched Squares to add a wide frame cut in white.  I cut the Peacock from the Proud Peacock die set  in white and the small feathers too.  Using a little glue on the tip of the leaves, I glued them through the holes in the peacock to create a more dimensional tail.  I added glue to the tips of the tail feather and used Frosted Sparkle Glitterbitz for a little bit of sparkle.  I cut the sentiment three times in white card and stacked them for dimension.  I glued it into place in the top of the frame.  The card was completed with white mats and layers.  The finished dimensions are 7 3/4" x  7 3/4" in size.  All for now, Sue x


                                                         Follow my blog with Bloglovin

Monday 28 October 2019

Season's Greetings

Hello all!  Not your usual Christmas colours, but I really like this one! I started by cutting the Pretty Poinsettia Frame out of coconut white card.  I lined it up right next to the original cut and cut it a second time.  I used my scissors to nip away the centre area, creating a larger frame.  I glued it to a piece of Old Rose card.  Next I used the Antique Rose Glitter Kiss and coated a piece of card with it and allowed it to dry.  I cut the frame out of it twice and saved the flower fall away pieces.  I paper pieced them back into the frame using glue to secure them in place.  I cut the Season's Greetings sentiment out of a section of it too, then added the words to the shadow cut in white.  I offset the words in the centre of the frame.  I made a multi-layered frame using the Double Stitched Rectangles with a wider white frame on the bottom and a thin Old Rose frame added on top.  The card was completed with white and old rose mats and layers.  The finished dimensions are 7" x  8 1/2" in size.  All for now, Sue x


                                                     Follow my blog with Bloglovin

Sunday 27 October 2019

Thinking Of You

Good Sunday morning all!  I was playing with a bit of a fun technique for the background of this card.  I used the Tantalising Teal Lustre Polish and spread it across a dark piece of card, covering it completely a bit of the thicker side.  Next I covered it with a piece of cling film and scrunched it so it was all wrinkled into the Lustre Polish.  I set it aside to dry over night, then removed the cling film, creating this lovely textural background.  I made two Exquisite Poppy flowers by cutting them out of white card that had a sticky adhesive sheet added to it.  I peeled off the backing and coated the petal in Frosted Sparkle Glitterbitz then assembled the petals.  I adhered them to the lower corner and accented them with Fern Fronds and Trailing Ivy cut in white.  I used the Thinking of You sentiment in white in the opposite corner.  I added the background to a larger piece of white card that I added Frosted Sparkle Glitterbitz to the edge of it for extra bling.  The card was completed with white, teal and black mats and layers.  The finished dimensions are 7 3/4"  x  7 3/4" in size.  All for now, Sue x


                                                     Follow my blog with Bloglovin

Saturday 26 October 2019

On Your Wedding Day


Hi bloggers!  Here is a lovely wedding card where I show how to shorten up the Wedding Bell border to use it across the wedding arch.  Hope you enjoy it!


 The finished dimensions are 7"  x 8 1/2" in size.
                                                        Follow my blog with Bloglovin