Thursday 31 January 2013

Butterfly Trails

 Good morning all!  I love playing with butterfly dies as there is just so much fun stuff you can do with them.  Whether it is cutting them out of sheer vellums or kraft card, layering them up or using decorative papers, there are always a bunch of different looks you can achieve.  Here I was having a bit of fun with the butterfly trail.  Why not use tiny flowers to create the trail?  I love the way this looks!  Definitely a clean and simple style card, but so easy, quick and pretty so it ticks all my boxes (sorry no ribbon as that would have just been wrong on this one!).  I simply started with a piece of coconut white card that I stamped my sentiment in the corner.  A little tip that I have found helpful is to start with a slightly larger piece than I need.  The reason for this is that I then have a bit of an allowance if I stamp my sentiment askew (as I often do!),  I can trim my card to make my sentiment straight.  I used the butterfly From Les Papillons and cut an aperture in my card.  I used 3D foam pieces on the back of my card to raise it for dimensions.  I cut a piece of black and white patterned paper so it showed through my aperture and mounted my white background piece over it.  Next I cut an assortment of sizes of the flowers from the Cherry Blossom die set in blush card.  This is an incredibly versatile set and I have used it for so many other things besides the obvious. I used my stylus and a foam mat to give the flowers a bit of shape and definition.  I glued them into place in the form of the butterfly trail down the card from the aperture to the sentiment.  I added a tiny 3mm pearl to the centre of each of them.  I double matted the card and finished the edges with black PVA glue dots.  So simple!  Finished dimensions are 7" x 8" in size.
  I have a bit of bad news though as we didn't reach our target of 400 comments on Tuesday's card.  A wonderful effort (around 275 comments!) and I truly enjoyed reading all your lovely comments.  There is good news however. Since both Monday and Tuesday there were over 200 comments, we have two extra days that qualify for more winners on Sunday's comment game!  Right now, there will be 9 winners' names drawn.  Anytime there are over 200 comments, I draw another set of three winners on Sunday so if you want to increase your chances of winning, don't forget to leave a comment!  All for now, Sue x


Wednesday 30 January 2013

Happy Anniversary

 Good morning my crafty friends!  Today's card will wake you right up, won't it!  I love red and black together and think they always make a card look striking, even sexy.  It is an incredibly simple card to recreate, taking little more than about fifteen minutes or so, which, I know can be quite appealing when your time is stretched.  I started with a piece of red card and simply stamped the oval medallion by Justrite all over the background using a black archival ink pad.  Re-ink in between each stamping and do some so they are off the edge of the card too.  I used some black tulle to wrap around the card and tied it into a knot.  I tied a messy bow using the lipstick red seam binding and added it to my tulle.  I used Spiral Flower four and some black felt to make a rolled flower.  To answer some of the questions I have seen in your comments about the felt flowers, not all felt is alike.  There are many different types of felt and you need to use the kind that is either 100% wool or a wool blend to be able to cut your die shape cleanly.  If you have ever purchased the inexpensive felt that is acrylic, you will notice that it does not cut very well, if at all.  However, use a wool felt and it will cut like butter!  I use the felt that Sam Poole stocks in her shop online (Creative Studios), it is beautiful to cut and the colours are lovely!  To make the rolled flowers, I use Cosmic Shimmer dries clear glue.  I make a thin line of it all the way along the base edge of my flower.  I wait about one minute so it gets tacky and then I roll.  I have never had one fall apart as this glue is the best! One word of caution with gluing felt though, any glue will leave a mark on felt even if it is dries clear type.  The felt will become hard and darker in colour where the glue is so you do not want to get it on your petals or it will show.  If I have missed answering any questions about the felt, please feel free to email me directly.
  After I seated my flower atop my bow, I added two stick pins for accents.  I stamped my sentiment (Justrite stamps) and cut it out with the small nested oval medallion die.  I used the die to create a faux nestie by drawing around the outside edge and hand cutting it.  I attached the tag with some Bakers twine.  I finished the piece by adding some black rhinestones swirls and piercing my inner layer of the black mat.  I think this one would look equally stunning in blues, pinks, white, you name it, pick your colour!  Finished dimensions are 7" x 8" in size.
   Now for the winner of the card that was posted on Monday!  Thank you for all your lovely comments and yes I do read them all (that is my favourite part of my day!).  The name that was drawn was:

Vie Carter!!!

Congratulations!  Email me at americansue1@gmail.com to confirm your address and claim your card!  All for now, Sue x


Tuesday 29 January 2013

Another Card Giveaway? Perhaps!

 Hi bloggers!  Girlie, girlie, girlie today.  Equal time for the ladies' cards I say!  I started by cutting four of the Botanical Swirl and Accents corner in white card.  Use the wax paper for these and they are a breeze!  I like the dotted line so I cut them just behind it to leave it as part of the corner on all of them.  I glued them to a piece of blush card.  Next I cut three frames using the two largest sizes of Labels 28 out of rose coloured card.  I added in the next size smaller in the die set on two of the frames to give me the extra frames that I needed.  I arranged my frames with the three largest lined up vertically.  The two smaller frames, I set on top horizontally.  I cut a long thin strip of blush card and began to weave it through all the frames to hold them and give me the buckle effect for my card.  Next I stamped my sentiment and cut it out with the tag from the french Frills set.  I inked it lightly with Spun Sugar while in the die.  I added it in the centre of my focal element with mounting foam.  I added this entire piece to a larger piece of card where I tied some silky crush ribbon around.  I tied a double bow and attached it with glue dots.  I added a pearl embellishment and two stick pins.  This colour is actually not available yet as it was a sample sent to me by our supplier to see what I thought of it.  It will hopefully be added to the line sometime later in the year.  I loved the colour myself, what do you think?  Finished dimensions 7" x 8 1/2" in size.
   I got to thinking yesterday as I was reading all the wonderful comments.  There were almost 250 comments by the time I did this blog post last night.  Only on two occasions have I had over 400 comments left in a single day, and I was over the moon!  As a little experiment, I will give today's card away if we can pass the 400 mark before Wednesday's blog goes live.  No duplicates though please, one per person.  If we hit our goal, I will randomly draw a name from the comments left and quite happily give this one away too!  All for now, Sue x


Monday 28 January 2013

It's A Giveaway Day!

Morning bloggers!  I had planned on doing this one as a demo in  the shows in December, but we didn't have any micro beads in stock at the time.  It is a small card by my standards, but I found  this piece of decorative background paper that was only 5" x 5" in size so I started with that.  It has a very vintage feel to it with the blue design on the cream coloured background, but I decided it  was calling out to be micro beaded.  I cut two of the Asian Motifs out of milk coloured card.  On one of them I used the smaller die in the centre to cut a frame.  I inked the shapes with Stormy Sky distress ink while still in the die.  Next I used the Fancy Lattice background die with blue card to cut a piece to put in the Asian frame on top.  Using the French Frills stamp set by JustRite, I stamped the thank you tag.  I cut it out with the matching French frills die set.  While in the die, I inked it with Stormy Sky ink.  This left a pretty milk coloured border around it.  The tag cuts in two pieces so I popped the sentiment part up on foam pieces for dimension and left the tag frame flat.  I added flatback pearls to the corners of the tag.  I mounted the tag across the centre of my Asian Motifs which I had stacked and offset.  I tied a pretty little bow out of the cream silky crush and added a heart Dazzler and stick pins to it.  I added the bow to the side of the card with glue dots.  I finished the corners with flatback pearls of 3 and 5mm sizes using the dries clear Cosmic Shimmer glue to adhere them to the micro beads.  I matted the entire piece on a larger piece of blue card.  You will get a laugh out of this, but I can't leave a pierced edge on the last mat on my card (it's a weird quirk, I know), but I didn't have enough of this card to add another mat behind it so no piercing this time.  I think it really needs it, but I hope you will let me slide this once! LOL  Finished dimensions are 6" x 6" in size.
   I thought that it was about time to do another card giveaway today!  All you have to do is leave a comment today and you will be entered in the drawing to win this card.  It's as simple as that!  I will do the drawing and announce the winner later in the week, don't forget to check back!  All for now, Sue x


Sunday 27 January 2013

Oh So Distressed

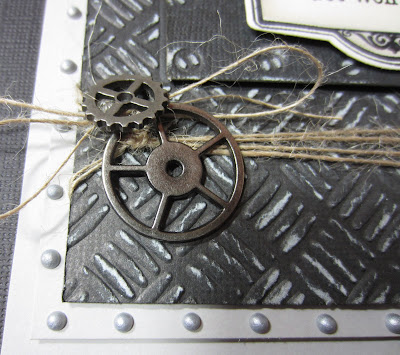
 Hi guys!  Well i guess with a title like that, you aren't expecting one of my flowery, blingy, girlie cards, are you? LOL  I thought I would throw one in for the guys this week, as I have had so many requests for guy cards.  While they aren't always as exciting, we certainly need them so here is one for the manliest men in your lives.  Distressed, grungey, and textural, all the things that most men would really appreciate in a card I think.  I started with a piece of black coordinations card that had a grey core to it.  I embossed it using the Industrial embossibility folder.  I sanded the embossing back to reveal the grey core, giving it a very distressed look.  I wrapped a piece of natural jute twine around the bottom of the card and added some of the fun gears from Tim Holtz.  Next I stamped the car from the Going Places set from Justrite and cut it out with the matching Vintage Labels and banner die.  I simply used a black archival ink pad to stamp it with and then used a Pumice stone distress ink on it while it was still ink the die to give it a vintage feel.  I stamped the sentiment and small frame from the With Gratitude set from Justrite.  I inked it with Pumice stone after cutting it out with the matching Antique Tags one die shape.  I added it to the card so it was surrounded by the faux riveted area within the embossing folder.  I matted with a double layer of grey card and added Cosmic Shimmer silver PVA glue dots to finish it off.  If you aren't a lover of the distressed masculine cards, I promise something a bit softer for tomorrow's post.  Finished dimensions are 6" x 7 1/2" in size.
  It is Sunday so time again for some winners names to be announced!  This week's comment game winners are:
Nannapat!!!
Brenda Hanlon!!!
Becky Dunham!!!
Congratulations!  Please email me at americansue1@gmail.com to confirm your address and claim your prize.  All for now, Sue x


Saturday 26 January 2013

Sweet Friend

 Hi guys!  I thought it was about time to show something with some ribbon on it!  I had almost forgotten about this one as it was the very first card I made with the JustRite Lace Medallion set.  I started with a piece of Teresa Collins decorative paper (I love the text in the polka dots!) as my background.   I thought I would carry it all the way through so I stamped the lace background and the Lace medallion on top of it with a black archival ink pad.  I love how it matches but still looks so different. I cut the medallion out with the matching die, but the background stamp, I cut by hand as it doesn't have a coordinating die for it.  Before I layered those two up, I cut a faux nestie out of black card to layer my medallion die on.  This added a bit of definition between the two lacy pieces.  In the background, I added a smaller piece of script paper (also from Teresa Collins) with a few mats.  I used some seam binding in London Tan colour and wrapped it around the left side of the card.  I tied a messy bow and added some black jute twine underneath it.  I used a glue dot to add my bow to the corner.  I cut some felt with the Spiral Flower Four die and rolled a pretty flower to add to the centre of my bow.  I added a black flatback pearl to the centre.  I stamped my sentiment (from Grand Sentiments by JustRite) on some matching card (it's a brownish peach colour) and cut it out with one of the smaller nested Medallion dies.  I very lightly inked the edges with Black Soot and mounted it in the middle of the medallion to complete my focal element.   I used some black rhinestone swirls as an accent to the top corner of the card.   I added a double mat of black card and pierced the inner layer to neatly finish my card.  Finished dimensions are 7 1/4" x 8 1/4" in size.
 Don't forget to tune in to Sam's shows on Create and Craft today at 10 am and 4pm.  I hear she has some crackin' demos planned!  All for now, Sue x


Friday 25 January 2013

Thinking Of You Today

Hello my crafty friends!  This one is quite pretty in real life, I hope it shows nicely on your computer screens.  I picked a deep periwinkle blue and pared it with black and white to help pop the colour.  I started by stamping the black background with the JustRite Victorian Tile background.  I used a clear Perfect medium to stamp it with and a clear embossing powder for a tone on tone look.  Next I stamped the lace medallion using a black archival on my blue card.  I cut it out with the large nested medallion die.  I stamped the lace medallion two more times on blue card, but this time I used the two smaller sizes of the die to cut them both into frames.  I just wanted the pattern on the frame so I wasn't concerned about the fact that the stamp was larger than the dies that I used.  I used the Victorian Tile background stamp with a black archival ink on to coconut white card.  I cut a one inch strip out of the background and cut the ends into forks.  I used the strip to slide through the medallion frames to create a buckle focal piece, with the largest medallion in the centre.  I stamped the frame from the Always and Forever set in black and used a blue marker to highlight the edge.  I cut it out with the matching Oval Medallion die and added it to the centre of my medallion.  I used some swirl pearls around the top and bottom of the card and a few flatback pearls as accents.  The edges were pierced and double matted in the pretty matching blue card to finish it off.  I would love to say that this blue card has been added to my card selections that will be available, but I picked it up while in the States the last trip.  If it is something you like, then I will go on the hunt for it, just let me know.  Finished dimensions are 6" x 7" in size.
   I want to give a heads up for Saturday as Sam Poole will be on Create and Craft with her new stamp designs.  She has two shows that are scheduled for 10am and 4pm on Sat. the 26th so don't forget to tune in and see her amazing demos!  All for now, Sue x


Thursday 24 January 2013

Elegant Birthday

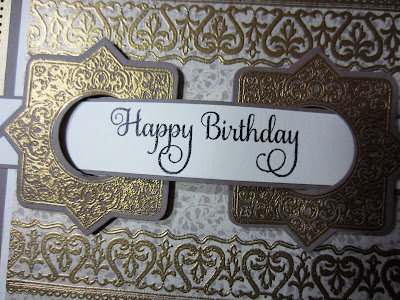
Good morning bloggers!  A different take on a sort of buckle-like card.  In stead of the usual three elements to weave a banner through, I decided to use only two just to hold the banner in place this time.  I rather like it as it is a bit different.  I started by picking some decorative paper as my background.  It has a very subtle pattern and a gold sheen to it.  I know it is difficult to tell with my photography skills (ha ha), but you may get a better view of it in some of the close ups below.  I stamped the Justrite border (Embroidered Edges set) across the top and bottom of the paper and heat embossed it with gold powder.  I used a bit of milk card and a taupish grey to mat my background (I was trying to pick up the subtle colours in the background paper).  Next I stamped the medallion from the Always and Forever set from Justrite twice.  I heat embossed both of them with gold powder and cut them out with the matching Medallion die and a small circle die.  I stamped my sentiment on milk card, cut it to make a strip and gave it forked ends.  I matted it with the taupish grey card.  I put either end through each of the medallion dies and added foam pieces to them to secure to my card.  I added an extra layer of foam to the centre of the banner to raise it up for dimension.  I used the soft card card for the final matting and layering and pierced the inner mat to frame and finish it.  I think this one could work for so many occasions and especially if you need something with an elegant look to it.  Finished dimensions are 7" x 8" in size.  All for now, Sue x


Wednesday 23 January 2013

Glittery Butterflies

 Hello my crafty friends!  Today's offering is a fun and different sort of card, almost a clean and simple (CAS) look to it.  I started by picking four shades of blue card of varying hues to use.  I cut them into two inch strips then tore the paper on one of the sides.   I used a piece of copy paper to keep the thickness to a minimum and I taped them onto the copy paper with the torn edges showing on all of them.  Using the solid die shape from the Les Papillons one set, I cut three apertures, slightly moving the shape to give a floating feeling to the butterflies.  I ran the die through the machine twice for each cut to ensure that all the detail cut completely.   I backed my aperture with a piece of white glitter card to add a bit of the bling showing through my butterflies.   Remember, you will also have three butterfly shapes that have a matching look to them that you can use on another card too.  On a piece of coconut white card, I stamped my sentiment using a black archival ink pad.  I glued my aperture to my white background card to the side of my sentiment.  I used my fingers to roll the edges of the torn pieces of card to add some texture and interest to my card too.  I added this piece with some foam to a double white mat with a pierced edge to finish my card.  This would work well in any colour scheme or even with flower dies too.  Finished dimensions are 7" x 9" in size.  All for now, Sue x


Tuesday 22 January 2013

Triple Thank You

 Morning all!  A really simple, quick card for today's post.  I stamped the Violet label from Justrite stamps three times on to milk coloured card.  I used a black archival ink pad to stamp, cut it out with the matching Antique Labels and Banner die and ink them with Antique Linen while still in the die.  I used an Antique linen distress marker to add a bit of colour to the flowers and leaves.  I stamped the tiny thank you into each of them in the oval area.  It is nice that it is left blank on the stamp so you can easily personalise it for whatever your needs.  I added some 3mm black gems to the centres of each of the flowers on the labels.  I used some Graphic 45 papers to create the background, keeping the colours neutral and on the vintage side to go with the look that I wanted.  I added a strip of black seam binding between the two papers and added a messy bow at the bottom topped with a fancy button and stick pin accents.  For a bit of bling, I added a black rhinestone swirl to the side of the card and pierced the edges to finish it off.  There is nothing tricky to this one, a simple card with a repetitive theme to it, but I just love the nice vintage feel to it.  Finished dimensions are 7" x 8 1/2" in size.  All for now, Sue x


Monday 21 January 2013

Lavender And Brown Lace

Hi bloggers!  I just love these colours together, not sure what it is but brown just seems to fit with lavender to produce a soft warmness that I can't pass up!  You do need to get to the close up pic but I stamped the lace medallion all over the background of the lavender card to add some interest.  I used a clear perfect medium pad to give it a simple watermark effect.  I stamped the lace background using a coffee archival ink pad on milk card.  I lightly inked it with Antique linen distress ink to soften and age it.  I cut it out by hand (yes we still do that from time to time! LOL)  I stamped the medallion with coffee archival and cut it out with the matching die from Justrite.  I stamped the sentiment and frame from the Valentine tag set and cut it out with the matching die from the Antique tags set.  I layered up all three pieces.  To give it a bit more of a shabby chic look, I decided on torn flowers of varying shades of lavender.  I used brown brads for the centres.  I added a scrunched bow tied from brown seam binding and a small tied jute bow peeking out from underneath for texture.  I pierced the edges of the brown mat to create a frame and add balance to the card.  Are you liking these colours too?  Finished Dimensions are 6 1/2" x 7 1/2" in size.  All for now, Sue x