Thursday 30 November 2023

Season's Greetings

 I started this card by cutting the Ornate Adornment Border die into the bottom of a piece of white card.  I backed it with a piece of Ruby Red card.  Using the Poinsettia from the Poinsettia Corner die, I cut three of them in red.  I cut leaves for each of them in green and then added two flowers in the upper corner and one in the opposite corner.  I cut the Season's Greetings sentiment out of silver sparkle card and glued it in the middle of the card.  The card was completed with white and red mats and layers.  The finished dimensions are 6"  x  8 1/4"  in size.  All for now, Sue x


                                                         Follow my blog with Bloglovin

Wednesday 29 November 2023

Birthday Wishes

 Hello crafters!  I started today's card by cutting an aperture in the middle of a piece of white card using the Art Deco Ornate Tile die.  Next I embossed it with the Tidal Sands Embossing folder.   I added mounting foam to the back of the embossed piece to raise it and added it to a piece of deep purple card.   Next I cut the Art Deco Fan Border out of black card and I extended it to make a longer border.  I cut the border down the middle to make two separate borders.  I cut two long thin pieces of black  card and glued them to the cut sides of the border.  I glued the two borders to each side of the card.  Using the Art Deco Ornate Tile die, I cut it out of wisteria card.  I cut the die again but out of black card this time.  I shadowed the wisteria die with it then added it to the centre of the card recessing it into the aperture.  I cut the Art Deco Birthday Wishes out of white and black card.  I shadowed it then glued it to the middle of the card.  The card was completed with white mats and layers.  The finished dimensions are 8 1/4"  x  8 1/2"  in size.  All for now, Sue x


                                                        Follow my blog with Bloglovin

Tuesday 28 November 2023

Congratulations

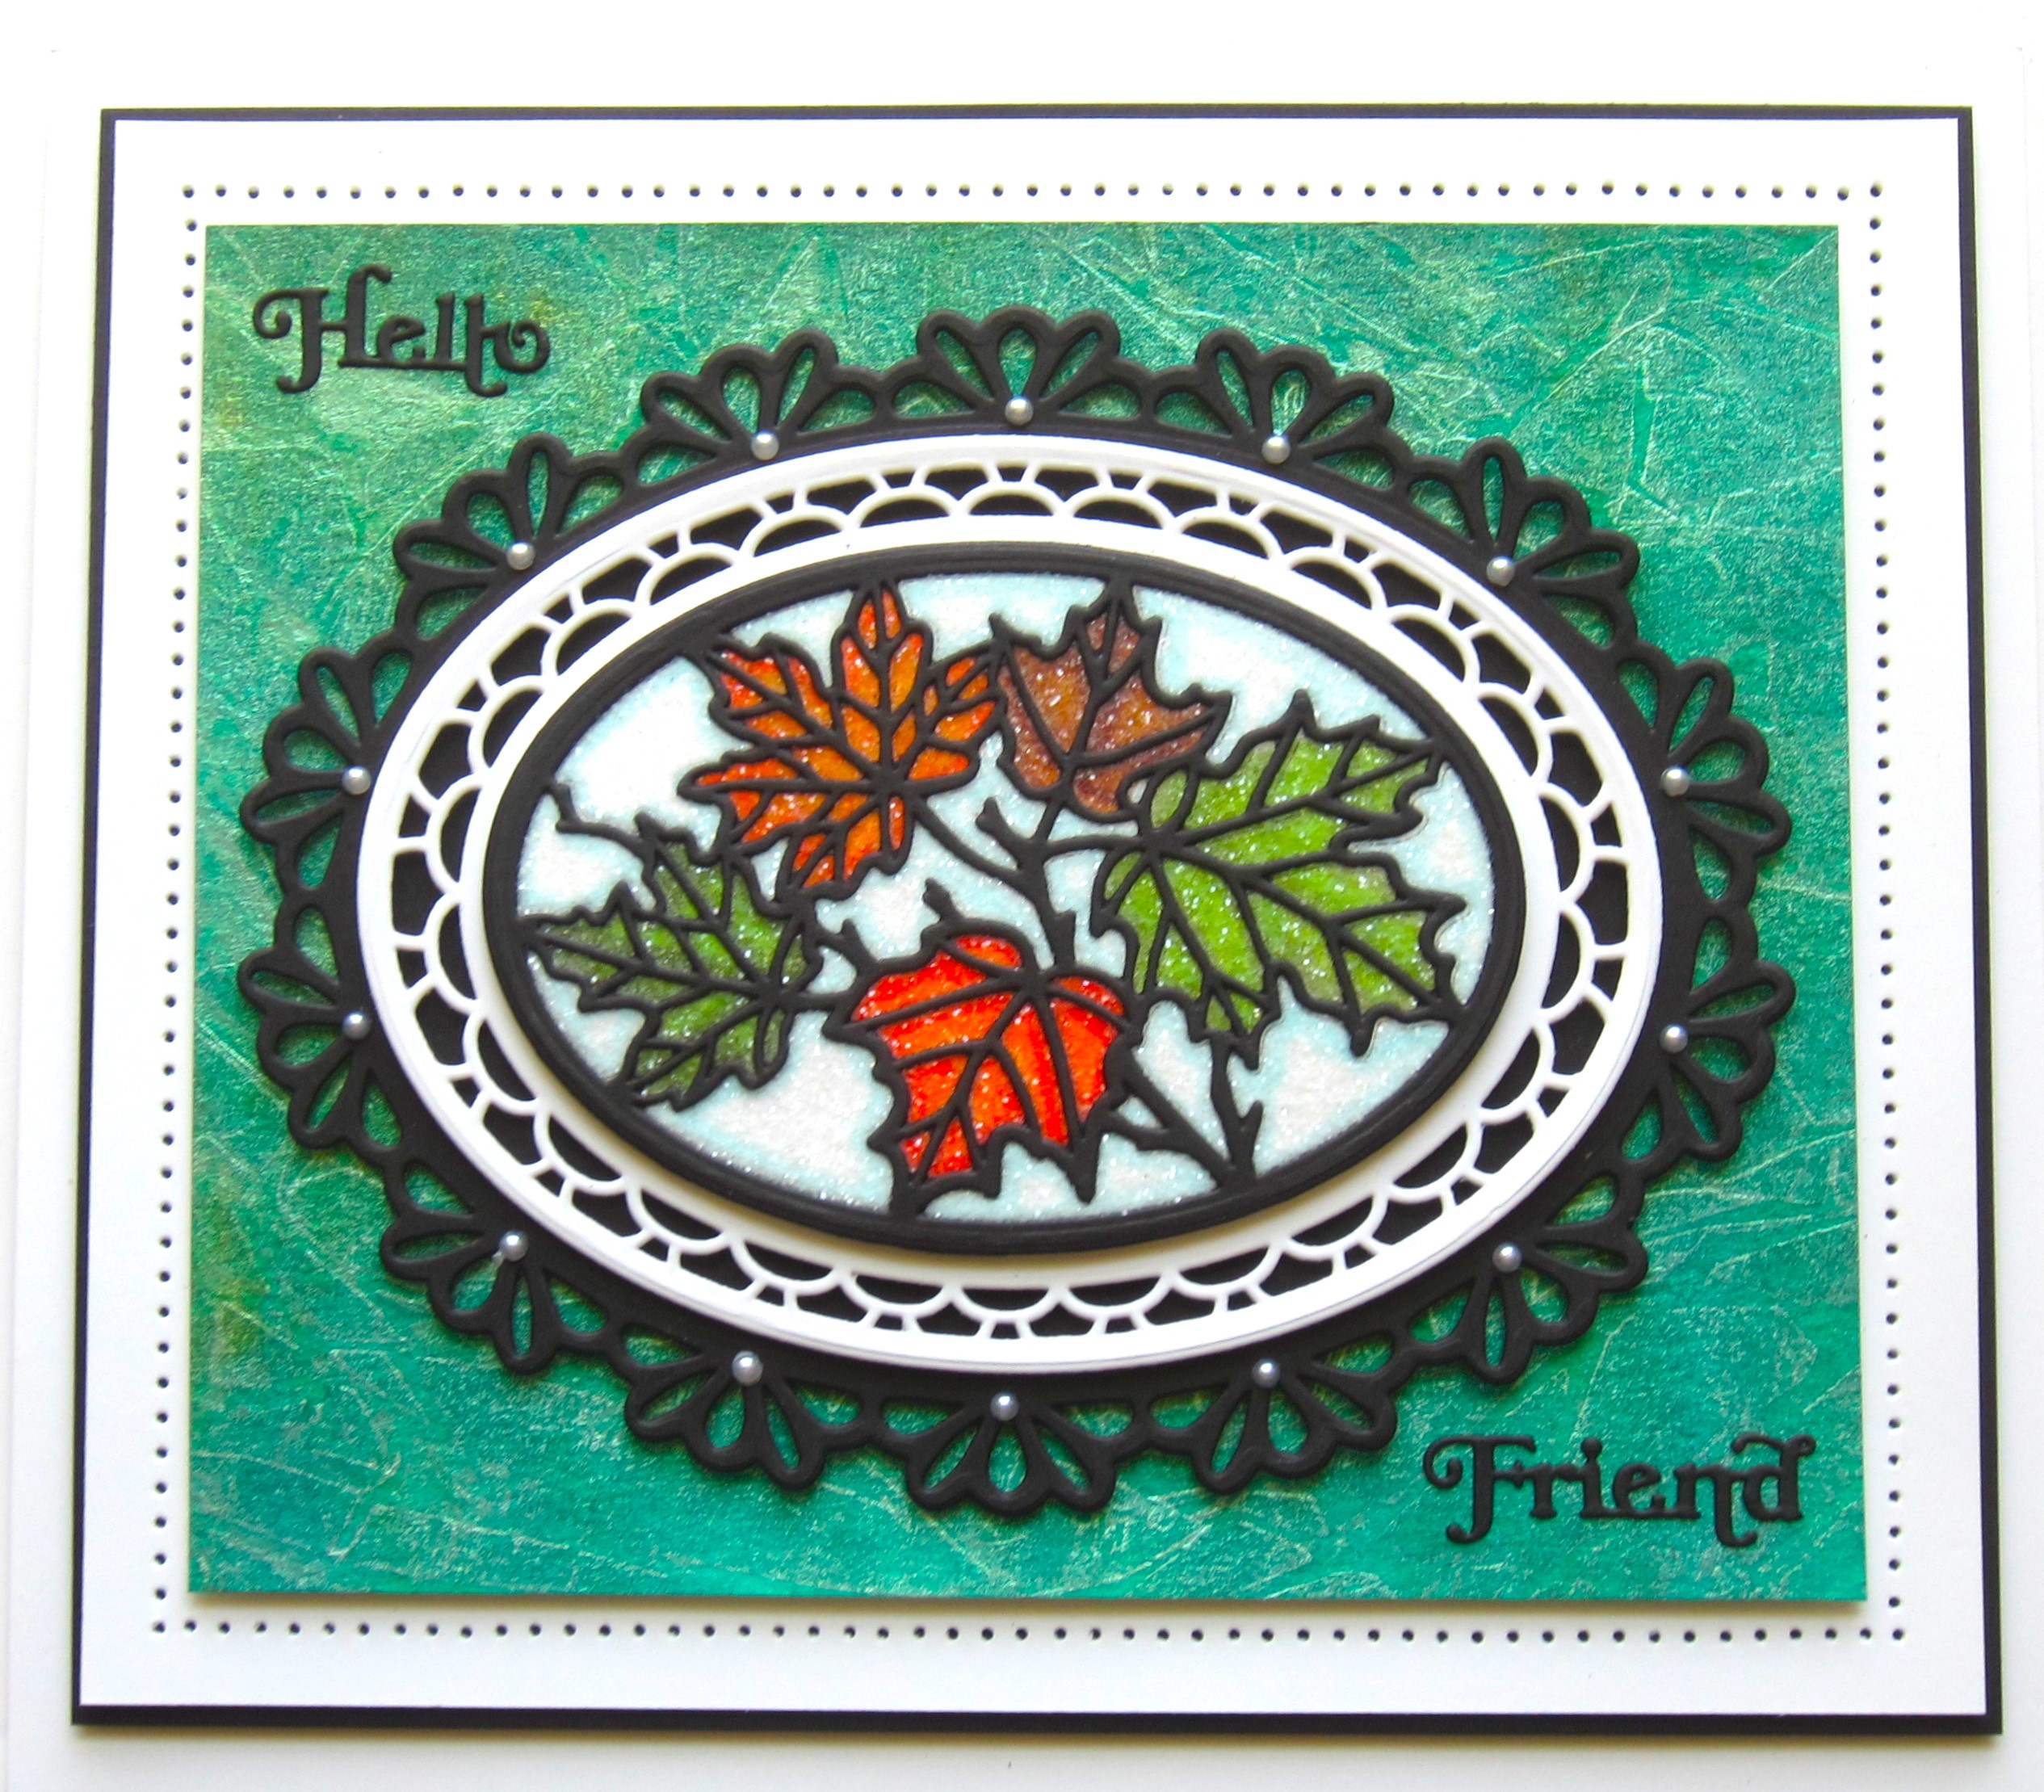
 Hi bloggers!  I started today's card by cutting the outer die from the Stained Glass Sunflower twice, once in Cobalt blue and once in black.  I offset the two colours of the outer die, then cut the middle die in white and layered it up on top.  I cut the Sunflower die out of a piece of black card and added a white backing piece to it.  I cut the die again out of cobalt blue and green card and used the fall away pieces and paper pieced it back in place.  I cut the die in white and used it for the background pieces of the die.  I added glue to the flower centres and sprinkled Frosted Sparkle Glitterbitz on it.  I layered it up on to the middle of the card.  I cut the Ornate Lattice Border out of cobalt blue and shadowed it in black then glued it to the bottom of the card.  I cut the Congratulations sentiment in black and glued it above the border.  The card was completed with white mats and layers.  The finished dimensions are 6 3/4"  x  8 1/4" in size. 


The winner of the November die release Blog launch is........................................................................................................................................................................................................ Heather Toms!!!


Congratulations!  Please email me at americansue1@gmail.com to confirm your address and claim your winning die collection!  All for now, Sue x


                                                       Follow my blog with Bloglovin

Monday 27 November 2023

Birthday Wishes

Hello crafters! I started today's card by cutting a bunch of half inch wide strips of card of three different colours.  I laid the strips down on to a piece of copy paper covered with a sticky adheisve sheet, alternating the colours.  Then I cut that piece,in the other direction, into half inch strips so that each strip had lettle sections of each of the colours.  I covered another piece of copy paper with a sticky adheisve sheet and added the strips onto the sheet offsetting the colours by a row every other time.  Next I cut two of the Decorative Hearts in white.  I added them to the background, slightly overlapping them.  I cut Milo in brown and added his ear with a flower on it.  I added his blanket to his back and put a pink envelope in his mouth.  I cut the Birthday Wishes out of raspberry card and shadowed it with black then glued it to tje heart on the left.  I added Milo to the other heart and then cut small hearts out of raspberry card and glued them around the heart.  The card was completed with white mats and layers.  The finished dimensions are 8 1/4"  x  9 1/4"  in size.  All for now, Sue x


                                                     Follow my blog with Bloglovin

Sunday 26 November 2023

For You

Good Sunday morning all!  I embossed a piece of black card with the Padded Quilt Embossing Folder.  I matted it in black and antique gold.  Using the Art Deco Grand Labels, I cut the largest label out of antique gold card and added a silver sparkle card backing piece to it.  I added it to the middle of the card with mounting foam.  I cut two of the smaller labels in that set to match with antique gold card and backed in silver sparkle card.  I added them above and below the larger label die.  I cut the Art Deco For You sentiment out of black gloss card and glued it to the centre die cut.  The card was completed with white, black and antique gold mats and layers.  The finished dimensions are 7 1/2"  x  9" in size.  All for now Sue x


                                                       Follow my blog with Bloglovin

Saturday 25 November 2023

Hello Friend

 Hello there my crafty friends!  I selected a piece of Pixied card from my background stash pile to use for the background.  It was made using Emerald Green and Yellow Straw Pixie Powders.  I cut the outer die from the Stained Glass Maple Leaves in black.  I cut the middle die in white and layered it up on the outer die.  I cut the centre die with a piece of back card on top and a piece of white card underneath.  I used the white die cut to colour the image with markers.  I covered it with a sticky adhesive sheet, then peeled the backing paper off and added the black die cut on top.  I coated it with Frosted Sparkle Glitterbitz, then trimmed away the excess sticky paper around the edges.  I seated it in the middle of the card.  I cut the Hello Friend sentiment in black and glued the two words in opposite corners.  The card was completed with white and black mats and layers.  The finished dimensions are 6 1/2"  x  7 1/4"  in size.  

I want to let everyone know that Creative Expressions has launched a retail website for you to shop your favourite CE crafting products.  If you are interested in checking it out, you can click the link herecreative-expressions.uk.com
Be sure to sign up for the free newsletter and you will recieve a free digital stamp

All for now, Sue x


                                                         Follow my blog with Bloglovin

Friday 24 November 2023

Season's Greetings

 Hello bloggers!  I started today's card by cutting strips out of the Silver Sparkle card and some leftover gilded card.  I cut them in one half inch strips and attached them to a piece of card covered with a sticky adheisve sheet.  Next I cut the outer die from the Stained Glass Bells in white.  I cut the Stained Glass Rectangles to fit on top and added it with mounting foam.  I cut two poinsettias using the Poinsettia Trio out of the left over gilded card and added them in the lower corner.  I cut the Season's Greeting sentiment out of Antique gold card, shadowed it in black and glued it to the backing piece.  I added it with mounting foam to the to of the frame.  The card was completed with white mats and layers.  The finished dimensions are 7"  x  8"  in size.  All for now, Sue x


                                                        Follow my blog with Bloglovin