Wednesday 31 August 2022

Spider's Web

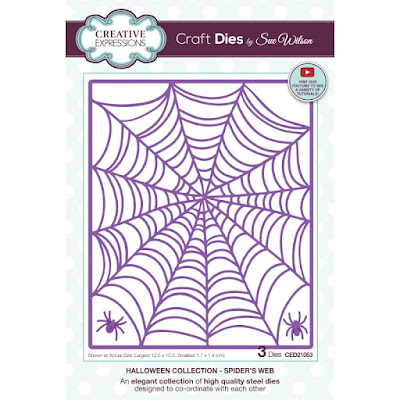
 Good morning all!  Last, but not least!  The final die in my Halloween  collection is the Spider's Web Background.  I have to admit, I am not a fan of spiders (or any creepy crawlers really), but having a spider's web is absolutely essential if you want to make some eerie Halloween cards or projects, don't you think?  While this Spiders Web makes a great background, you can also cut it up and use pieces of it as I have done here.  I love the way Jamie's haunted tree and gate look with it, don't you!  If this one is floating your boat, then just leave a comment on this post.  I would love to know what you think of my very first Halloween die collection .Well that's it for my collection, but don't forget to check out Jamie's Halloween collection as well as the rest of the Creative Expression's team!  We will be doing a spooky release on Facebook every day in September.  Just a quick reminder too that the winners will be posted on my blog on Sept 5th in the afternoon so don't forget to check back then!  All for now, Sue x


                                                         Follow my blog with Bloglovin

Tuesday 30 August 2022

Spooky Greetings

Hi crafters!  The final post of the day is dedicated to the only separate sentiment in the collection .  Introducing Spooky Greetings!  This sentiment has been done in a sort of spooky font to really go with the collection.  This sample also shows off Jamie's Witch nicely as she comes with a cauldron, cat, a broom, some bats, and a few other great embellishments.  I love how she can go with the really dark and eerie cards as well as one like this which has a bit lighter of a feel.  The sentiment goes well with both styles too!  Just pop your comment on this post and your name will be entered into the drawing to win this lovely sentiment.  We still have one more die to share with you and it will be here first thing in the morning at 6am.  I hope to see you back here then!  All for now Sue x


                                                       Follow my blog with Bloglovin

Ghoulish Ghosts

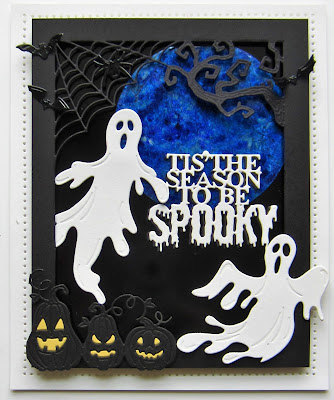
Hello my crafty friends!  I hope you are enjoying this spooky release as much as I am!  The third die that I would like to share with you is the Ghoulish Ghosts!  You have to have some ghosts, right?  This set has ten dies in it including three different ghosts, a large Boo with spider webs, as well as some spiders, a chain, some bones, a lock and some keys.  All sorts of fun things to use as embellishments on your cards.  I have used the Halloween frame as a backdrop for the ghosts so you can see how different it looks.  What great versatility it has!  Go ahead and add your comment on to this post if this set is calling your name!  You never know, they might just fly right into your collection! LOL  The last post of the day will be here at 6pm tonight.  I hope to see you back here then!  All for now, Sue x


                                                     Follow my blog with Bloglovin

Haunted House

Hi there crafters!  The next die on offer is the Haunted House.  This set has seven dies in it including the house, three small ghosts, a flying witch, a moon and several bats. The large Trick or Treat sentiment is one from  Jamie's collection.  Notice the pumpkins?  They are part of the frame from the previous post.  What Halloween collection would be complete without a scary haunted house!  Is this one singing to you?  You just need to leave a comment on this post and your name will be entered into the drawing to win this die.  I have also added the Pinterest button on the bottom of every post so feel free to pin any of the samples or dies to save for later inspiration.  The next post will be along at 3pm today.  All for now, Sue x


                                                          Follow my blog with Bloglovin

Halloween Die Collection Launch / Halloween Frame

 Hello bloggers!  Starting today we are having a mini launch of new Halloween dies for the first time ever!  I am so excited to finally be able to bring you my first Halloween collection.  It is a small set of four main dies and one sentiment die, but Jamie Rodgers and I have designed our collection together so that they mix and match with each other!    As usual, I will be giving away one of each of the dies through drawings done of those that leave a comment on the blog posts.  Please don't forget to add your name to the comment and make it memorable in some way, such as adding a surname or initial, or the city where you live, etc.  I will post the list of winners on Sept 5th.
First up we have the Halloween Frame.  I have designed this die so that all the pieces can easily be nipped apart to use separately if desired.  It comes with it's own sentiment too so everything you need is in one die!  I just love the mummy so you will be seeing a lot of him!  Leave your comment and then join us back here at noon for the next offering.  All for now, Sue x


                                                         Follow my blog with Bloglovin

Monday 29 August 2022

Joy

Hi bloggers!  I selected a rather wild green background from my stash to use as a starting point for today's card.  I used Olive Green, Emerald green Peacock green and Golden Mint Pixie Powders.  Using the Round Corner Squares, I made a multi-layered frame with a white base and a smaller black frame on top.  I also cut two white mats using the Round Corner Squares and layered them then glued them inside the frame to the pixied background.   I cut the Wreath Frame in black and glued it to the white mats.  I made a smaller frame using a leftover piece of the pixie card and added it to the wreath with mounting foam.  I cut the word Joyful out of white card, then nipped away the last letters leaving the word Joy.  I glued it inside the frame in the centre of the card.  The card was completed with white and black mats and layers.  The finished dimensions are 8"  x  8" in size.  

Guess what?  We have another die launch this month which starts tomorrow.  It is only a very small release of five dies, but I am very excited to share it with you as it is my very first Halloween release!  We will be starting tomorrow morning at 6am.  All for now, Sue x


                                                          Follow my blog with Bloglovin

Sunday 28 August 2022

Happy Bird Day

Hello crafters! I started by cutting the Tropical Flora die out of several shades of green card.  I cut a white frame using the Double Stitched Squares and added mounting foam to the back of it.  I attached the die cuts from the Tropical Flora die to the mounting foam so that the leaves can be seen from the inside lip of the frame, slightly overlap them and mix up the style of leaves and colors as you move along the frame to attach them.  I added a second piece of mounting foam over the leaves then added a white backing piece to the frame.  Next I cut the Happy Bird Day Dear Friend sentiment from the Parrot die set in black.  I glued it to the inside of the frame.  I cut the Parrot in white and coloured the Parrot using primary colour ink pens.  I cut the parrot again in white and coloured just the wing and cut it away and added it onto the first parrot with a small piece of mounting foam to raise it slightly.  I added the parrot to the right side of the frame with mounting foam and a piece of greenery under him.   I cut two Hibiscus flowers in Red and added yellow centres using the dies from the Tropical Hibiscus die set.  I added some leaves in green and attached the flowers in the upper left corner of the frame.  I cut a piece of white card an inch larger than the frame and added strips of double sided tape around all four sides.  I sprinkled Frosted Sparkle Glitterbitz all over it, then added the frame to the centre, using mounting foam  I completed the card with white mats and layers.  The finished dimensions are 7 ¾”  x  7 ¾” in size.  All for now, Sue x


                                                        Follow my blog with Bloglovin

Saturday 27 August 2022

Wonder

 Hello crafters!  I started with a piece of white card and used the flowers from the Poinsettia Trio and cut them randomly all over the card, getting them as close as possible without overlapping them.  I covered another piece of white card with a sticky adhesive sheet, then adhered the first sheet with the cut outs to it.  Next I paper pieced all the poinsettias back into the card and used Frosted Sparkle Glitterbitz to fill in the remaining exposed adhesive areas in the flowers.  I cut the word Wonder out of black card and cut the shadow backing out of white vellum.  I glued the word to the shadow then glued it to the background.  Using the Foliage Pieces set, I cut several pieces of foliage,  a few pine cones and a berry sprig and attached it to the side of the sentiment.  The card was completed with white mats and layers.  The finished dimensions are 7 1/2"  x  8 1/4"  in size.  All for now. Sue x


                                                       Follow my blog with Bloglovin

Friday 26 August 2022

Happy Birthday

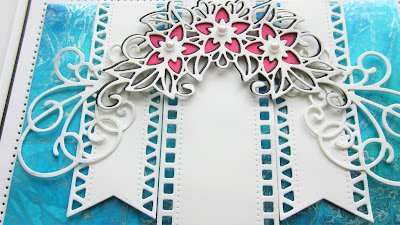
Hi bloggers!  I selected a piece of Pixie Sparkled card from my background stash for today's card.  I used Beyond Blue Pixie Sparkles, spritzed it with water then covered it with cling film and allowed it to dry overnight.  I used the Decorative Flags die set and cut one of the larger ones and two of the smaller flag dies out of white card.  I attached the flags in the top centre of the card with mounting foam.  I used the Star Flower Cluster die and cut it once out of white card and once out of black card.  I used the black die cut as a shadow behind the white one.  I cut the extra flowers out of raspberry card and glued them in place from the back of the die.  I used the both of them in white and attached them to the ends of the Star Flower Cluster, then attached the arrangement to the top of the card.  I cut the Noble Happy Birthday in white and shadowed it in black, then attached it to the bottom of the card with mounting foam.  The card was completed with white and black mats and layers.   The finished dimensions are     7 1/2"  x  8 3/4"  in size.  


On another note:

Sign up to Creative Expressions free newsletter today and share their

 corresponding Facebook post for a chance to win a card designed and signed by

 Jamie Rodgers PLUS a festive product bundle worth £50 RRP!

There will be 5 lucky winners! All you need to do is sign up by 30th August 2022 to

 be in with a chance of winning. The 5 winners will be picked at random and notified

 on 31st August 2022.

You can sign up to their newsletter from the home page of their website


https://www.creative-expressions.uk.com

 All for now, Sue x


                                                       Follow my blog with Bloglovin