Thursday 28 February 2019

Just Because

Hi crafters! It's a quick black and white card for today.  Today's background was the result of needing a bunch of white Fern Fronds diecuts for a few other projects so I decided to cut them all out of one piece of coconut white card.  I just loved the way the negative space looked when I was finished so I added a piece of black card to the back of it, then trimmed it down a bit in size.  I cut the Petal Pockets Flower dies, all three sizes, out of a piece of coconut white card that was covered with a sticky adhesive sheet.  Once cut, I peeled the backing off and coated them with Frosted Sparkle Glitterbitz, then formed the flowers by folding the petals inward.  I added black stamens and pearls to the centres.    I cut the Pierced Flags in white and added thee next size up in black as a mat, then cut the Just Because Sentiment in black and glued it to the flag.  I seated the flowers at the end of the flag in a cluster.  White and black mats and layers were used to complete the card.  The finished dimensions are 7" x  7 3/4" in size.  All for now, Sue x


                                                     Follow my blog with Bloglovin

Wednesday 27 February 2019

Just For You

Hello crafters!  Today's card uses one of the same techniques that I demonstrated on Hochanda this past weekend.  I started with a piece of Arctic Blue card on top and a piece of Bluebell card underneath it, lined up exactly.  I used the middle layering die of the Lilian die set and randomly cut it all over the card so it went through both sheets.  Next I went back and lined up the top layering die from the set directly over the cut outs on the top Arctic Blue card and cut them again.  I then glued the two pieces together as they lined up nicely from being cut this way.  I made a wide white frame using the Double Stitched Squares and attached it with mounting foam.  I cut a strip of vellum and attached it across the middle of the frame from side to side.  I used the Just For You die and shadowed it then glued it onto the vellum strip.  Using the Wildflower layering dies, I cut five flowers of assorted sizes, using the Bluebell as the top layer and the Arctic Blue as the middle layer.  I assembled them and added white base layers to all of them, then mounted them in opposite corners.  I cut a bunch of the leaves in white as accents and glued them around the flowers.  The card was completed with white, Arctic Blue and Bluebell mats and layers.  The finished dimensions are 7 3/4" x  7 3/4" in size.  All for now, Sue x


                                                        Follow my blog with Bloglovin

Tuesday 26 February 2019

Thinking Of You

Hi bloggers!  Wisteria, white and a touch of black for today's offering! I started with a piece of wisteria card and embossed it with the Brambled Rose Embossing folder for texture.  I cut a strip of double pearls down the middle and added them to the top and bottom edges of the card.  For the focal element I cut the Avery die in white using the larger decorative edge, then added a think black decorative edge to it to set it apart.  I backed it with white and added mounting foam to the back.  I cut one more of the Avery die in white, but used the inner cutting edge.  I matted the inside section with wisteria card,  then put a larger black mat over it so it showed through the outer detail and nipped the die in half.  I seated the Avery halves horizontally to the outside of the focal die which I attached in a vertical manner in the centre of the card.  I cut the centre of the die in wisteria card for the base to my Think Of You sentiment.  I added three small flowers from the Chloe die set.  White, wisteria and black mats and layers were used to complete the card.  The finished dimensions are 7" x  9" in size.  All for now, Sue x


                                                      Follow my blog with Bloglovin

Monday 25 February 2019

Happy Birthday

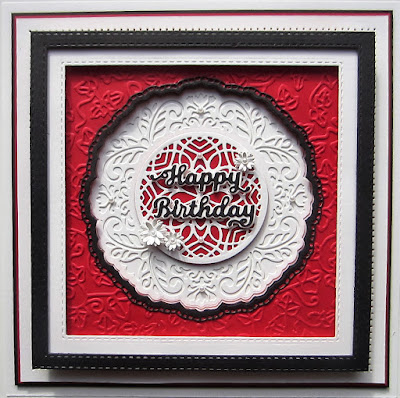
 Hello crafters!  Thank you for such a warm welcome back this past weekend!  Sharing one of the cards from the shows, here is the Millie die.  I started with a piece of Ruby card and cut an aperture in the middle with the Millie die single cutting edge.  Next I embossed the card with the Eternal Ivy Embossing Folder for texture.  I added mounting foam to the back and attached it to a piece of coconut white card.  Next I recessed a cut version of the Millie die down into the aperture.  I cut the outer decorative edge die in black and glued it to the outer lip of the aperture.  Using the centre die from the Millie set, I cut it in white and added a ruby red card backing to it and attached it to the centre of the care with foam.  I added the Happy Birthday Shadowed sentiment in black with a white shadow.  I made three tiny flowers using the Petite Forget Me Nots set and added them around the sentiment.  A multi layered frame was made using the Double Stitched Squares and added over the card with foam.  White, ruby red and black mats and layers were used to complete the card.  The finished dimensions are 8" x  8" in size.  All for now, Sue x


                                                       Follow my blog with Bloglovin

Sunday 24 February 2019

For You

Good Sunday morning all!  I have an unusual colour combo for today's offering, but I thought I would give it a try!  I started by embossing a piece of slate grey card using the Opulent Frame folder.  I used Enchanted Gold Gilding Polish lightly over the top of it.  Next, I cut the Eliza die in white and added an antique gold card backing.  I cut the centre die from the set in white and added a slate grey backing to it.  I used the For You shadowed sentiment in white with a grey offset shadow and backed it with the larger white shadow before adding it to the centre of the card. I used the Layered Carnation to make three dimensional flowers.  The edges were tinged with Enchanted Gold gilding polish to tie in with the card.  I embellished it with gold leaves.   White, grey and gold mats and layers were used to complete the card.  The finished dimensions are 7" x  8 1/2" in size.

Just a quick reminder, I am finishing up the ODS on Hochanda today with shows at 9am, 1pm and 5pm.   Hope you can join me!   All for now, Sue x


                                                       Follow my blog with Bloglovin

Saturday 23 February 2019

Border Background Recessed Card


Hi bloggers! One of my favourite card styles is a recessed aperture.  I just love the way they draw you into the focal element.  Today's video shows a great way to achieve that look.

Just a quick reminder that I will be doing a one hour show at noon today and then kicking off the ODS tonight at 6pm and 8pm, and on Sunday at 9am, 1pm and 5pm.    Hope you can join me then!


The finished dimensions are 7 1/2" x  7 1/2" in size.  All for now, Sue x
                                                        Follow my blog with Bloglovin

Friday 22 February 2019

Sending Mermaid Kisses

Hi there my crafty friends!  I wanted to share one of my mermaid cards with you since I will be doing a one hour show with them on Hochanda, tomorrow, Saturday the 23rd at noontime.  The collection wasn't quite large enough for an ODS but it didn't stop me from making a bunch of fun cards with them!  Here's a little sneak peek of what you are in store for tomorrow!  I started with a piece of coconut white card and I used our Bubbles Burst Mini Stencil and inked through it with Peacock Feathers, Iced Spruce and Twisted Citron Distress Oxide inks.  I moved the mask randomly all over the background so they overlapped in places.  I dried it well with a heat tool, then used spray glue all over it and coated it with Frosted Sparkle Glitterbitz.  Next cut a piece of Aqua card on the diagonal and glued it to the lower section of the card.  I added a thin strip of white card across the join area between the two pieces.  From the Mermaid Kisses die set, I cut both mermaids out of milk card.  I cut them again out of Ocean card and nipped away the mermaid’s body and glued it on to the original mermaid.  Their hair was coloured with Tea Dye distress ink and I used Worn Lipstick for the cheeks.  Next I added the mermaids to the card with mounting foam.    I cut several of the sea grass from the Can’t Wait To Sea You die set using khaki card.  I glued them into line along the diagonal strip and added three fish inked with Spiced Marmalade distress oxide ink.  I cut the sea turtle from the set and inked through the die with Vintage Photo then removed the turtle from the die and inked all over with more Vintage Photo and a hint of Twisted Citron and added it to the card.  The sentiment was cut from Ocean card and glued to the bottom of the card.  The card was completed with white and aqua mats and layers.  The finished dimensions are 6 1/4" x  7" in size.  All for now, Sue x


                                                      Follow my blog with Bloglovin