Tuesday 30 November 2021

Tis The Season To Sparkle

Hello crafters!  I started today's card by cutting the Winter Pines out of black card with a sticky adhesive sheet added to it.  I cut five trees (two taller and three shorter), then one by one, I peeled the backing paper off the trees and coated them with Polished Silk Glitter.  I used Lilac, Canadian Blue and Lavender glitters.  I cut a piece of black card to use as the background and then used the Soft Gray Matt Chalk Polish on the round applicator and made a moon in the sky by pressing it to the card and slowly rotating it in place.  I added the trees to the bottom of the card with mounting foam.  I cut the Tis The Season To Sparkle sentiment out of Periwinkle card and glued it to the top of the card, slightly overlapping the moon.  The card was completed with white mats and layers.  The finished dimensions are 8"  x  9"   in size.  All for now, Sue x


                                                        Follow my blog with Bloglovin

Monday 29 November 2021

Follow Your Heart

Hi crafters!  How about a quick break from Christmas cards! LOL  I started by embossing a piece of white card with the Floral Brocade embossing folder.  I used the Double Stiched Squares and made a thin white frame to go over the background. I used the Decoratve Noble Hearts and added a big red heart to the centre of the frame.  I cut a smaller white heart and layered it up.  I cut the Follow Your Heart in black and added a small ed heart to the tail on the "H."  I cut three flowers using the Heart Leaf Flowers and added them to the bottom of the frame with white leaves on both sides.  The card was completed with white, red and black mats and layers.  The finished dimensions are 8"  x  8"  in size.  All for now, Sue x


                                                      Follow my blog with Bloglovin

Sunday 28 November 2021

Joy To The World

Good Sunday morning all!  I started by cutting the Slimline Outer Scalloped Rectangle Aperture Trio die out of white card.  I decided to add a bit more detail and cut the Inner Scalloped Rectangle Aperture Trio and glue them together.  I added mounting foam to the back to raise it and added a piece of arctic blue card behind it.  I left a wide margin around the dies so I added a thin brown frame using the Slimline Essential Frames die set.  I pulled out the Forest Animal die set and cut all three deer out of shades of brown.  I added the mama deer and baby deer to the left aperture.  I added the buck with some trees glittered with Iced Snow to the right aperture.  I cut the Stacked Joy To The World sentiment cut in brown to the centre aperture.  The card was completed with white and nutmeg brown mats and layers.  The finished dimensions are 5"  x  9 1/2"  in size.  All for now, Sue x


                                                       Follow my blog with Bloglovin

Saturday 27 November 2021

Just A Note To Say I'm Thinking Of You

Hello bloggers!  I selected a piece of  powder pink card to use as the background.  I cut the Scalloped End Rectangles into six small frames and glued them down the two sides of the card.  I cut a multi-layered frame using the Double Stitched Circles and added a wider white base and a thinner old rose card frame on top.  I added a white backing behind it then added it to the centre of the card with mounting foam.   I cut the Just A Note sentiment duos out of old rose card and added a black shaodw behind them.  I glued both sentments into the centre of the frame.  Using the French Marigolds, I made three flowers, inked the edges with Victorian Velvet and added them to the bottom of the frame.  I added white leaves as accents.  The card was completed with white, old rose and powder pink mats and layers.  The finished dimensions are 7"  x  8 1/2" in size.  All for now, Sue x


                                                         Follow my blog with Bloglovin

Friday 26 November 2021

Happy Holly Days

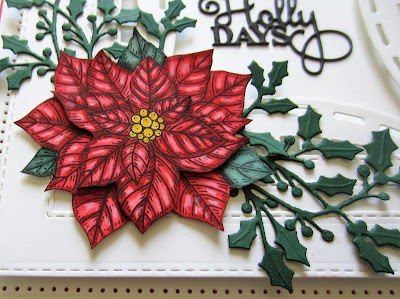
Hello there my crafty friends!  I started this red and white treat by cutting the Ornate Oval Frame die twice.  I cut them in half, then made a triple white frame using the Double Stitched Squares.  I glued the cut halves of the Ornate Oval to the inside of the triple frame.  I added mounting foam to the back of the frame to raise it, then attached it over another piece of white card.  I cut the Happy Holly Days sentiment in black and glued it to the centre of the frame.  Using the Poinsettia Stampcuts, I inked and cut three flowers.  I coloured them with Distress Markers (Festive Berries, Pine Needles and Fossilized Amber).  I attached them in opposite corners and added Holly Accent Sprays cut from Khaki green card.  I used a soft white pencil to add highlights to the flowers.  The card was completed with white and ruby red mats and layers.  The finished dimensions are 7 3/4" x  7 3/4"  in size.  All for now, Sue x


                                                         Follow my blog with Bloglovin

Thursday 25 November 2021

For Someone Special

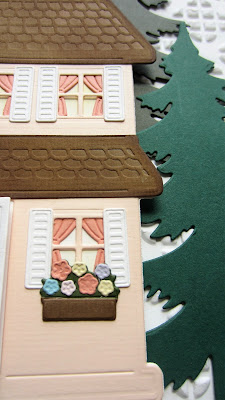
Hello bloggers and Happy Thanksgiving!  I embossed a piece of white card with the Geo Trellis embossing folder for texture.  I cut the House Front die out of soft salmon card as the base.  I cut it again out of nutmeg brown card and cut away the two roof areas and glued them onto the base piece.  I added some curtains from the House Front Accessories die set to the underside of the house (to show through to the front), then added white shutters to the outside of the windows.  I also added a soft custard card backing to look like there is light coming from the inside of the house.  I added a white door and a couple of window boxes with flowers as accents to the downstairs windows.  I cut two of the Winter Pines out of Brunswick Green card and added them to the background so they are to the back and side of the house.  I added the house with mounting foam on top.  I cut the For Someone Special sentiment out of Coral card and added a black offset shadow and glued it to the top of the card.  I completed the card with white, soft salmon and coral mats and layers.  The finshed dimensions are 7"  x  9" in size.  All for now, Sue x


                                                        Follow my blog with Bloglovin

Wednesday 24 November 2021

November Blog Launch Die Winners

 Hello crafters!  As promised (a day late) but here now.  Here are the winners from the blog launch last week:


Triple Heart Aperture Trio: Judy Hollers!!!

Heart Accessories set: Ursula from Verwood!!!

Happy Valentine's Day:  Susan Battensby!!!

Hugs & Kisses:   Sharon in Toronto!!!

Lace Heart Stampcut!!!   CCM Carmen-Dorothy!!!

Layered Heart Background:  Freedomlass aka Lesley T!!!

Noble Decorative Hearts:  Robin Sachs!!!

Follow Your Heart:  Deb E Isle of Wight!!!

Heart Leaf Flower:  Cr@fty Heather Toms!!!


Congratulations all!  Please email me at americansue1@gmail.com to confirm your postal address and claim your winning die set.  Thank you so much for all your support!  All for now, Sue x

Season's Greetings

Hello crafters!  I started with a piece of cobalt blue card and used the Snowflake Flurry mask on top of it.  I used Silver Luna Paste through it, then set it aside to dry thoroughly.  I used the Clipped Corner Rectangles and made a multi-layered white frame to go over the background.  I cut the Snowflake Bauble and the Sparkle Bauble out of white card.  I cut the backing pieces for both with a sticky adhesive sheet added, then attached them and sprinkled Silver Polished silk glitter on them.  I added them to the inside of the frame and used the beaded drops on both.  I made two poinsettias from vellum as accents and added some white Evergreen Branches to them.  I cut the Season's Greetings shadowed sentiment in silver and added them to a white shadow backing.  I attached them in opposite corners of the card on the frame.  The card was completed with white and cobalt blue mats and layers.  The finished simensiona are 7"  x  8 1/4"  in size.  

I do have to make a huge apology as I completely forgot to do the drawings yesterday for the winners from the blog launch (first time ever!)  I would do it now, but its actually my bedtime as I remembered and posted this!  As promised, they will be up tomorrow afternoon!  Thanks for you patience on this (although I am completely surprised that I didn't get a single email asking what happened to them!! LOL)   All for now, Sue x


                                                      Follow my blog with Bloglovin