Wednesday, 11 April 2012

You Are Loved

 Good morning all!  I have spent all weekend and the last few days getting everything ready for our upcoming Big Stamp and Scrapbooking show at the Alexandra Palace in London.  I am so looking forward to meeting some of my blog followers there so please stop by and say hi so I may put a face with the names that I see please.  I will be on my own stand called Rubbernecker which is right inside the door just to your right as you enter.  I will be demoing all weekend with my clear micro beads as I was able to get a small shipment in time for the show.  Now for todays post, I just loved the way this card came out but it was a total experiment!  I wanted the flowers to look like porcelain and I usually will dip them in ultra thick embossing powder to achieve that sort of look, but I didn't have any with me while I was staying at my Moms.  I decided to experiment with clear crystal lacquer to see if I could get them to look similar.  I made my flowers with the bitty blossoms die and dripped crystal lacquer on them.  It got a bit thick by the time I had coated the first flower so I turned it upside down to drip the excess off onto the second flower (no waste).  I let them dry overnight and I was pleasantly surprised with the results in the morning!  My close up pic doesn' t do any real justice but I think it was a suitable alternative to the ultra thick technique.
I cut the layered elegant swirl die twice so I had a cut out decorative circle for my focal element.  I used the extra scalloped die piece to cut a matching black mat to mount behind it and help accent it.  I stamped my sentiment and then cut it out with the square swatch die and mounted it in a diamond orientation using a slightly larger one cut in black as a mat.  I did a slight inking with antique linen to highlight the phrase.  I added some guipur lace in black next to my striped grosgrain ribbon and bow on the side of the card.  I also used a few of the stunning swirl die underneath my flowers and leaves.  I finished the card with some piercing all the way around the edge and a mat of black for balance.  What do you think of this monochromatic floral card, song or no song for you?  All for now, Sue x

Tuesday, 10 April 2012

Almost White On White

Hi everyone!  I probably should have just gone ahead and done the all white card with this one, but I just wanted a pop of colour on it and this navy blue silky crush ribbon is just delicious in real life.  I could not resist it!  I cut an aperture in the background with labels 24 and raised the back piece up on mounting foam.  Behind the opening, I embossed a piece of white card that I had stamped my sentiment on to first.  I placed this behind my aperture and cut a Heartfelt Creations Oval Window die and and nipped out the centre window crossbars and  mounted it over my opening.  Although, it mostly covers it, you can still see a bit of the labels 24 shape behind it and I liked that.  I cut two borders using the new edgeability dies and layered them on the bottom of my card.  I added rows of pearls around the to edge of the card as an accent.  Using my silky crush ribbon, I tied a double bow and added a pearl embellishment from my stash to the centre.  I finished off the bow with a couple of the pearl stick pins (available through any Creative Expressions stockists to answer a question from a comment left a few days ago).  I finished the card with piercing around the edge to give it an elegant look.  I really liked the simplicity of this card (yes, it sang to me!)  All for now, Sue x

Monday, 9 April 2012

Red And White Swirls

Morning all!  I am just loving these Heartfelt Creation dies!  There are just so many things you can do with them.  I love the swirly  filligree look to this one.  I cut it positioned in the upper half of my card.  As it doesn't cut completely away, just the top half comes away from the card.  From the back of the card, I taped the very edges of the die so it became part of the background again.  I stamped my sentiment below it with a black archival ink pad.  I embossed it with clear embossing powder.  (I had a question about what I use recently and this ia the way that I always do my sentiments).  I cut my background on the diagonal underneath the sentiment.  The bottom piece I embossed with the valor embossibility folder.  I layered the pieces of the background on another piece of card where I pierced around the edge.  Along the two joined pieces, I added some swirls.  Atop the swirls, I made flowers from the spiral flower 3 and the Bitty Blossoms set.  On one of the spiral flowers, I nipped off the tip of the petals and cut fringe into each petal before rolling it.  This will give you a flower that looks a little like a carnation and is completely different from the original flower the die makes.  I added some of the Bitty Blossoms to the spray of flowers.  Although it did not photograph very well, I put a bit of Diamond Stickles on the edges of the flowers for a bit of bling.  I hope you like this one!  All for now, Sue x

Sunday, 8 April 2012

Sewn With Love

.Happy Easter! I didn't have any Easter cards so I hope you don't mind if we stay with our sewing theme for today too!  This card was a lot of fun using the new Bakers twine and some kraft card from my craft stash.  I had some kraft ticking background paper which I thought suited the sewing theme so nicely.  I did do a bit of stamping on the background first using some of Sam Poole's Vintage Sewing stamps, but it doesn't show up very well but it does add a bit to the vintage feel of the card.  I decided that it needed some texture so I used an embossibility folder on the top half of it.  Using Mom's sewing machine, I added a zigzag stitch around the top half also.  I did a bit of edge distressing with my scissors to bring out the vintage feel too.  I happened to have some paper ruler borders in my stash so I added one of those across the middle of the card.  On the lower half of the card, I stamped my sentiment.  I stamped my scissors on a small piece of kraft paper and cut them out.  I glued them on to my card but left the end of the scissors unattached to my base card.  Next I cut four of the thread spools, inked them antique linen and wrapped them with Bakers Twine.  I chose four of the colours from the new vintage selection .  I wrapped the twine around the spools until it covered them sufficiently.  The last one, I left about seven or eight inches hanging from the end.  I mounted all the spools across the top of my card and used the leftover piece of the twine to swirl down to where my scissors were mounted on the card.  I tucked the end through the open scissor end and glued it into place.  I tacked the twine in several spots with a drop of Cosmic Shimmer clear glue.  The card was matted and layered with black card and finished with black Cosmic Shimmer PVA glue dots around the edge.
It's Sunday and time for the comment game winners for the week.  The three  winners are:
Ladock Girl!!!
Gay Richardson!!!
Eemeli!!!!

Congrats to all the winners this week.  Please email me with your postal address to claim your prize.  All for now, Sue x

Saturday, 7 April 2012

Sew Special

Happy Saturday!  How about a vintage look sewing card for today's post!  This is from designer Nina Brackett's new dies called Sewing Elements.  Don't you just love that old fashioned sewing machine?  It reminds me of the one my Mom had when I was growing up (a long time ago!LOL)  I created a distressed background using some Kaiser Craft papers that I had and by roughing the edges with my scissors.  I sewed around the edge (since it was a sewing card, I thought, why not!)  I added some crocheted ribbon and piece of fine tulle that I ripped to distress even more! On top of that, I added a large swatch square that I cut.  I inked it with pumice stone distress ink and stamped a couple of vintage buttons on it with a clear perfect medium pad.  I added my sentiment and an old button with a piece of twine tied into a bow.  I cut the sewing machine out of Co-ordinations card (black with a turquoise backing) and sanded the embossing to reveal the turquoise colour.  I mounted this on my Swatch square for my focal element.  I added a bow made from the aqua silky crush ribbon with a bit of the black tulle behind it.  In my craft stash, I had some ruler ribbon, so I made a flower out it and added it to the centre of my bow.  To complete the card, I added some black rhinestone swirls as an accent piece.  A little different, not my usual, but I hope you aren't disappointed!  All for now, Sue x

Friday, 6 April 2012

Purple Iris

Hi everyone!  I also want to say big  hello to the newest members of the blog as we have had an extra surge in the followers of late.  Today's card is another from the Heartfelt Creations line of stamps and dies.  More colouring with this one and I have to confess to being a bit rusty at it.  The iris was done with coloured pencils as they were what I had handy to use when I made this card.  I used the matching die to cut out the iris, but then I stamped it one more time and cut it out only the top petals, this time by hand,  to mount upwards.  I added a few leaves around it and mounted it on an oval with a slightly larger purple oval mat.  I cut two chateau gate dies in black.  I taped the gate closed from behind and cut the die just below the centre under one of the swirls.  These were both done this way and then mounted end to end underneath the iris to give it a pretty scrolly outer frame.   Setting the focal element aside for a moment, I created the background by using the Valor embossibility folder to give it an embossed texture.  I added a border from two of the edgeability inserts with a cutting edge all done in white.  There is a backing piece done in a deeper purple that I just used the cutting edge to mirror the first border.  I added some pearl PVA glue dots down the middle of the two insert patterns.  I ran a piece of thwe silky crush ribbon around the card (under the border) and secured it to the back of the card and added a bow with glue dots.  I stamped my sentiment on a tag and inked lightly around it.  I added it to my bow with a bit of Bakers Twine.  I mounted my focal element on 3D foam above my ribbon and bow, added a few decorative stick pins and pierced around the edge to finish it off.  So you have my early signs of spring here even if Mother Nature isn't cooperating! LOL  All for now, Sue x

Thursday, 5 April 2012

So Many Winners!

Hi guys!  If you have come to the blog to see today's card, then scroll down to the post below this.  If you have come to the blog to see if you are a winner, then it's finally time!  Thank you so much for your patience in waiting for this!  I decided that it may be simpler to do all the third place winners, then all the second place winners, then all the grand prize winners together at the end of the post.  Without further delay...

The three winners of third place in the blog candy contest are...............................
..........................................................................................................................
.................................................................................................................
.........................................................................................................
................................................................................................
...................................................................................
......................................................................
...........................................................
..........................................
........................
................
Tammy Ortiz!!!
Fresh Scents Scotland!!!
Lucy (big eye avatar)!!!

The three winners for the second place prizes in the overdue blog candy contest are...................
.......................................................................................................
...........................................................................................
...........................................................................
...........................................................
.........................................
..........................
.................
............
Marie-Louise!!!!
Kelly's Kards!!!!
Crafty Marian!!!

Now for the three grand prize winners in the overdue blog candy contests.  They are..................
.................................................................................................................................
......................................................................................................................
..............................................................................................
.............................................................................
............................................................
............................................
..........................
............
......
Cornish Emma!!!
Nikkib!!!
Delyth!!!

Congratulations to all nine winners!  Please email me at americansue1@gmail.com to confirm your addresses and claim your prize!  Thank you everyone for being so incredibly patient in waiting for me to get back here, finish my shows and then draw the candy winners!  If you didn't win this time, don't forget about the Sunday drawing for the comment game.  It's not too late to leave a comment on the blog and have your name entered to win!  Thanks again!  All for now, Sue x

Decorative Lace Border

Good morning! Another favourite colour combo of mine and I absolutely love this shade of the silky crush ribbon!  This is another of the Heartfelt Creation dies (aren't they lovely, you can tell that I favour them, can't you?!)  This is the Decorative Lace border that I have used, cut out of taupe card and threaded my ribbon through some of the openings.  I know it is difficult to see behind my ginormous bow, sorry!  I stamped my sentiment on the bottom corner of the same colour background card.   I wanted a tone on tone look for it.  I matted it on to a piece of decorative card which matched my ribbon.  I cut the bottom border with a decorative insert and a cutting edge from the edgebility range.  The top was done using one of the smallest inserts to give it a pretty accent.  I pierced down the left and right side and added a swirly pearl piece for bling to finish off my card.  Very simple, quick and easy, but I was really happy with it in the end. 
Now for the good news!  I have finally finished my shows for the week.  There were sell outs of the remaining two bundles of new dies after my 1pm show yesterday so they let me go home after the show and have cancelled the remaining shows on Thursday and Friday.  This is good news because I can finally get into work today and get all the blog candy drawings caught up!  For the first time ever, I am officially three blog candy drawings behind!  Check back later this afternoon for a list of winners!  All for now, Sue x


Wednesday, 4 April 2012

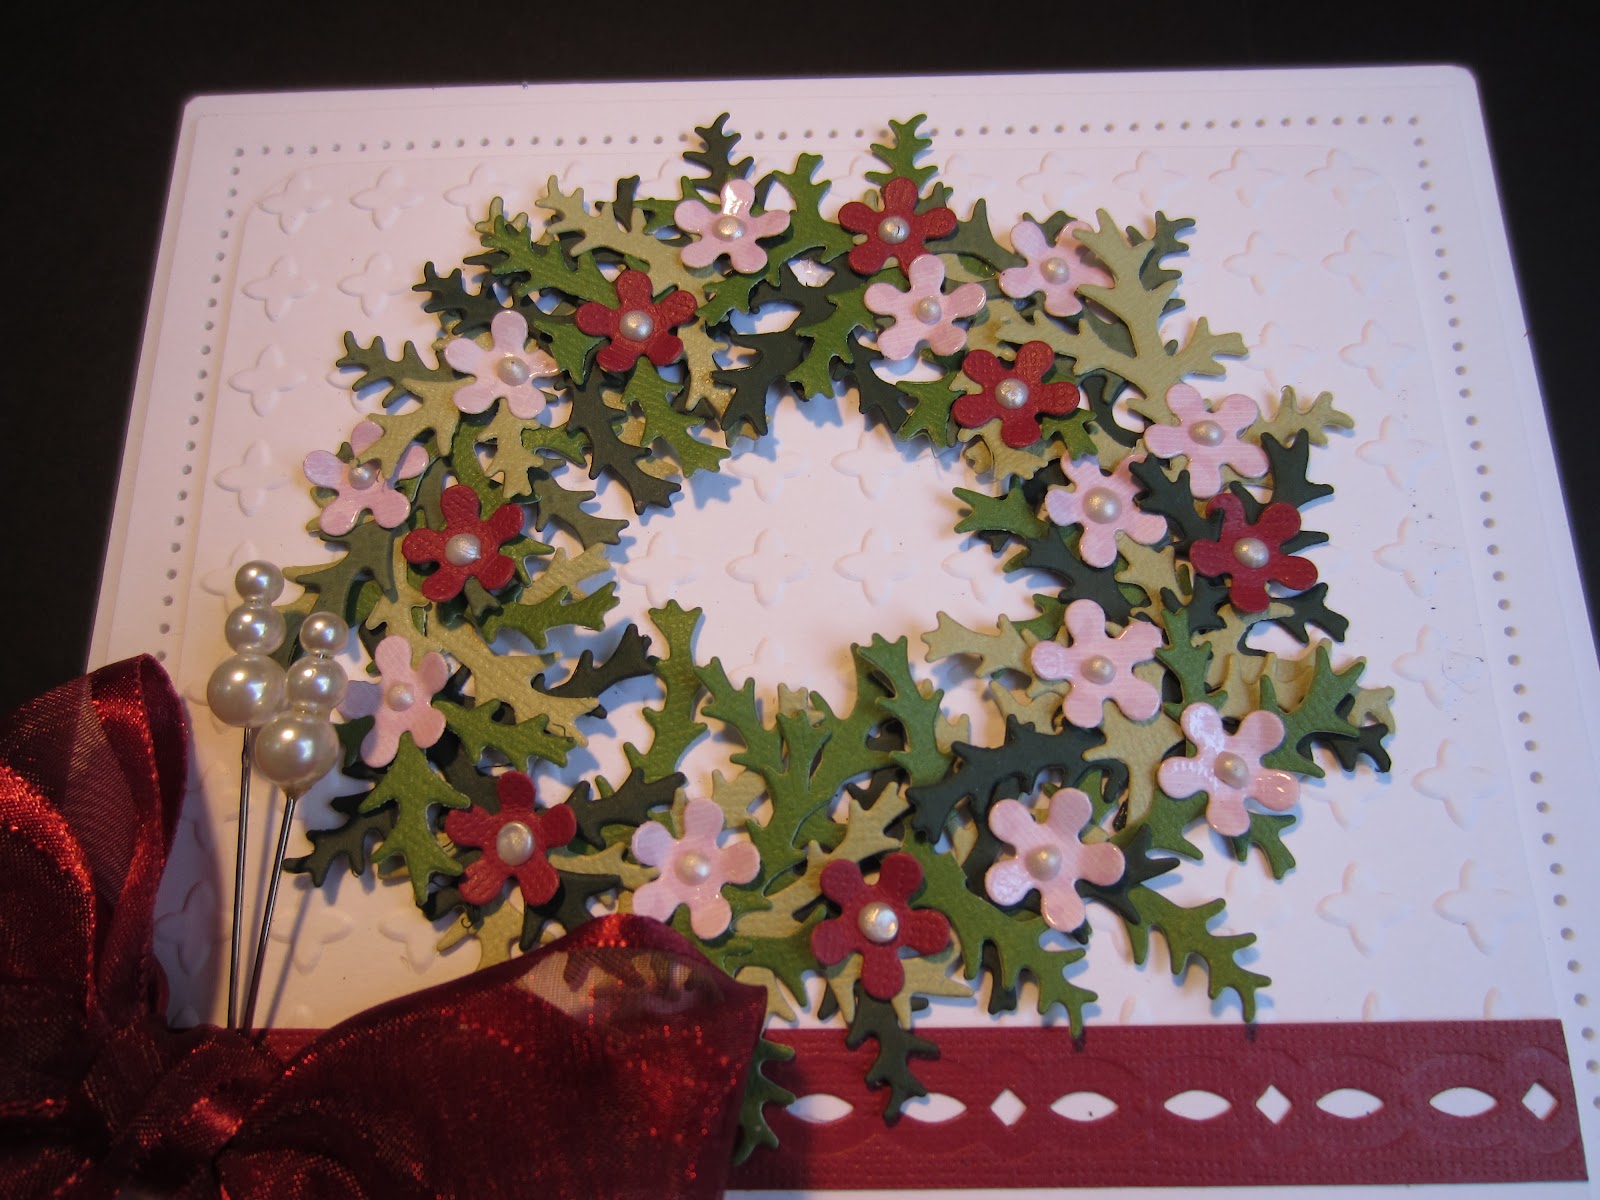
A Summer Wreath

Hi blog friends!   While this could easily be made into a Christmas card, I decided it would make a lovely summer wreath.  Why not?  I have used the small sprig from the Heartfelt Creations that comes in the Bella Rose Die set.  I used four different shades of green and cut out about 6 sprigs from each colour.  This die will easily allow you to cut them two at a time and I didn't bother embossing these, so it went very quickly.  I used the Valour embossibility on white card for a crisp clean white embossed background for my wreath.  I left the bottom of the card without embossing and stamped my sentiment on the right side.  To begin my wreath, I used a bit of Cosmic Shimmer dries clear glue on the end of each sprig and alternated the colours as I attached them in a circular pattern.  The Scalloped Posy die set comes with eight very small flowers that are perfect for this.  I cut about 24 of these flowers using a pale pink and a deep cranberry colour and added them randomly to my wreath.  I added a small dot in the centre of each of them using the Cosmic Shimmer  pearl PVA glue.  I cut a thin border from the same cranberry coloured card and used a decorative insert to cut a pretty accent in it.  I used this border to separate the embossed section from the unembossed section on my background.  I tied a double loop bow from some matching cranberry coloured satin edged ribbon (a new ribbon to play with!)and added some pearl decorative pins.  I pierced the entire edge to frame my wreath and finish the card.  Generic enough for any sentiment of your choice and suitable for many occasions too.  All for now, Sue x

Tuesday, 3 April 2012

Red Red Rose

Hi guys!  Look, I coloured!  It has been absolutely ages since I got my coloured pencils out and put them to work!  I'm a bit rusty in fact, as it took me forever to finish this rose, but in the end, I really enjoyed it!  There is a lot going on in this card, but to start, I embossed the centre of a large piece of card, using the Valor Embossibility folder.  I cut two of the Chateau Gates but taped the gates from the back and cut both of them at the small swirl half way down the side of the die.  I put them end to end and added some mounting foam across the back to secure them in place, then mounted the piece in the centre of my embossed background. This gave me a lacy filligree edge for my focal element.  I stamped the Bella rose and coloured it with pencils.  Using  the rose die, I cut a template out of card so I would be able to line it up over my stamped image to see where I needed to place my die.  Once aligned, I taped it into place and re-registered the die in the same place through my template.  Taped it all and then cut it so my rose was cut without being uneven.  I stamped the rose a second time and cut out just the centre of the rose to decoupage.  I used  two of the basic oval nesties to show off my rose.  The sides of the cards are mirror pieces both done with two of the new edgeability inserts and the fancy scalloped cutting edge.  I used the negative piece to add on the edge with a thin piece of mounting foam.  I mounted both pieces on a strip of red card to show off the cut out pieces.  I mounted each piece to the sides and matted everything on black card.  To finish, I added a few of the black rhinestone swirls to the top and bottom of the rose.  A little late for Valentines day, or just way early for next year!  All for now, Sue x


Monday, 2 April 2012

Purple and Taupe Lace

Good morning guys!  Another card which features several of the Heartfelt Creation dies.  I love the look of these, so lacy and filligree.  I started with the background and used an Embossibility folder to achieve the texture on the background.  I did a little cheat on this one because I wasn't sure what size I wanted this to be so my background has been cut into two pieces so I could either lengthen or shorten it as needed and hide the cut with my ribbon.  On the top of the background piece, I cut three of the scalloped posy die half circles, cutting away the negative piece.  I did the same on the smaller bottom piece to my background too. I decided what size I wanted to final size to be then  I used the pretty purple striped grosgrain ribbon to hide the cut and I added a bow and crystal stick pins to the side.  For the focal element, I cut the larger Elegant Swirl die twice (it is a half circle shape) to get a circular back shape.  I stamped my sentiment and cut it with Labels 24 (the med size in the set)  I used the die to trace around the outside to create a faux nestie shape for my sentiment.  I used dusty concord distress ink to highlight my sentiment while in the die.  I matted the card with my taupe card and pierced down each side, rather than all the way around this time.  Hope it sings to you!  All for now, Sue x

Sunday, 1 April 2012

Remembering With You

Hello my blog family!  I thought I would show you one of the cards that I made using the Heartfelt Creation dies.  I'm hoping to be able to demo this one at some point, but it may have to be rejigged a bit if we sell out of some of these dies.  It is difficult to tell, but there is a fun bit of roundness to the half circle pieces on the top and the bottom of the card.  Just the very tips of the dies rest under the edge of the sentiment die in the centre, but they were designed so that they would be a bit poofy (for lack of a better word!)  They have just been cut from a strip of card that is about four inches wide and about 8 inches long.  I cut the top and the bottom with the decorative swirl design from Heartfelt.  This piece does not cut all the way out, but rather leaves the flat section attached.  So once I cut both sides, I folded it over so that they covered a piece of decorative paper that I attached between them.  I used the thread die from the Sewing Elements set to stamp my sentiment on and use as a stopper for the two decorative pieces top and bottom (it was the perfect size and it doesn't really look like thread when put on it's side, does it?  Using the same decorative paper, I cut a border using the edgeability dies and decorative insert.  I wished that I had backed it with another colour card to bring it out a bit more, but the bow made from the silky crush ribbon covers most of it anyways!  Hindsight, is always 20/20 isn't it!  I did cut two more of the edgeability borders using one of the new inserts and attached them to the sides of my focal piece for a bit of interest.  I mounted the entire piece on a coordinating paper and then did my paper piercing all the way around the edge to finish it off.  If you were lucky enough to get these Heartfelt Creation dies, you will love them and all the fun things you can do with them!

It's Sunday so it is time to do the drawing for the weekly comment game.  Just a quick not to let you know that the blog candy drawing will take place on Monday the 9th (unless we sell out and they let me go home earlier than scheduled, then it will be moved up).

The winners this week are:
Serene Polly!!!
Jacqui aka Morgana!!!
Joesgrandma!!!

Ladies, please email me at americansue1@gmail.com to confirm your address and claim your prize!  Thanks for all the lovely emails that have been left for me on the blog, I really love reading your comments about my cards!  All for now, Sue x