Tuesday, 31 October 2023

Happy Halloween

Hello my Trickster friends!  Happy Halloween (and the very last of my Halloween cards too!)  I cut the Bat And Web Border in black and used an old white pigment ink pad to colour it a gray colour.  I cut the border again in black and nipped away the bats and glued them onto the gray border.    I glued it to the top of a piece of white card.  Using the Clipped Corner Rectangles, I cut a black rectangle and added it below the web and bat border.  I cut the Skeletons in white and used the white ink pad on their hats and turned them gray.  I added two of the skeletons to the black background.  I cut the Happy Halloween sentiment from the Halloween Wordie sheets.  I added a gray mat to it and attached the sentiment above the crouching skeleton.  The card was completed with white and black mats and layers.  The finished dimensions are 7"  x  7 3/4"  in size.

The winner of the October Die Release Blog Launch is............................................................................. ..................................................................................................................................................                                                            

                                                            Robin Sachs!!!

Congratulations!  Please email me at americansue1@gmail.com to confirm your postal address and claim your winning set of dies!  All for now, Sue x


                                                       Follow my blog with Bloglovin

Monday, 30 October 2023

Happy Birthday

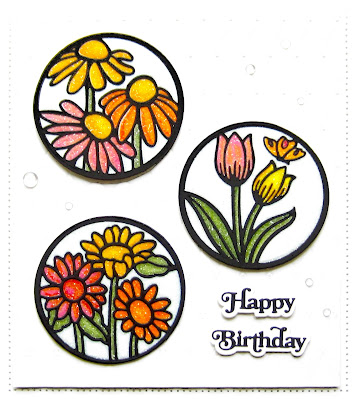
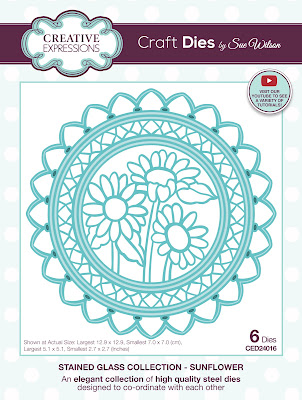
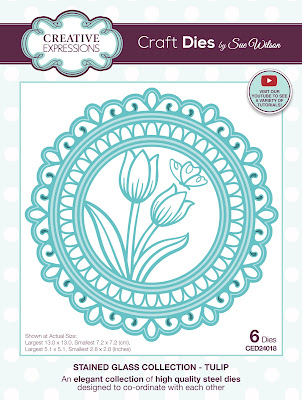
Hello crafters!  I selected a piece of white card and embossed it with the Padded Quilt embossing folder.  I cut the focal die from the Stained Glass Coneflowers, Tulips and Sunflowers.  I cut each one of them with a piece of black card on top of a piece of white card.  The top piece of card will cut out completely, while the bottom piece of card will only cut the outer cut line and will emboss the design into the card.  I removed each of the white copies and used them to colour each of the images with markers.  Once coloured, I covered them with a piece of sticky adhesive sheet and added the black die cut on top.  I trimmed away any excess sticky sheet and sprinkled Frosted Sparkle Glitterbitz over the rest of the coloured die cuts.  I added each of them with mounting foam to the embossed background.  I cut the Happy Birthday in black and glued it to a white backing piece and added them in the corner.  I added some water crystals randomly to the background as accents.  The card was completed with white mats and layers.  The finished dimensions are 7 3/4"  x  8 3/4".

Don't forget to check back tomorrow to see who the winner of the blog launch is!  All for now, Sue x


                                                       Follow my blog with Bloglovin

Sunday, 29 October 2023

A Very Merry Christmas To You

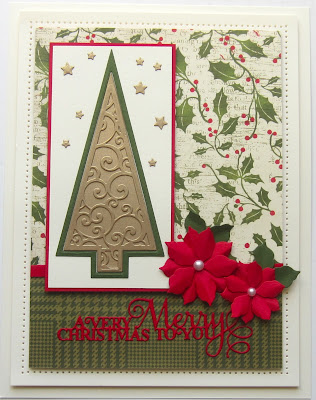
Good Sunday morning all!  For today's card, I found some decorative papers in my craft stash and used them as the background (sorry, I d not recall the name of the papers).  I cut the largest die from the Swirly Tree-O out of Antique Gold card and backed it with the same colour card.  I added the larger outer die front he set and cut it in green and added the tree to it.  I cut a piece of milk card and matted it in red.  I added the tree to it with mounting foam, then added some small stars around it in gold as accents.  Using the Classic Poinsettia die, I cut two flowers, assembled them and added them next to the tree and added green leaves as accents.  I cut the A Very Merry Christmas To You in red and glued it to the bottom of the card.  The card was completed with milk card mats and layers.  The finished dimensions are 6 3/4"  x  8 3/4"  in size.  All for now, Sue x


                                                       Follow my blog with Bloglovin

Saturday, 28 October 2023

Fabulous Friend

 Hello my crafty friends!  I decided to do an old technique that I came up with many years ago called the Fire and Ice technique on today's card.  I cut the Art Deco Fan Background out of black card.  I covered the front of the card with a sticky adhesive sheet, then turned it over and added Chocolate Gold Gilding Flakes to the back of it (where the sticky sheet was showing through the die cut)   I used a piece of Rubit Scrubit pad to move the flakes around all over the design, then to refine and remove the excess flakes.  Next I turned the die over to the front and removed the backing paper and coated it with Iced Snow.  I cut the Art Deco Grand Labels in antique gold card and backed it in white.  I added it to the top of the card with mounting foam and glue.  I cut the Art Deco Fabulous Friend sentiment in black and glued it to the label die.  The card was completed with white and black mats and layers.  The finished dimensions are 7 1/4"  x  8 1/4"  in size.  All for now, Sue x


                                                       Follow my blog with Bloglovin

Friday, 27 October 2023

Lace Filigree Border

Hello my crafty friends!  Here we are at the last post of the blog launch.  We are showcasing the Lace Filigree Border die set.
This border has delicate filigree work that can be extended or cut into sections to use as corners or other accents.  This border will work really well with any of the Stained Glass collection too.  For the last time this launch, I will remind you to put a comment on this post, as well as all the rest of the posts for maximum coverage in the drawing.  I will do the drawing and post the winner on the morning of Oct. 31st so don't forget to pop back by and check to see if your name was the one drawn out!  I hope you have enjoyed the release as much as I have!  All for now, Sue x


                                                          Follow my blog with Bloglovin

Mini Shadowed Best Wishes

Hi bloggers!  The next die on offer is also the final sentiment die.  We are showcasing the Mini Shadowed Best Wishes die set.  This is a lovely sentiment for so many occasions so I am sure it will fit nicely with the other dies in your collection.  You just need to add your comment on the bottom of this post for maximum exposure and it may be the one that gets drawn out to win everything, you just never know!  The final post of the launch will be on the blog here at 3pm today.  Please join us back here then.  All for now, Sue x


                                                        Follow my blog with Bloglovin

Ornate Lattice Border

Hello crafters!  We are at the final day of the October die release blog launch.  There are only three posts today.  We are starting out with the first of the two border die sets.  Introducing the Ornate Lattice Border.  This die set has five dies in it and can be used all together or in parts as I have done on this sample.  I'm sure this set will be a great addition to your crafty stash.  If this one is calling your name, then don't forget to add your comment onto the bottom of this post.  One lucky person is going to win the entire collection and it just might be you!  We still have a few more posts and I will be back at noon with the penultimate post.  All for now, Sue x


                                                           Follow my blog with Bloglovin

Thursday, 26 October 2023

Stained Glass Sunflower

Hello crafters!  The final post for today (yes there are still some more tomorrow) is the Stained Glass Sunflower die set.  While sunflowers are usually yellow, I have taken some poetic license and made these flowers a light purple colour.  I like that you can do that and they still look so pretty!  These are easy to paper piece, use glitter on, colour with markers, use glossy glaze, you name it, these dies work well with so many crafty products and techniques!  They are the perfect dies for a quick card or you can even cut them apart and use the pieces.  I really enjoyed making cards with these, I hope you will too!  If you would like a chance to win the entire collection, just leave a comment on this post and check back on the 31st to see if your name is the one that is drawn out!  The final day starts here tomorrow on the blog at 6am.  All for now, Sue x

                                                                                 
                                                           Follow my blog with Bloglovin

Stained Glass Butterfly

Hello bloggers!  Now this is a set that you can have a lot of fun with!  It is butterfly themed so there is an out decorative die that is full of small butterflies as well as the inner die that sports a butterfly, a sun and a leafy branch.  Paper piecing is so easy with this set as you can see it done on this sample. 
Don't forget that you can use the Pinterest Pinit button on the bottom of each post if you would like to save any of the samples or die sets for later inspiration.  Feel free to copy them as they are or change anything you would like to, that's what they are there for!  We have a final die set for today that will be on the blog at 6pm UK time.  All for now, Sue x


                                                          Follow my blog with Bloglovin

Stained Glass Coneflower

Hi there my crafty friends!  The next die being released is the Stained Glass Coneflowers.  This is one of my personal favourites and I just love that they look amazing done in any colour combination too.  There is a beautiful decorative outer frame, a middle frame that adds a lot of detail and interest and then the gorgeous Coneflowers in the very centre die so you can use all the dies together as I have done here or you can use one, two or all three dies for your cards and projects.  What do you think of this one?  Like it?  Just leave a comment on this post as I know you are going to want to try to win this collection, don't you!  The next post will be along at 3pm today.  Please join us back here then!  All for now, Sue x


                                                       Follow my blog with Bloglovin

Stained Glass Tulips

Hello crafters!  Today we are showcasing the rest of the Stained Glass dies, except these are all circular in style.  First up we are showing off the Stained Glass Tulips die set.  These all have six dies in the set, the same as the oval Stained Glass dies.  There are three distinct sections to each die and they can be cut into the card or out of the card.  If this set is floating your bat, then why not add your comment to the bottom of the post and gain an entry into the drawing to win the entire collection.  Have you seen any dies you really like, I would love to hear about them.  I will return at noon today for the second post of the day.  All for now, Sue x


                                                              Follow my blog with Bloglovin