Monday, 30 September 2013

So Thankful

 Hi bloggers!  Gold and white for a simple card for many occasions.  Think wedding or anniversary with a sentiment to suit your needs.  I used the Lace Oval Frame Background by Justrite Stamps to create the focal element.  I love it when a background stamp can be used in ways other than a background.  I stamped this one twice with a Clear Perfect Medium ink pad on to coconut white card.  I dusted it with pale gold mica powder for a soft, shimmery look.  Using the Grand Oval dies, I cut each one into an oval frame, one small, one larger.  I added mounting foam to both, with extra layers added to the smaller frame to raise it higher.  I stamped my sentiment which was from the Mix And Match Sentiments designed by Becca Feeken for Justrite Stamps.  I heat embossed it with gold powder and mounted my frames over it.  I added two larger ovals cut from white card below it as a mat.  I cut a larger piece of white card and embossed it with my Tapestry embossing folder and used it as a background for my card.  I matted it on soft gold card and added a double bow tied from champagne coloured frilly edged ribbon.   The bow was finished with a small pearl embellishment and two pearl stick pins.  A final pearl swirl was added in the upper corner and a double white pierced mat finished the card.  Finished dimensions are 7 1/2" x 8 1/2" in size.

Now for the winners of the two Christmas cards from Friday's post.  The names drawn were:
Shirley Teretta!!! and Maid of Kent (Ann)!!!
Please email me to confirm your address and claim your cards!  I promise more card giveaways to come!  All for now, Sue x


Sunday, 29 September 2013

Believe In The Magic

 Good Sunday morning crafters!  A white on white Christmas card for today courtesy of Heartfelt Creations stamps and dies.  I used my Heart Lattice embossing folder to add a simple embossed background for my card.  I decided to wrap it like a present and used white seam binding on the opposite corners before adding a thin silver mat border.  I cut a smaller piece of coconut white card and stamped my sentiment in the middle of it.  I used a clear perfect Medium pad and silver embossing powder.  I cut seven of the holly swirls from the Ornamental Add On die set by Heartfelt Creations and glued them into a wreath shape around my sentiment.  I added Iced Snow glitter and flatback pearls to each of the holly swirls as accents.  I tied a messy bow from white seam binding and added a small pearl embellishment to the centre.  I seated my bow on a piece of white tulle.  Beautifully simple and finished with a double white pierced mat.  Finished dimensions are 8" x 8" in size.

Now for the weekly Comment game winners.  This weeks names drawn were:
Sheila Ginger!!!
Jane Gray!!!
Joanne K!!!

For the extra qualifying post of Sept. 27th, the winners are:
Mary Moore!!!
Beryl Treble!!!
Amy Richards!!!

Congratulations all!  Please email me at americansue1@gmail.com to confirm your address and claim your prize.  Don't forget to check back tomorrow for the card giveaway drawing!  All for now, Sue x


Saturday, 28 September 2013

Just For You


 Morning crafters!  Custard, grey and silver, such lovely colours together, don't you think?  I was hoping the elegance of the colours coupled with the lovely Labels 20 stamps and dies would carry this one so I went for simplicity.  I cut an aperture out of my custard card just above centre.  I used my Heart Lattice folder while the die was still in place to emboss the rest of the background.  Remember when you do this, you can't close the folder or the die will cut into the folder.  You need to cover it with your tan mat (which makes it too thick to close anyways) and add a couple of sheets of card as a shim, then the raspberry adaptor plate and run it through your Grand Calibur.  I added mounting foam to the back and set it aside.  Next I stamped my Labels 20 Get Well stamp by Justrite and embossed it in silver shine embossing powder.  I used the tag from Becca Feekens Filigree Delights set and cut it in silver card.  I mounted it vertically and added a smaller stamped labels 20 with my sentiment in the centre.  I wrapped a piece of silver satin ribbon around my background and taped the ends to the back. I tied a double bow and added a silver button (from my stash) to the centre.  I used a clear perfect Medium pad and then dipped two pearl stick pins in my silver embossing powder, heated them and let them cool.  I attached the bow to the side of my card and added my silver stick pins.   I lined up my aperture with the stamped image and attached them with the mounting foam for dimension.  The card was completed  with a double white mat and the addition of  Cosmic Shimmer Silver PVA glue dots around the edge as an accent.  Finished dimensions are 7 1/2" x 8 1/2" in size.  All for now, Sue x


Friday, 27 September 2013

Peace/ Card Giveaway x 2

 Hi bloggers!  Do you recall back in July when I demoed this card at the show in Las Vegas, I said that I would give it away when I got home?  Well, today is the day!  And I have two of these to give away on top of it all!  The original and the demo version.  So leave a comment today if you would like to be entered in the drawing to win one of these cards.  I will draw two names and post the winners names on Monday mornings post.  A quick rundown in case you missed the demo back then.  I started with a milk coloured card background stamped it with the sentiment (Heartfelt Creations)and heat embossed it with gold powder. Next, I embossed the background with a Couture Creations folder called Taylor from their Elegance Collection to add texture.  I used the holly swirl die from the Heartfelt Creations set called Ornamental Add Ons and cut several out of milk card.  Using Cosmic Shimmer dries clear glue, I covered the leaves with it and sprinkled Iced Snow on top of them.  I added cream flatback pearls to all the round berry pieces in the die cut.  I glued them in place radiating from the upper corner across and down the side of the card.  I cut four of the die from that set that looks sort of like an ornament out of soft gold card.  I scored them all down the centres and glued them back to back to form my 3D ornament.  I glued the two sides from the first and last ornament to the background so it looked like it was hanging from the holly spray.  I went back and highlighted my sentiment with an Antique Linen distress marker and added small pearls to the holly spray on it.  I tied a messy bow out of chalk seam binding and added a small pearl embellishment to the centre.  I attached it in the upper corner.  I added a double mat out of soft gold card and pierced the inner layer.  Some more cream flatback pearls were used in the lower corner to complete the card.  Finished dimensions are 7" x 8 1/2" in size.  All for now, Sue x


Thursday, 26 September 2013

Congratulations In Teal

Hi my crafty friends!  I love teal and I love buckle cards so it shouldn't be a surprise to see them both together here!  I think it comes to life when you add some pretty matching stamps like these from Justrite.  I stamped the Lace Vintage Labels Three in black and embossed them with clear powder on teal card.  I used the largest stamp for the centre, then stamped the slightly smaller designs twice to use on either side.  I cut all of them out with the matching dies to create frames.  I cut a strip of coconut white card and cut both ends into forks.  Using the over, under method, I wove the strip through the frames and then taped them into place from the back and added a strip of mounting foam.  Next I created the background for my focal element.  Using a wide strip of teal card, I embossed it in my Interlocking Circles embossing folder and added some flatback pearls to some of the junctions.  I added a thin black mat to it.  I cut a larger piece of white card and added embossed vertical lines using an embossing board to the top and bottom.  I mounted my embossed teal strip in the centre to finish my background.  I added my buckle feature to the middle of the card, then used the pretty frame from the Justrite Elegant Large Sentiment set.  I used a clear perfect Medium pad and white embossed it.  I cut it out with the matching Vintage Labels Four die.  I stamped it again and embossed it with white and stamped my sentiment in the middle with a black Archival pad.  I hand cut around the inner part of the frame this time.  Once cut, I inked it lightly with Peacock Feather distress ink to highlight the white embossing and frame my sentiment.  I mounted it on foam in the centre of my buckle feature.  I added a thin black mat before finishing with a double white pierced mat to complete my buckle card.  Finished dimensions are 7" x 9" in size.  All for now, Sue x


Wednesday, 25 September 2013

Thinking Of You

Hi everyone!  Back today with a Labels 20 creation!  You know how much I love these and I was very happy with the way this one came out.  I started with a piece of coconut white card.  I used the Scalloped Borders Two insert to cut a pretty decorative piece out of the top and bottom of my card.  I really like how it frames the focal element.  I mounted this piece on dimensional foam and backed it with a piece of blush card so there was a really light pink showing through.  For my focal element, I used the Justrite Labels 20 Get Well set and stamped the largest image in clear perfect medium on my coconut white card.  I heat embossed it with white powder and inked through the die with Victorian Velvet distress ink.  I used the matching distress marker to add depth to parts of the image.  I stamped the smaller Labels 20 images and heat embossed them as well with white powder. I added my sentiment in black in the centre of the smallest piece.  I inked the smaller pieces with a lighter hand using the same ink.  I cut out all the pieces with the matching dies and stacked them atop each other with foam pieces.  I used the dusty rose and blush coloured felt and made flowers from both Spiral Flowers Four and simple circles which I cut in a spiral and rolled.  I also made one flower out of white seam binding using the tutorial method at the top of my blog.  I cut a swirl and leaves from the Jewelled Flowers and Flourish set as accents.  Finally, I finished my card with a double white pierced mat and several flatback white pearls in the corners.  Finished dimensions are 8" x 8" in size.  All for now, Sue x


Tuesday, 24 September 2013

Let It Snow

 Hello crafters!  I don't mean that title to be taken as a request! LOL  One of the many things on my to do list when I returned to the UK was to take pictures of the cards from the CHA show I did so I could post them.  I had forgotten to do it so the ones that I have already put on the blog, were taken in the hotel room (they weren't the best pics).  I think I have done much better with this one!  I love Christmas cards that are not your usual colour combos and this aqua and white just sings to me.  I started by stamping my aqua card background with the Delicate Holly Swirl stamp from Heartfelt Creations and heat embossing it with white powder.  I just stamped it randomly around the edges.  Next I stamped it some more on white card and also white embossed it for a tonal look.  I cut the card into two strips and cut forked flags in one end of each.  I matted them with aqua card.  For the centre strip, I embossed it rather than stamping it.  I used the New Years Dove embossing folder by Couture Creations.  I matted it with aqua card as well.  I used an older die from the Fancy Tags Three set and cut it out of aqua card.  It has perfect openings on the sides to slide a sentiment through so I thought I would take advantage of that.  I stamped the Let it snow sentiment (Heartfelt Creations), matted it with aqua card and slid it so it was centred in the die.  I used the lovely holly die in the Ornamental Add On set and cut two of them in white and glued them top and bottom.  I added Cosmic Shimmer Iced Snow to the leaves and flatback pearls to the holly areas as accents.  I finished with a double white pierced mat for crisp, clean look.  This is one of my favourite Christmas themed cards.  I hope you like it as well.  Finished dimensions are 6 1/2" x 8" in size.

Now for the delayed Comment Game winners for the week!  We had an extra qualifying post this week so there are two sets of winners.

The winners are:
Denise Hancock!!!
iReneM!!!
Tracy W!!!

For the extra qualifying post of Sept 16th, the winners are:
Beachie!!!
Janette MacArthur!!!
Foxyg!!!

Congratulations all and thank you for your patience!  Please email me at americansue1@gmail.com to confirm your address and claim your prize!

I had a really fun weekend at Ally Pally and absolutely loved meeting so many of you there!  Thank you for stopping by and saying hi and allowing me to do a it of demoing for you.  Just a quick note, my shows have been changed so please check the side of the blog for the new dates and times.   Julia Watts has shows today at 10am and 2pm using some of the new stamps that have been drawn by my artist.  They are so incredibly beautiful! You just have to tune in to check them out and see her fab demos!  All for now, Sue x


Monday, 23 September 2013

Lacey Tiers Stained Glass

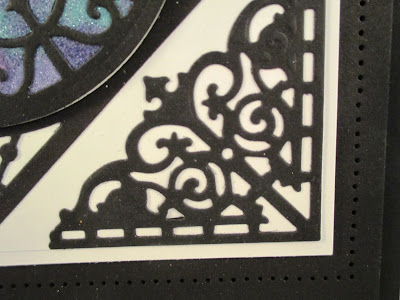
Hi bloggers!  I just wish you could see this one in person as it is so pretty!  I love the pop of the glittered window against the black and white, it really does look like a stained glass window.  I used the Filigree Corner dies designed by Becca Feeken for Justrite stamps and cut four of them out of black card.  I glued them in the corners of my white card.  Next I cut one of the Lacey Tier dies out of black card.  I glued the frame on the diagonal in the middle of my corners.  I cut a piece of coconut white card large enough to accommodate the circular part of the die.  I covered the piece with a sticky self adhesive sheet. I peeled the backing paper off and placed my die cut on it.  I made sure that it was completely stuck down by placing the release paper back over it and rubbing well.  Next I used the Lilac, Lavender, Iced Blue and the Vintage Violet polished silk glitter and sprinkled it randomly over the exposed sticky sheet.  I used my finger to rub it smoothly into the sticky areas around the die cut.  This also blends the glitter nicely.  I tapped off the excess and wiped off any glitter left on the die cut.  I trimmed the excess away from around the circle and added mounting foam to the back.  I mounted it in the centre of my card.  I added a double black mat with a pierced inner mat layer to complete my card.  No sentiment this time as I think it could be used for just about anything.  I really liked the way this one came out, I hope you do too!  Finished dimensions are 8" x 8" in size.  All for now, Sue x