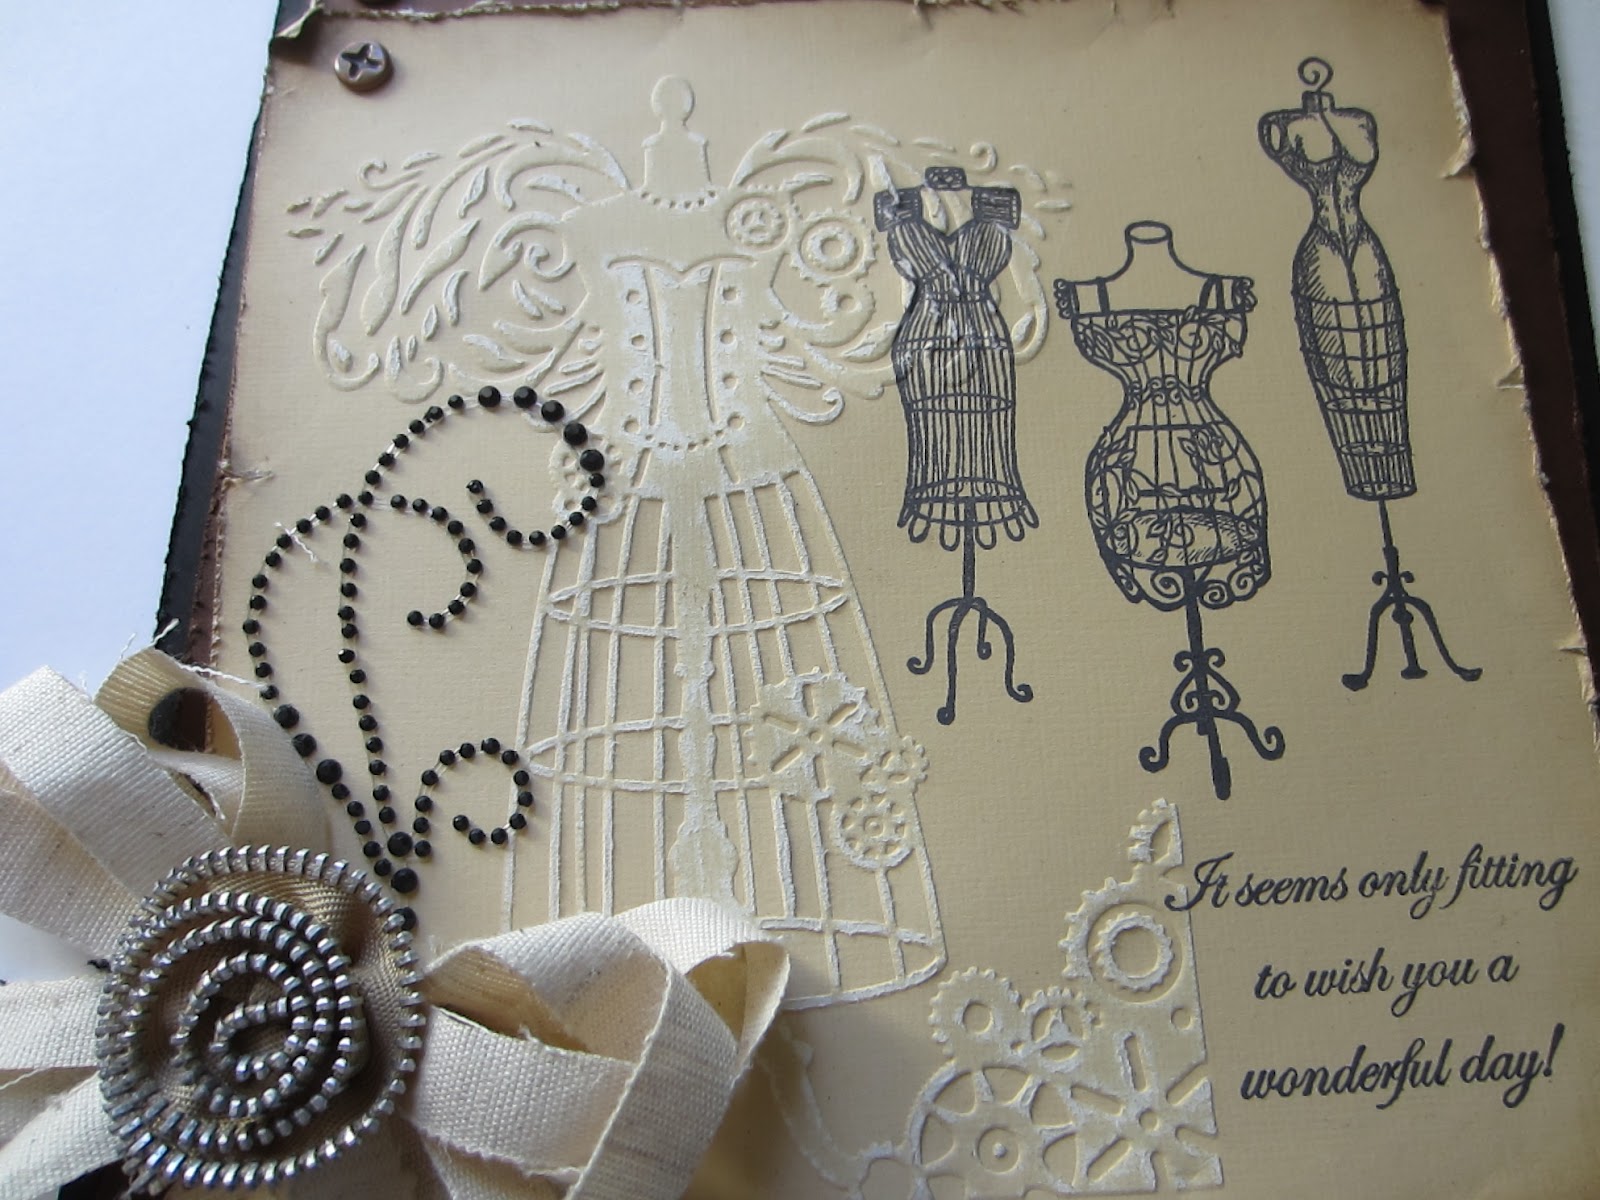
 )Hi guys! The card for today's post is quite different I think, in that it uses household greaseproof baking paper! Look closely, yes there it is, the ruffly background behind the focal element. If you are having any difficulties getting any of your die cut pieces out of the dies, then lay down a piece of baking paper or if you can find it, American wax paper (which actually even works better!) These will allow your card to pop out of your dies very easily. And, being that we are crafty crafters, we can then use this delicate lacy piece in one of our creations too! I was cutting the Persian border for another card and this was leftover so I decided to ruch it a bit so it went around my Labels 25 shape. I used three of the borders if memory serves me. These are just taped to the back of the label shape here. I then stamped my sentiment and cut it with the Persian Motif die and inked it lightly with Tea Dye to complete my focal element. I added two pieces of cream lace from my stash at the bottom and tied some American seam binding around the card and added a messy bow on the left side. Using the smaller Persian accent pieces, I cut two and offset them to look like a flower. I did the same with the very small Persian piece for the centre of the flower. I topped my bow with these and added some pearl spray bits (from my stash again. This decorative paper is from Authentique, isn't it pretty! I just love the colours. Hope you are liking the frilly baking paper. You may just be raiding your kitchen soon for supplies! All for now, Sue x
Wednesday, 29 February 2012
A Play With Baking Paper
)Hi guys! The card for today's post is quite different I think, in that it uses household greaseproof baking paper! Look closely, yes there it is, the ruffly background behind the focal element. If you are having any difficulties getting any of your die cut pieces out of the dies, then lay down a piece of baking paper or if you can find it, American wax paper (which actually even works better!) These will allow your card to pop out of your dies very easily. And, being that we are crafty crafters, we can then use this delicate lacy piece in one of our creations too! I was cutting the Persian border for another card and this was leftover so I decided to ruch it a bit so it went around my Labels 25 shape. I used three of the borders if memory serves me. These are just taped to the back of the label shape here. I then stamped my sentiment and cut it with the Persian Motif die and inked it lightly with Tea Dye to complete my focal element. I added two pieces of cream lace from my stash at the bottom and tied some American seam binding around the card and added a messy bow on the left side. Using the smaller Persian accent pieces, I cut two and offset them to look like a flower. I did the same with the very small Persian piece for the centre of the flower. I topped my bow with these and added some pearl spray bits (from my stash again. This decorative paper is from Authentique, isn't it pretty! I just love the colours. Hope you are liking the frilly baking paper. You may just be raiding your kitchen soon for supplies! All for now, Sue xTuesday, 28 February 2012
Triple Thank You Card

Monday, 27 February 2012
Winners, Winners and More Winners!
As I promised in the morning post (see below if you missed it), I have finally gotten caught up with drawing all the winners. For the first time ever, I have not had a chance to post a pic of the new blog candy (the picture showing on the blog is from the last candy drawing!) so I will put together a nice blog candy prize for the winner. I promise to update that pic this week.
I have a couple of announcements to make, however, and I am so hoping that you will all understand. I am finding it extremely difficult to keep up with the comment game so I must discontinue it in the form that we have currently been using. I was happy to give up housework and grocery shopping to make time, but the OH wasn't having any of it. I must admit that clean knickers are high on my list of needs so as a form of self preservation, from today, I will no longer be doing it on a daily basis. However, since I love giving stuff away (and I think you like it too) once a week, from the daily posts with over 100 comments left on them, I will gather all the names from everyone that has left a comment and they will go into the hat and I will draw three winners for the week. It will still be a random drawing since I think that is only fair. To sweeten the pot a bit too, if any post has over 200 comments left before the next post goes up, I will include a bonus draw from that post. I am hoping that this will help ease the time crunch that I have been feeling lately but still keep everyone leaving their wonderful comments too. It is truly special to know that you have taken the time to stop by the blog to see what's new. Okay are you ready for this list? Phew! Get a cuppa and relax, it's a long one and then at the end, I will be doing the Big Blog Candy Drawing!
For the Comment game, we left off at Feb.4th so I will begin there.
Feb 4th: comment no. 14 left by occasionali!!!
Feb 5th: comment no. 32 left by Lynnus!!!
Feb 6th: comment no. 60 left by Val C!!!
Feb7th: comment no. 35 Lydia Jordan!!!
Feb. 8th: comment no. 6 left by Pam Swadling!!!
Feb.9th: comment no. 73 left by Melanie181!!!
Feb.10th: comment no. 35 left by Ria!!!
Feb.11th: comment no. 2 left by Jan!!!
Feb. 12th: comment no. 14 left by Sheila Stokes!!!
Feb.13th: comment no. 42 left by Clare with paint in her hair!!!
Feb. 14th: comment no. 78 left by Cathy in MN!!!
Feb.15th: comment no. 98 left by Fynecrafts!!!
Feb. 16th: comment no. 41 left by with love and light Theresa H!!!
Feb. 17th: comment no. 15 left by Ali W!!!
Feb.18th: comment no. 10 left by Mrs. O crafty blog!!!
Feb. 19th: comment no. 74 left by Lilygee!!!
Feb. 20th: comment no. 36 left by Jayne59!!!
Feb. 21st: comment no. 52 left by Sue M!!!
Feb.22nd: comment no. 64left by Lindyloo12!!!
Feb.23rd: comment no. 104 left by May!!!
Feb.24th: comment no. 29 left by Vee Cassidy!!!
Feb. 25th: comment no. 112 left by maid of Kent!!!
Feb.26th: comment no. 21 left by Mabex!!!
Now for the big Blog Candy drawing, beginning with third prize, the winner goes to.........
..............................................................................
..........................................................
.........................................
............................
..............
.......Tracy Heaton!!!
The winner of second prize goes to...................................................
............................................................................................
..........................................................................
............................................................
...................................................
........................................
............................
................
............
Lizzie (serial copycat)!!!!
Now, the Grand First Place Prize Winner goes to..............................
..................................................................................................
..................................................................................
.................................................................
......................................................
............................................
..................................
...........................
...................
............
.......
....
DESIREE!!!!!!
Congratulations to all the winners. I will need to confirm all the postal addresses please so if you could send me an email at americansue1@gmail.com, I will post out your prize. I will begin the weekly drawings and post the first set of winners on Sunday March 4th. The big Blog Candy Contest will still continue every 100 followers we add. Thank you so much in your understanding in this. All for now, Sue x
Sanded Lattice
 Hello my crafty blog friends! I hope that you aren't getting tired of looking at my lattice dies as I have a bunch of cards to show using them! I will try to spread them out a bit for you. This card happens to be the first card that I made when I received the dies. Mainly because I was dying to see what they looked like when cut using Coordinations card. I happened to grab a piece of black/turquoise backed card to try them with. Well you know what we are like as crafters, we don't waste anything(I don't want to be thrown out of the crafters union, now do I! LOL) so it became the basis for the first card. I sanded back the card to reveal the turquoise coming through giving it an edgier look. I made a faux nestie by tracing the outside shape of the lattice motif. I cut it out, sanded the edge lightly to smooth it and then added some white stitch marks around the edge. I stamped my sentiment then cut it out with the smaller lattice piece and inked it with black soot distress ink. I made a faux nestie for this shape and did matching stitching on it also. I mounted my focal element on a piece of decorative paper that I had (not sure the name though) and then mounted it another backing paper with a harlequin pattern to it. I added some black rhinestone swirls to the bottom and side and finished the card with a double bow made from the black silky crush ribbon. I added a black organza rose as a knot cover and a couple of decorative black stick pins. I used a white inksentials pen to faux stitch the edge to complete my very first lattice die card.
 Just to let you know, I will be back around mid day today with another post of
blog candy winners and comment game winners. Be sure to check back then. All for now, Sue x
Sunday, 26 February 2012
Red and Tan Simplicity
 Good morning all! I thought a simple card for today's post would work nicely. I chose this red card for the background since it matched the new striped ribbon that I am enjoying using now. I embossed the background with the new Embossibility folder, giving it a lovely deep impressions. I tucked the end of the ribbon under it at the top and let it hang down. I cut out the largest size of the Romantic Rectangle die to use as a backing for my focal element. I cut it down the centre and realigned the pattern to create a square. The seam is hidden by the points on the red Persian Motif. I stamped my sentiment and then cut it out with the Splendid Circle dies. Using a bit of fired brick distress ink, I inked through the die to highlight it. I layered up all the pieces to sit atop the ribbon piece. I cut out the square piece from the damask accents and you can see it peeking out from underneath the ribbon which is being held in place by the ribbon buckle die cut. I cut the ribbon into a "V" shape to give it a finished look. You're probably not surprised to see the edge pierced as it is one of my favourite techniques! I have had a few emails about the piercing lately too so I thought I would add a word here about it. I use the Tim Holtz design ruler for my piercing but I anchor my ruler on either side of the card with some push pins to keep it steady while I am piercing. I hope that helps answer any questions you may have had. All for now, Sue x
Saturday, 25 February 2012
Dave's Fav

Hi guys, this was Dave Bradford's favourite card from the shows so I am posting it today in his honour! I have used the Lattice Motif die template for my focal element here, but I used the same technique as I used on yesterday's card. Stamp your sentiment on dark grey card then coat your lattice die with perfect medium and align it over your sentiment and run it through the GC to transfer the ink to your card. Using clear embossing powder, heat emboss it. Cut out the shape and use it as the back piece for your focal element. Be sure to wipe your die off well, then cut another lattice motif in yellow card, mount with foam pieces atop your letter pressed one. Cut the Moroccan border die twice with pale grey and twice with dark grey. These dies will weave together quite nicely to create a cute two tone border for each side of the card. Just use a few dots of clear Cosmic Shimmer glue to adhere the borders to your background. I used a bit of ribbon from my stash for this one. I cut several ribbon buckles from the yellow card and stacked them for depth. I then cut one from green card and cut away the petals and the ribbon buckle portion, leaving only the leaves and mounted it so it just peeks out from under the flower stack. I didn't use it as a ribbon buckle per se, but rather it was intended as a bow embellishment. I finished the card with the Cosmic Shimmer silver PVA glue dots to frame the card. Thanks again for all your support, comments and emails. I have been over the moon reading all of them. I am hoping that the crazy schedule will slow down so I can catch up on blog candy and comment game winners. Soon, I hope! All for now, Sue x
Friday, 24 February 2012
You Are So Kind
 Good morning my crafty friends! Thank you all for the wonderful emails and comments you have left for me during these shows! They have added more shows for today at 10, 3 and 6pm. They asked me yesterday to do several added shows and since I was already there (a captive audience so to speak, they really didn't have to pin me down and tickle me until I cried uncle! No not really, but I bet you have that image in your head now, huh?), it wasn't a problem. Christine Emberson is going to help me out and do the shows on Saturday. What a star she is! Please tune in and see what she has planned. It has been great fun for me and I love that it has brought many new friends to the blog too. Welcome all!
 For today's card, I have picked another one that I really liked when I finished it (probably the white and aqua together, which I love). I started inking my lattice motif die using a clear perfect medium (I patted the pad all around the metal edge of the die), then I placed it in the centre of my aqua card and carefully taped it into place. I cut the piece in my GC and when I removed the die, the ink had transferred from the edge of the die on to my card, but only around the lip of the outside edge. Using Aurora Sparkle embossing powder, I heat embossed that edge giving me a sparkly letterpress image of the shape of the die. Now the Lattice motif that was actually cut out was adhered to a piece of white card, but turned the opposite direction so that you can still see a bit of the white card, but you also get the nice scallopy edge showing through top and bottom. I cut two of the borders from Samantha Walkers set called Antique Frames and Accents and glued them to the edge of the aqua card. Using a strip of the redline sticky tape down each side of the border, I ruched some velvet ribbon lace down both sides. Remember to use some clear Cosmic Shimmer glue once you have it stuck down like you like It. The glue will make it stay put permanently. Especially with the thick velvet this is a must or parts of your ruching will pop loose. I made a bow with some satin ribbon I had on hand and added a smaller bow of organza atop it. I left a long piece of the satin ribbon to run down the centre of the card. I stamped my sentiment and cut it out using one of the Persian Motif pieces and inked it slightly with Bundled Sage distress ink. I mounted this in the centre as a focal element over the piece of satin ribbon. I added one of my big pearl buttons that I have in my craft stash (brought back from the States with me) to cover my naked bow. Finished the card off by piercing all the edges (like I do). Just love it, a real happy dance card for me at least. Is it up your alley? All for now, Sue x

Thursday, 23 February 2012
To You
 Hi guys! I hope you enjoyed all of yesterday's shows, I know I did! Now, at least, I can begin posting all the samples for your closer inspection too. This is a very simple, but I think, elegant card. I have used this layout many times but I keep coming back to it for this type of card as I feel it really shows off both the embossing and the lovely dies very well. To start, emboss your background piece with your embossibility folder (I believe this one is called Patchwork). The background is slightly larger than the folder so you will have to do the first section, then move the card over and line it up by having it slot back into the folder in the repeatable background. Then run it through a second time to finish it off and mat on to pale pink card. Next, do a smaller piece of pink card with the same folder and this time it should all fit inside the folder in one go. Mat that piece on to cream card and mount in the centre of your larger background piece. Using a second piece of pank card cut the same size as the other one, mat on to cream card. Cut four of the Damask Motif pieces with the unusual, but lovely shape and these will clip on the edge of a smaller piece of pink card, but this time the clip "holder" pieces will go to the back of the card and the rest of the entire die will sit on top of the smaller piece of pink car. They will overlap a bit in the front, but that will not show when we are finished. Mount this piece on to the pink card that you did not emboss, but mount the entire piece on to the embossed piece but rotated so the points are opposite. I hope that makes sense, it is a mouthful! Finally, stamp your sentiment on to cream card. This sentiment is only part of the phrase which says "From Me To You," but I only wanted to use the To You section here. Using one of the smaller pieces from the Persian Accents, cut it out and ink it lightly with Antique Lineen distress ink. Mount on a foam piece in the centre of your card and you are done! I added a few small pearl accents around on this one as a final finishing touch. Think any occasion, any colour combo and this card will work beautifully too. Hope you like it. All for now, Sue x
Wednesday, 22 February 2012
Splendid Circle Halves

I started with a piece of Graphic 45 paper for the background. I stamped the top half of my sentiment on the top of the Splendid Circle die template. I then stamped the bottom part to the sentiment and cut it out so that it was in the very bottom of the circle. Both circles were highlighted with broken china distress ink while in the die. I cut two larger circles in black to use as mats. I cut a strip of coordinating aqua card and added an adhesive strip it. Using our new clear micro beads, I coated the aqua card to give the strip a nice shimmery texture with the beads. I love the way these look! I added a tan and black mat to the strip and mounted my circles above and below it showing just the sentiments. I also wanted to say that I could have just cut the circle in half between the sentiment rather than stamping it twice, but the sentiment was rather tight so I thought it was easier to do two circles. The other halves of the circles are hidden by the centre strip. I added one of each of the lovely new layered flowers to the strip topped with a half pearl. I used some black rhinestone swirls top and bottom for accents and interest. And, of course, this one just needed the piercing today, don't you think? All for now, Sue x
Tuesday, 21 February 2012
Lacy Layered Flowers
 Good morning all! Today is the day or rather tonight is the day that I launch my Lattice Motifs and Accents along with the other new release Spellbinder dies! 9pm on Ideal World kicks off a 2 hour launch and then I am back at midnight to 1am for those of you night owls! I do hope that you will be able to tune in and see all the fun new stuff I have in store for you. Finally, no more having to keep it secret! What do you think of the new Layered Flower die templates from Spellbinders? I absolutely love these, they are so lacy and pretty. You know me, I love all the frilly girly stuff and these really fit the bill for me. I decided on a black, cream and red colour combo for this card. I decided that all the lacy flower parts needed to be cut in cream, but I alternated the backing piece from black to red to form a sort of wreath with the flowers. I used both black and cream pearls for the centre of the flowers too. The background is another of the new Embossibility folders (just wait, they're really fun!) I used a tad of antique linen over it to distress it and bring out the pattern a bit more. I cut a border from the Damask Accents set and matted it on to red card to help show it off and I ruched the black American seam binding up the card along the edge of the border, adding a messy bow, a wooden button, Bakers twine and a couple of pearl decorative stick pins. I stamped my sentiment on one of the smaller dies in the new Labels 25 set and I used the actual metal die as a stencil to create my black faux nestie behind it. I just always feel like a nestie standing alone needs a mat to help it stand out. A tiny little bit of black swirly pearlie coming from behind the sentiment into the corner was added as an accent. Finally I finished the card with Cosmic Shimmer pearl PVA glue dots as a frame (remember, don't forget your edges, they are always so neglected!)
Monday, 20 February 2012
Wherever You Go
 Good morning my crafty friends! I am down to the last three ship cards that I made. I thought I would show this one next as I used the other part of my Tim Holtz kraft card here on it. You know us crafters, nothing wasted, huh? LOL I wasn't sure when the next time I would need some kraft card with a compass on it was, so why not I thought! Again, using the plain side on the back, I stamped my globe stamp and cut it out and mounted it on foam in the upper corner. I stamped the large ship this time, again in black and again highlighted with a white pencil. I just loved the way it popped off the card each time so, again, why not! I added a ships wheel in the corner this time and distressed the edges all the way around with walnut stain. I stamped my sentiment in the upper part of my Spellbinders label and mounted it so only the top half was peeking out from under my focal element. I used a bit of walnut stain on it while still in the die to create a nice framed edge on it too. I had a couple of mismatched brass brads that I added to the upper corner. I stamped the anchor with walnut stain, embossed it with clear and cut it out and punched a hole in the top. I used some red and white Bakers Twine and wrapped it around the card several times before putting on my black back mat. I tied the anchor to the twine to finish the card. All for now, Sue x
Sunday, 19 February 2012
Being Happy
 .Hi everyone! Another new card today for you. Mint, melon and brown for today's card colour combo, mostly because I was itching to use some of the new silky crush ribbon in this colour! This is very nice to work with and it has this great crushed texture to it. I selected a piece of striped card for the background, distressed the edges with walnut stain and pulled colours from it for my rest of the card. Although the card is rather masculine looking (and I bought it to use for guy cards), it looks rather nice when you girlie it up too. I like that kind of versatility. I cut the largest size from the Romantic Rectangle die templates but decided it needed a brown faux nestie mat behind it. I mounted it at an angle (I like symmetry so I find this incredibly hard to do, but have tried doing it more lately so it feels better each time now!) I folded the ribbon in half to create a top for the brown ruffled lace that I used. I cut a damask border to peek from below the ruffled lace. I tied a bow and topped it with one of the lovely lacy flowers and a button knotted with twine. I stamped my sentiment on the largest size of Labels twenty five, inked the edge while still in the die with Spiced marmalade distress ink and mounted it straight atop the rectangle. I added some pearlie swirlies to the side and some assorted buttons to the top corner to complete the card. I hope you like the new dies and this has given you some inspiration. All for now, Sue x
Saturday, 18 February 2012
Ship Ahoy!
 Hi guys! I hope you got a chance to watch Sam's shows yesterday on C & C using these stamps. They were fab! Leah and I sat and watched them together(between episodes of baby tv!) I didn't realise until I watched the shows just how many samples that I had made using Sam's new ship stamps! There are actually three more to come after this one! I sat down one afternoon and cranked out seven ship cards without blinking an eye! They are very easy to be creative with and work so well for those pesky male cards we always worry about having to come up with ideas for, huh? This card took about 15 minutes to make, which is very unusual for me! I started with a piece of the 12" x 12" Tim Holtz kraft card from his Kraft stack.. It already had a lovely large compass sort of pattern on it in a raised clear embossing. It picked up the light nicely so you can see it on the background of the card in the pic. I used Grand Labels four to cut it out. Using the natural jute that Sam had on the show yesterday, I glued it to the edge of the card following the shape of the nestie, but when I got to the bottom corner, I coiled it leaving the end piece to come out and fray at the end. I stamped the ship on a back of a leftover piece of the kraft card with a black archival ink pad. I cut it out with a circle die and edged it with black soot distress ink. The highlights on it were done with a white pencil. I stamped the sentiment on a kraft tag (which actually came off of something I purchased and I just used the back of the tag!) I used a clear perfect medium pad o stamp a few anchors om it for a watermark look. I edged it with black soot also. I hadn't realised that the metal tassel I attached to the top of the card had fallen as I took the pic so it looks a little bit like a blob, but it is actually one of the Tim Holtz metal tassels so it hangs nicely when you hold the card upright. I added one of the game spinners to the background (sort of to look like a compass needle). I cut a piece of black card and distressed the edges quite heavily and matted the entire card on it. You could quite easily adapt this for Father's Day or a male birthday and you have a quick and easy card sorted! All for now, Sue x
Friday, 17 February 2012
Another Lattice Sample

Good morning my crafty family! I was going to save this one until after the show, but I just love it and wanted to look at it today on the blog. I usually have better resolve, but oh well, I hope you like it as much as I do too. I am really happy with the way that my lattice die looks with the other new winter release Spellbinder dies. It plays nice with other, me thinks! I have used one of the new Embossibility embossing folders for the background on this sample. I'm not going to say any more about them now, you will have to tune in to see the show to find out the skinny on them. How cheeky is that! I have used the new Romantic Rectangles behind the lattice die. These are so pretty and I have several demos planned using them as they are very versatile, just wait and see. The huggy pieces around the sentiment are from the Moroccan die templates, which is another really lovely set. I made the flowers using Sam Poole's Button Floral stamps and added some sprigs, green suede leaves and black decorative stick pins. The ribbon is black American seam binding which is new on the show this time as a full roll. I use this all the time, it is really lovely to use with floral treatments on your cards. I used a piece of black guipur lace from my craft stash, isn't that stuff just yummy! I finished the card with a bit of matting and layering and Cosmic Shimmer black PVA glue dots to give it a fun kind of finish (I can't pierce every time now can I!) All for now, Sue x
Thursday, 16 February 2012
A Ship's Journey

More ships for today though! I have used the cracked glass technique on this sample. This is a really fun technique to use with your ultra thick embossing powders and it is especially nice with those vintage and grungey styled cards too. I stamped the ship using a coffee archival ink pad on to a cream card. I heat set it so that the ink was good and dry. I used a clear perfect medium pad and inked the entire piece and poured clear ultra thick embossing powder over it. I heated this from below the card so that it would give a nice smooth finish (heating from the top gives it a bumpy finish most times). I applied three coats of the ultra thick in the same manner to build up a nice thick layer. Next step is to pop it in to the freezer for several minutes. I usually leave it for about 8 to 10 minutes. It will curl up as it gets cold. When you remove it from the freezer, bend it back flat and you will get these really nice cracked pieces. If you are happy with the cracks, you can ink over them to accent them even more. If you haven't inked the cracks and you don't like the way they have come out, just reheat it and it will melt back together! I cut a circle frame out of some dark gray coordinations card and sanded it to distress it. That piece was then mounted on to a slightly larger dark brown circle frame and I added some faux screw brads to them, giving it a porthole look (again, hey it's a ship, I just see portholes!) I tore a piece of Tim Holtz glassine paper and crumpled it. I lightly swiped the top with walnut stain to bring out the wrinkles a bit. I stamped a light gray piece of card with the sentiment on the bottom, the map stamp on the top and attached the glassine and a few strands of jute before attaching my porthole and ship. I stamped the telescope and cut it out and attached it to the corner. I distressed all the edges of the gray card and mounted it askew on to some dark brown distress card to complete the entire piece. See, I don't just do frilly, girly stuff all the time! Hope you like it! Sam has put an amazing tutorial on her blog on how to make the sailors knot (like I showed on my first ship card). You can check it out at www.http://www.creative-studios.co.uk and don't forget to tune in to see Sam's shows on Friday at 10am and 2pm for more inspiration! All for now, Sue x


Wednesday, 15 February 2012
The Cat's Out Of The Bag!
 Hi crafty friends! Another sneak peek for today but this one is very close to my heart and I am really hoping that you like what you see because part of this is something that I designed for Spellbinders! I figured that it is time to spill the beans and let you know that I've been working with Spellbinders on this since last year. They have asked me to be one of their new designers with my first set of dies being released and demoed next week on Create and Craft. I am so nervous, and excited, and nervous (did I say I was nervous!), I can hardly stand it! If it goes well, then there will be others to follow so I am really hoping that you like them! Along with my new set of dies which are called Lattice Motifs and Accents, I have also used on this card the Splendid Circles, the Damask Motifs and Accents and the Layered Flower dies which are part of the new winter release collection. I cut the Lattice Motif using black and peach backed coordinations card. I sanded it to let the peach accents show through. I cut two of the Lattice accent pieces next. These are sort of square pieces with the lattice design showing through and I used them on an angle to mat my splendid circle with my sentiment. I softly inked the sentiment with black soot distress ink to highlight it. I mounted my focal element on some rusty peach gingham card. I cut a larger section from my old dictionary for a background piece. I cut a Damask border to go over it from top to bottom. I also cut three of the Damask Motif pieces to hold on to the edge of it. The chalk white American seam binding was run top to bottom over the dictionary background also and I made a bow using it with some peach coloured grosgrain ribbon also. I made a flower using the new Layered flower die cut from several of the dictionary pages. I crumpled them and put a hole through the centre for a brad. I put all the pieces of the flower on the brad and gave them a final crumpling before edging it with Tattered Rose distress ink to give it a soft matching colour. I finished the piece with some pearly swirlies in the upper corner as an accent. I really hope you like it and check back as I will be showing more of my Lattice Collection soon! I am saving some of my favourite cards done with the Lattice dies for the show! All for now, Sue x
Tuesday, 14 February 2012
Weigh Anchor
 Hi guys, I don't really have a Valentine's card to show today, but I was having a play with Sam Poole's new stamps again and wanted to show those. I can't put these down as they are so much fun for inky techniques and grungey playing. I wanted to make the ship look like it was bursting out of the card here. Originally I was thinking of making it look like a treasure map using the background map stamp but I couldn't find any paper that I liked to work with it. So I changed my plans a bit and added the map stamp randomly to the paper I did end up using just to give it a bit more interest. I cut a square section out of the centre and then tore the edge a bit and rolled it backwards, I used walnut stain distress ink to age it a bit too. I stamped the ship using the walnut stain on some neutral cream card and mounted it behind my torn, inked centre section. I used a bit of antique linen on the piece too before mounting it so it wouldn't be so stark and clean. I used a tiny bit of white pencil to highlight the sails although it doesn't show up in the pic as well as I would have liked. I stamped the sentiment inside of the rope circle stamp and cut it out. I overstamped the sentiment with the anchor stamp twice using a clear perfect medium ink to give it a watermark look. I mounted it using foam in the corner. I added a small wooden ship's wheel from my craft stash to the upper corner of the focal element. You know how you pick up these little trinkets and then you find just the right time to use them, I was chuffed that it fit nicely on this card! Using my scissors I distressed the edges of the plaid paper and inked over it with walnut stain. I added a metal corner to it and then mounted it on cream and dark brown card that had also been distressed with my scissors (and a few small tears and rolled corners were added to age it also) to give the piece an overall aged and vintage look. If you like these stamps, don't forget to tune in and watch Sam's shows on the 17th. You will have to check the schedule on the day for her show times though. I can't wait for the shows (not just because I get to babysit her daughter Leah either!!) as I know Sam will have some fab demos to show us! All for now, Sue x
Monday, 13 February 2012
Fancy Nesty Tutorial
 Hello everyone! Finally a few minutes to put together the other tutorial, the Spellbinder one that I promised some time back! I started with a piece of card that measured 8 inches by 12 inches. Make a score line in the centre so that the finished card will measure 6 " x 8" in size when folded.
 Next, tape your chosen die (I'm using the Parisian Motif here) with the cutting ridge down on the inside of the left side of the scored card. Tape the die with removable tape (I like the Scotch brand) so that it won't tear your card and get it close to the edge of the card
 Next, you will need to make a score line from the die upwards to the edge of the card and from the die downwards to the edge of the card. The score line needs to be in the centre of the die. The Parisian die has a small notch when taped in this direction that allows you to find the centre easily.
 Next, you will turn your card with the taped die upside down on your base plate so that you can no longer see the actual die, but you should still be able to see the score line that you made above and below the die. This is the line to which you will need to line up the cutting plate. Normally when cutting a die you would cover the entire piece with the cutting plate, but we only want half of the die to actually cut so the other half of the die will remain uncovered as we run it through the machine.
 When you finish passing it through the machine it should look like this when you remove the cutting plate.
 Next step is to emboss the entire piece. So you will cover all of it this time with the tan mat and then the pink embossing plate and run it back through the Grand Calibur. This will bring out the detail on the cut half and leave the other half nicely embossed into your card to complete the design of the Parisian (or whatever your chosen die may be) die template.
 Carefully remove your taped die now and you will find a half cut and a half embossed design. Remove the pieces from the cut die that may still need to be poked out. Leave the embossed side as is.
 Next you are going to fold your card in half on the original centre score line. The back of the cut die should be facing up at this point like it is in this picture. On the score lines that are above and below the die, you are going to fold the card flap backwards but allow the cut portion of the die to swing under so that it will be facing the right side up.
  This is perhaps a better pic showing how I am folding it backwards at the score lines but I am using my hand to push the cut portion of the die outward as I fold backwards.
 This is what your card should look like when you fold the scored lines (give them a nice crease with a bone folder) and you have flipped the cut section so that it is not right side up.
 In this pic I am trying to show that there will usually be a piece in your die that is on the centre line. You will have to cut by hand the fall out piece so that half of it is completely gone and on the embossed side it should remain intact so as not to disrupt the overall look of the die on that side. You now have the entire base piece done so that you can decorate the rest of the card as desired.
 Here is the same card using the Holly Motifs and Accents and I have decorated it using borders and corners and smaller dies. You can use this tutorial for any of the fancy Spellbinder dies and it looks wonderful! I hope you will give it a try. All for now, Sue x
Sunday, 12 February 2012
A Sneak Peek, Some Changes, and Blog Candy Winners!
 Good morning blog friends! My feet are firmly back on the English soil this morning. I have tried my best to bring a bit of the California sunshine with me for everyone too! I had a lovely time first in Florida with my Mom, then at CHA and a final week with my daughter in California, but I am glad to be back now. I probably should have waited until closer to the time, but I kept getting emails asking when my next shows were going to be. Well, all of that has been changed now! Instead of the POTW, I am now doing a POTD on February 21st with a two hour launch at 9pm on Ideal World. The good news is that the shows are based on new Spellbinder Winter releases which are even more stunning than ever! Wait til you see these! These are the first shipments in to the country so if you want them quickly, this is the way to get them!

I did promise to take care of the blog candy winners when I returned and I have done the drawing this morning!
The winner of third prize is..........
..........................................
.......................................
.....................................
.............................
.........................
................
Sandra Fiddy!!!!
The winner of the second prize is.........................
.....................................................
...............................................
........................................
...............................
.........................
...............
...........
Lainey!!!
The winner of the GRAND Prize is
...............................
............................
............................
..........................
........................
.......................
........................
.......................
.......................
.................
..........
Sonia St. Helens!!!
All the winners need to email me at americansue1@gmail.com to confirm their postal address
before I can send out their prizes to them please.
Due to the changes in my schedule, though, I need to temporarily suspend the comment game until after the POTD shows are behind me as I expected more time for my prep than I now have. I hope you will still leave all your lovely comments and I will pick up right where I left off so there will be a long list of winners then! I hope you will understand! All for now, Sue x
Saturday, 11 February 2012
A Team Effort

Friday, 10 February 2012
Vintage Styling!

On another more personal note, I was contacted by Bim Habeeb who is a regular blog follower and she is soon to have surgery on her shoulder. Bim is a qualified midwife and has asked me if I would let everyone know about a petition that she supports and needs some help with getting signatures. I feel as if this is a worthy cause so I am placing a link here to the petition, should you like to learn more about it go to http://epetitions.direct.gov.uk/petitions/13716?http://epetitions.direct.gov.uk/petitions/13716
All for now, Sue x
Thursday, 9 February 2012
Medallion Styled Card

The large anemone flower was next up and I cut two of them and removed the centre from each of the petals then offset the two flowers. Finally, I stamped my sentiment and cut it out with the smallest size of teardrop circle and mounted it in the centre. I ruched the brown ribbon from the top of the card to the focal element. I tied a bow and attached it to the top of the ruching. I completed the card with pearl PVA glue dots around the edge to frame it.
I have had quite a few emails about my Create and Craft schedule and I thought that I would let you that I am going to be back doing the POTW shows beginning on Friday February 24th at noon. I don't have the schedule of each show yet but you should be able to check their website for that closer to the shows. I will tell you now that I will be showing the brand new Spellbinder winter release dies on the POTW. Let me just say they are stunning! I am hoping that it won't be too much longer before I can show you some sneak peeks of the new cards I've been working on. Just a little tease, there are new products, new stamps and new dies! I am so excited! All for now, Sue x
Wednesday, 8 February 2012
Seafarers Delight
 Hi blog friends! I am really excited to show Sam Poole's new stamps. These fab new stamp designs, great for those masculine cards, will be officially released for sale later this month. I really enjoyed working with these as they lend themselves to so many techniques. I used the Eco-Green Paints to create the crackle technique I used on the background. A layer of black paint first. Next a layer of watered down PVA (Eco Glue or Cosmic Shimmer brand work well for this). While the glue is still tacky, I painted the mushroom coloured Eco paint over the top. I heated it to speed up the drying time and bring out the crackle effects. The crackle is a result of the drying time between the glue and the top coat of paint. Once the piece was thoroughly dry, I stamped the map background stamp randomly over it with frayed burlap distress ink. I stamped my sentiment in black archival ink in the upper corner. I made a sailor knot using some natural cotton fibre from my craft stash. I inked it with tea dye a bit to distress it. I stamped the clipper ship with black archival on kraft card. I used a white pencil to highlight the ship, the sails and the water. I cut out a gray circle frame and embossed it with the metal look mask and then sanded over the top to distress it. I cut a slightly larger circle frame in black to mat it with and added silver PVA glue accents to the edge. I wanted it to take on the look of a porthole, giving the card more of a nautical theme. If you like these new stamps that Sam has done, she will be using them on Feb. 17th on her show on Create & Craft. I know she has some fun demos planned, don't forget to tune in to see. All for now, Sue x

Tuesday, 7 February 2012
More CHA Pics

This dress took the designer 6 months to make I was told! All the flowers were individually made by hand. Now that is truly patience!
 Here are some of Wendy Vecchi's samples. Aren't they spectacular! Creative Expressions carries her line now and we are adding the new designs and stamps as well as her new resin pieces from Blossom Bucket.

 A beautiful sample showcasing some incredible work.
 Some lovely jewelry.
 I loved the unusual dress and body painting on this model.
Here are two of my favourite people, Suze Weinberg and Stacey Caron. I have known Suze for about fifteen years and Stacey is the owner of Spellbinders.


 A pic of the Spellbinders booth at the beginning of the show.
 All for now, Sue x
Subscribe to:
Comments (Atom)