Wednesday, 7 October 2020

For You

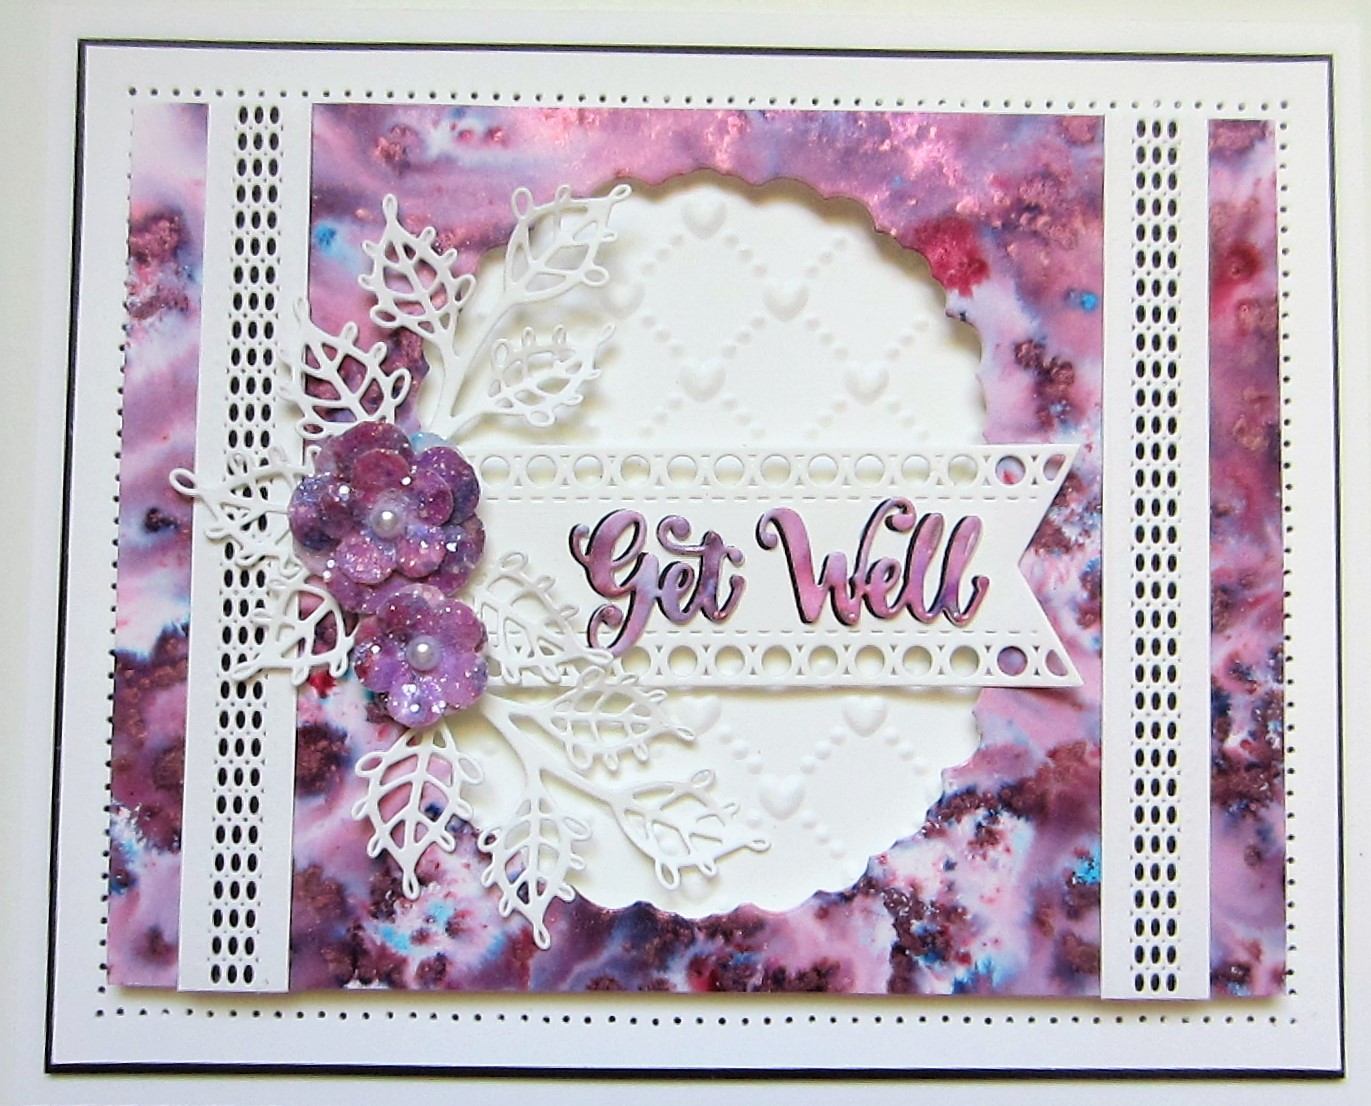
 Hello all!  I am loving the new Aurora Flakes, they are so pretty (but very hard to photograph  nicely unfortunately)  I started by covering a piece of white card with a sticky adhesive sheet.  I peeled the backing paper off and sprinkled the Blue Ice Aurora Flakes over it.  I used a piece of Rubitscrubit pad to move the flake around until it covered the sticky sheet, then used it to refine and remove any excess flake.  I used the Delilah Background and cut into the flaked piece.  I cut one more Delilah in black and used it as a shadow behind the other one, then backed the entire piece in white.  Using the Delilah Edgers, I cut two of the side pieces and added in the decorative design to them.  I glued them on top of the background but left a spot open where I tucked in a piece of vellum.  Using a small piece of leftover flaked card, I cut the For You sentiment and glued it to the vellum.  I cut a slightly larger piece of white card and ran double sided sticky tape around the edge.  I used Iced Snow on it, then added the main background piece with foam.  The card was completed with white and black mats nad layers.  The finished dimensions are 7"  x  8"  in size.  All for now, Sue x


                                                        Follow my blog with Bloglovin

Tuesday, 6 October 2020

Strength Circle Saying

 Hi crafters!  I thought I would share another card sample from the recent launch.  I started this card by coating a piece of white card with the Opal Polishes.  I used Summer Sky, Blue Wisteria and Lilac Rose OPal Polishes randomly all over the card.  I allowed them to dry thoroughly, the used the outer cutting die from the Strength Circle Saying to cut an aperture in the centre.  I embossed the piece with the Sublime Swirls Embossing folder for texture.  I added mounting foam to the back and attached it to a piece of white card.  Next I cut the Martha Background twice out of white card.  I used the Martha Edgers to cut away the sides of the background.  I glued them to the Opal Polish background and added pearls to the corners and tips as accents.  I cut a slightly larger piece of white card as the backing and added four white Joanie dies for detail.  I attached the Opal Polish background to the centre.  I cut the Strength Circle in both black and white card.  I used the black as a shadow behind the white one, then recessed it into the aperture opening.  I cut a Jasmine Flower from some of the leftover Opal Polished card and added it to the left side of the card.  The card was completed with white mats and layers.  The finished dimensions are 8 1/4"  x  8 1/4"  in size.  

We still have at least six of the winning dies unclaimed.  Please scroll down to the post with the list of winners and check to see if your name is on the list!  I would really like to get them all sent out!   All for now. Sue x


                                                          Follow my blog with Bloglovin

Monday, 5 October 2020

Greetings Of The Season

Hi bloggers!  It's time for another traditional style of Christmas card.  I started this one by embossing a piece of white card with the Hollies And Berries Embossing folder.  I used the Double Stitched Ovals and cut a wide frame out of white card.  I added mounting foam to the back and attached it to the centre of the embossed background.  I coated a piece of red card with the Fire Red Glitter Kiss and allowed it to dry thoroughly.  I used the Classic Poinsettia dies to cut enough to make three different sized flowers.  I assembled the flowers and added them in opposite corners of the oval frame.  I used the Evergreen Branch die and cut them out of Khaki card and used thm around the flowers as accents.  I cut the Greetings of the Season sentiment out of the Glitter Kiss card and attached it to the matching shaodow die cut in white.  I glued the sentiment into the centre of the oval frame.  The card was completed with white mats and layers.  The finished dimensions are 7"  x  8 1/2"  in size.    

The winners of the blog launch were announced yesterday and we still have quite a few dies that have not been claimed.  Just scroll down to see the post under this one for the full list of winners!  All for now,  Sue x


                                                                 Follow my blog with Bloglovin

Sunday, 4 October 2020

Sept. 2020 Blog Launch Die Winners Oct 4th

 Hello crafters!  Thank you so much for another fun and fabulous die release blog launch.  I always love reading what you think of everything, which ones are your favourites or what ideas you have to use with the dies!  It is so inspiring.   So without any further commentary, here are the winners from each of the die drawings:


The More Candles, The Bigger The Wish:   dj from Kettering!!!

Everyday Is A New Adventure:   Snuffy Snoo!!!

Wishing You Brighter Days:   Evis M!!!

Never More Than A Thought Away:   Jackie Trinder!!!

Cherry Blossom Frame:   Veronique L!!!

Robin Family:   Clai01!!!

So Sweet Of You:   brandco2450 (Sharon in Toronto)!!!

You Brighten My Day:   Christine Bentley!!!

Theresa Background:   rj'smusic!!!

Theresa Edger:   Julie's crafty Creations!!!

Whitney Background:    Vi Wilkerson!!!

Whitney's Edgers:   Wakey L!!!

Carousel Animals:   Nana on the Hill!!!

Carousel:   lindyloo12!!!

Cecelia:  Barbara Gosden!!!    (oops! I missed this one!)

Carousel Alphabet:   Carol Eaton!!!

I See Your Birthday Has Come Around Again!:   Aquarius!!!

Strength Circle:   Sandy (tort)!!!

Family Circle:   Elizabeth Bennett!!!

Grateful Circle:   Crafty Vonnie!!!

Cut Corner Rectangles:   Crafty Jo!!!

Hello Dear Friend:   Billie Sue Woolley!!!

Leafy Oval:   Suemac!!!

I'm Here For You:   Deb E Isle of Wight!!!

Birthdays Are The Best Days:   AON!!!

Whirligig Flowers:   Bente S!!!


Congratulations all!  Please email me at americansue1@gmail.com to claim your winning die and confirm your postal address.  Please put the name of the die you have won in the subject line and your complete name and address in the email.  If your name does not relate to the name on your comment on the blog, please reference that name too so I know that I have the right person.  Thank you for all your support, I really appreciate it!  All for now. Sue x


Get Well

 Good Sunday morning all!  Back into my background stash for this Pixie Powdered pretty!  I used Aubergine Dream and Plum Twist Pixie Powders for this one.  I used the Mille die and cut an aperture in the middle.  I added mounting foam to raise it.  Next, I embossed a piece of white card with the Quilted Hearts Embossing Folder and attached the background over it.  I cut two of the dies from the Chantilly Lace  Edger die set in white and glued them to the sides of the card.  I had a bit of leftover pixied background and I cut the Get Well sentiment and the flowers from the Magnolia Corner from it.  I added a black shadow behind the sentiment, then seated it on a white Decorative Flag die.  I added dries clear glue to the flowers then sprinkled them with Frosted Sparkle Glitterbitz and allowed them to dry, then assembled them.  I seated the two flowers at the side of the flag die and accented them with Lace Edged Leaves.  The card was completed with white and black mats and layers.  The finished dimensions are 6 1/2"  X  7 3/4"  in size.  

Don't forget that I will be posting the die winners from the blog launch later on today.  Please check back to see if your name is on the winner's list!  All for now, Sue x


                                                        Follow my blog with Bloglovin

Saturday, 3 October 2020

You're Invited


 Hello crafters!  It's baby time again!!  I started with the Double Stitched Rectangles and cut two wide frames.  I added mounting foam of varying heights to the frames and attached them to another piece of white card.  I recessed the centre piece from the frames down into the centre after attaching the frames/  I cut the animals from the Zoo Animals die set and the Farm Animal die set out of various shades of pastel card.  I attached them randomly around the frames.  I used the kangaroo and joey in the centre and added a yellow sun from the Rain Or Shine die set.  I used the Newborn Sentiment die set for most of the text and added the You're Invited sentiment at the top.  The card was completed with white mats and layers.  The finished dimensions are 7"  x  8" in size.  All for now, Sue x


                                                          Follow my blog with Bloglovin

Friday, 2 October 2020

Nothing Warms The Heart Like Good Friends

Hello crafters!  It's a traditional red and white Christmas card for you today!  I started by cutting the Poinsettia Adjustable Frame die four times out of white card, using the largest size.  I cut four matching backing pieces out of Ruby Red card and glued them together.    I cut a piece of white card and embossed it with the Stylized Poinsettia embossing folder.  I added mounting foam to the pieces of the frame, then attached them to the embossed card.   I cut a slightly larger piece of card and ran a bead of dries clear glue around the edge.  I sprinkled it with Frosted Sparkle Glitterbitz then allowed it to dry.  I added the frame to the glittered card.   I cut the Nothing Warms The Heart Like Good Friends sentiment out of red card and glued it to the inside of the frame.  I used the bow from the Decorative Holly Accents die set and made a red bow with tails and glued it to the bottom centre of the card.  The card was completed with white and red mats and layers.  The finished dimensions are 7 1/2"  x  71/2" in size.  All for now. Sue x


                                                                   Follow my blog with Bloglovin

Thursday, 1 October 2020

Golden Girl


Hello bloggers!  Back to a single post in a day, I'm afraid!  I wanted to share this card using the Golden Girl die as I think it looks lovely in the new Cut Corner Rectangles.  I started by cutting the Golden Girl out of both white and black card.  I used the black behind the white as a shadow.  Next I used a piece of Silver Sparkle Yupo paper to create the background.  I used Valencia and Red Pepper Alcohol inks on to the Yupo.  I added a bit of blending solution to blend the colours and then let it dry.  I cut a small piece off of the background before gluing it behind the Golden Girl.  I used the small leftover piece and I cut it into five squares and placed them over the leaves in the design.  I nipped away the leaves from the background card and added them with foam over the leaves in the background cut in white.  I made a large frame using the Cut Corner Rectangles and added it with foam.  I completed the card with white and black mats and layers.  The finished dimensions are 6 1/2"  x  8"  in size.  All for now. Sue x


                                                       Follow my blog with Bloglovin