Tuesday, 14 January 2025

Welcome Friend

Hello crafters!  I cut a piece of black card and covered it with a sticky adhesive sheet.  I peeled the backing paper off and coated it with Pink Sunset Gilding Flakes.  Next I cut the Floral Symphony Cover Plate with a piece of black card on top of a piece of white card.  I paper pieced the flowers in shades of pink and orange.  I offset the black die on top of the paper pieced  copy, then added the die to the gilded piece of card.  I cut the Welcome Friend sentiment in white, shadowed it in black and glued it to the bottom of the card.  The card was completed with white and black mats and layers.  The finished dimensions are 7"  x  7" in size.  


All for now, Sue x


                                                      Follow my blog with Bloglovin

Monday, 13 January 2025

Have A Great Day

Hello bloggers!  I have a slimline card to share with you today!  I started by  creating the frame first.  I used the Slimline Stitched Rectangle Frame set.  I cut a white frame with them, then added a black frame on top using the Slimline Essential Frames.  I added mounting foam to the back of the frame then cut a piece of white card to attach it to.  Before attaching the frame, I sponged some blue at the top of the piece, then cut three hills using the Stitched Hills and Clouds and added them to the bottom of the card.  I cut the Fish Shop in grey and added blue awning, door and sign.  I added it to the bottom of the card with mounting foam.  I added a lamppost next to it.  I cut both the Bookshop and the Flower shop in grey.  I used iris card for the windows, door and awning on the Book shop.  I used pink card for the accents on the flower shop.  I added the buildings with mounting foam, then added some trees and clouds around them as accents.  I added the Have A Great Day sentiment which was cut from the Wordie Sheets.  The card was completed with white mats and layers.  The finished dimensions are 43/4"  x 9"  in size.  


All for now, Sue x


                                                         Follow my blog with Bloglovin

Sunday, 12 January 2025

May All Your Wishes Come True

Good Sunday morning all!  I cut a piece of white card and used the swirl stamp inked with a clear perfect Medium pad.  I stamped it all the way around the edges of the card then coated it with white detail embossing powder.  I heated it to melt the powder.  Next I used the Scalloped End Rectangle dies and cut a multi-layered frame.  I cut a wider white base and added a smaller aqua frame on top of it.  I added mounting foam to the back of the frame then I embossed a piece of white card with the Diamond Illusion embossing folder and attached the frame to it, then added it to the middle of the card.  I cut the BookShop in aqua card and added windows, a door and the awning cut out of ocean card.  I added it to the inside of the frame and cut several trees and a lamppost to go next to the shop.  I stamped a little sun and cut it out by hand and added it in the corner of the frame.  I cut the May All Your Wishes Come True in black and glued it to the top of the card.  The card was completed with white mats and layers.  The finished dimensions are 7 1/2"  x  8 1/2"  in size.  

https://www.creative-expressions.uk.com/product/creative-expressions-sue-wilson-miniature-village-bookshop-craft-die/

All for now, Sue x


                                                        Follow my blog with Bloglovin

Saturday, 11 January 2025

Happy Retirement

Hello bloggers!  I started with a piece of watercolour card.  I used a paint brush and some green ink and watercoloured it across the bottom of the card.  I used Spun Sugar and Tumbled Glass lightly in the sky area.  Next I cut the Primrose Cottage in shades of purple and added it to the top of the hill.  I cut two of the Bluebell Cottages, one in grey and maroon and the other in peach and tan card.  I added the other two cottages lower down on the hill.  I used several shades of green card and cut a bunch of trees and scattered them around the cottages.  I added a lamppost too.  I cut the Happy Retirement sentiment in black and glued it to the top corner of the card.  The card was completed with white mats and layers.  The finished dimensions are 6 3/4"  x  8 1/2"  in size.  


All for now, Sue x


                                                        Follow my blog with Bloglovin

Friday, 10 January 2025

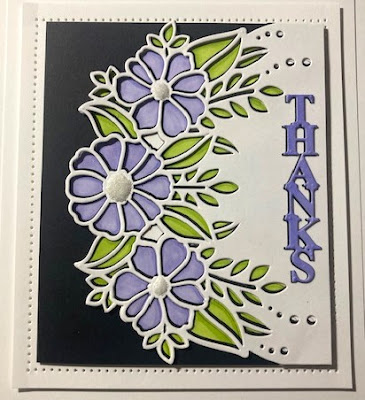
Thanks

Hi there my crafty friends!  I cut the Floral Harmony Cover Plate with two pieces of white card.  I used the bottom white piece to colour the image with alcohol ink markers.  I cut the die again out of black card and added it behind the top white die cut as an offset shadow.  Next I glued it to the coloured design.  I added a piece of black card behind the die cut.  I cut the Thanks sentiment out of iris card and added a black offset shadow die to it, then glued it along the white edge of the die cut.  I added dries clear glue to the flower centres, then sprinkle clear Micro beads on them and allowed them to dry thoroughly.  The card was completed with white mats and layers.  The finished dimensions are 6"  x  6 3/4"  in size.


  All for now, Sue x


                                                       Follow my blog with Bloglovin

Thursday, 9 January 2025

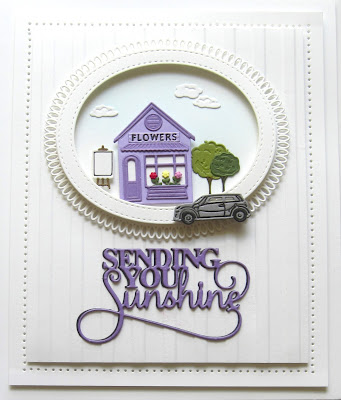
Sending You Sunshine

Hi bloggers!  I used the Stripes embossing folder to emboss a piece of white card.  Next I cut a small Looped Oval in white and added it to the top of the card.  I used the Double Stitched Ovals to make a thin white frame and added it with mounting foam to the looped oval.  I cut the Flower Shop out of lavender card and added an amethyst roof, windows and door.  I added two trees, some clouds and a sandwich board to the inside of the frame.  I added some pretty flowers to the window box.  I cut the delivery van in grey and added it to the corner of the frame.  I cut the Sending You Sunshine sentiment out of lavender card and shadowed it in black.  I glued it beneath the frame.  The card was completed with white mats and layers.  The finished dimensions are 6"  x  7 1/4"  in size.  


Try a new craft today!

Visit Creative Expressions website and shop thousands of January sale products with up to 75% off!

Don't forget to use your Make-it! Rewards points for an additional 10% discount!

See their T&C's page on their website for further details.


 https://www.creative-expressions.uk.com/product-category/january-sale/


All for now, Sue x


                                                        Follow my blog with Bloglovin

Wednesday, 8 January 2025

Happiness Is Time Spent With A Friend

Hello bloggers!  I cut the Wild Daisy Cover Plate with a piece of black card on top of a piece of white card.  I glued the black die cut on top of the white embossed copy.  I cut the die a second time out of custard card and used the fall away pieces to paper piece them back into the black die cut.  I used some Fossilized Amber distress ink on the petals before paper piecing them.  I cut the die again out of green card and used the pieces for the greenery on the card.  I matted it in yellow then white card.  I cut the 3D Card Maker in white and glued it to the inside of the card.  I used the Dynamic Daisies and added them all over the pop up areas.  I cut two full daisies and added one to the bottom of the card and the other to the top of the card.  I cut a single butterfly from the Bountiful Butterflies and glued it to the top of the card.  I cut the Happiness Is Time Spent With A Friend sentiment in black and glued it to the bottom of the card.  The finished dimensions of the card are 4 1/2"  x  5 1/2" in size.


Visit Creative Expressions website and shop thousands of January sale products with up to 75% off!

Don't forget to use your Make-it! Rewards points for an additional 10% discount!

See their T&C's page on their website for further details.

  https://www.creative-expressions.uk.com/product-category/january-sale/


All for now, Sue x


                                                            Follow my blog with Bloglovin

Tuesday, 7 January 2025

A Joyful Christmas

Hello bloggers!  I do have to apologize as I missed this one before Christmas because it wasn't in my Festive file!  I didn't want not to post it as I think it is quite pretty but I think this is the final Christmas themed card of the year (at least I hope so!)  I selected a piece of cobalt blue card for the background.  I used the Stitched Hills and Clouds die and cut two rolling hills in white.  I used a fine tipped white marker to add the snow to the sky.  I cut the Corner Cottage out of tan card and added a darker brown roof, windows and door.  I cut a white circle and added to the upper corner and the Santa and sleigh were cut in black and added across the moon.  I added the cottage with a white fence, a lamppost  and an assortment of trees around it.  I cut the A Joyous Christmas in black and glued it to the bottom of the card.  The card was completed with white mats and layers.  The finished dimensions are 7"  x  7 3/4"  in size. 


All for now, Sue x


                                                     Follow my blog with Bloglovin