Tuesday, 30 June 2020

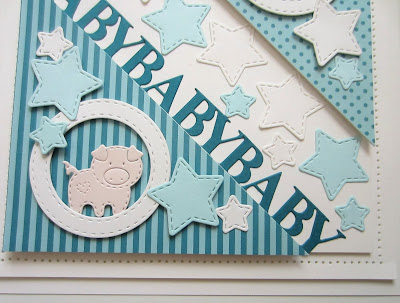
Baby Baby Baby

Hello crafters!  I think it's time for another sweet baby card!  I had a nice dig through some old decorative paper and found the teal striped paper and the matching teal polka dot paper and decided to use them as the background for this card.  I cut both of them into triangular shapes and added foam to raise them.  I added them to opposite corners of a piece of white card, leaving a wide gap between them.  In the upper area, I cut a Double Stitched Circle in white and added it with foam.  I tucked the donkey from the Farm Animals set inside cut out of blush card.  I used the Stars from the Twinkle Twinkle Clouds And Stars set in different sizes cut out of white, blush  and aqua card.  I cut another circle for the lower section and added the pig from the Farm Animals set in Blush card.  I added more stars around the lower section.  I cut the word "Baby" from the Newborn Sentiments set three times out of teal card and glued them along the recess.  I cut more stars and scattered them on top in the recess area.  The card was completed with white on white mats and layers.  The finished dimensions are 7 1/4"  x  7 3/4" in size.  All for now. Sue x


                                                      Follow my blog with Bloglovin

Monday, 29 June 2020

For Someone Special

Hi bloggers!  I started this card by embossing the background with the Diagonal Floral Vines Embossing folder.  Using a piece of dark card, I covered it with Rose Copper and Lavender Glitter Kiss randomly.  I allowed it to dry well while I went on to cut other parts of the card.  Once dry, I used the outer die from the Mallory set to cut into the Glitter Kiss piece.  Next I cut two of the Mallory die in white.  I glued one on to the Glitter Kiss backing and attached the other one vertically behind it.  I added it to the centre of the card with mounting foam.  I used the Jasmine stamps to stamp a bunch of them and then the matching Jasmine Flower dies to cut them out.  I assembled the flowers and added them around the focal element in opposite corners.  I cut the Magnolia Corner in white and cut it apart and used it as accents around the flowers.  I cut the For Someone Special sentiment in white and black and shadowed it then glued it to the inside of the Mallory die.  The card was completed with white mats and layers.  The finished dimensions are
6 3/4"  x  8 1/4" in size. 

I have a little surprise for you today!  Through the use of modern technology, I will be popping in on Jamie Rodger's shows on Create and Craft today (via Zoom from my kitchen  LOL)!   Just a quick hello on his 5:15pm show, but I will be doing  a full demo on his 9pm show.  I hope you can tune in to see it (although I am a bit rusty, it has been about 9 months since I have demoed!)  I am looking forward to it though!   Hope you can join us!  All for now, Sue x


                                                       Follow my blog with Bloglovin

Sunday, 28 June 2020

Hello Sunshine

Good Sunday morning all!  It's a fun sort of card for today's offering!  I started with a piece of white card and added a wide strip of some pink and white striped paper (from my stash) down the middle of it.  I cut the sun from the Rain Or Shine set in bright yellow card and glued it in the upper corner.  I cut the Hello Sunshine sentiment from the same yellow card.  Next, I created a Decorative Flag with both ends having the V cut.  I did this by cutting the V cut end of the die first, and not going over the entire die in the machine, then flipping it around and lining up the cut out squares on the edges in the die, then cutting the other end.  I glued the sentiment to the flag then added it with a bow in the centre of it (added mounting foam to keep it raised there, then glued the two ends to the card).  From the Tickled Pink die set, I cut three flamingos out of bright pink card and added their wings.  I used a black sharpie and coloured their beaks then added them to the card with mounting foam.  The card was completed with white mats and layers.  The finoished dimensions are 7"  x  8" in size.  All for now, Sue x


                                                        Follow my blog with Bloglovin

Saturday, 27 June 2020

Guess Who Thinks You're Special

 Hello there my crafty friends!  I was having a play with the new Opal Pearl Polishes for this card.  I used a piece of white card and used Red Pearl, Blue Pearl and Green Pearl Opal Polishes all over it randomly.  On white card they only show up as a pearl, but on dark card you get the red, green or blue pearl colours to come through.  If you look at the close ups, you can see hints of soft pastels coming through sort of like a mother of pearl look to it.  I used the Sunburst Frame 3D embossing folder and hand cut out the centre oval section.  I glued a piece of acetate to the underside of the opening then added it to a piece of milk card as a background in the centre.  I cut the outer dies from the Joanie die in Antique Gold card and glued the frame across the acetate, touching the top and bottom of the background.  I cut the Guess Who Thinks You're Special sentiment die in antique gold and milk card and used the gold as an offset shadow, then glued it in the centre of the frame.  I used the extra flower die from the Magnolia Corner die set and added three flowers to the opposite corners of the oval as accents.  The card was completed with antique gold and milk card mats and layers.  The finished dimensions are 7"  x  8 3/4" in size.  All for now, Sue x


                                                      Follow my blog with Bloglovin

Friday, 26 June 2020

Get Well

Hi bloggers!  I started today's card by using Sun Yellow, Scarlett Red and Mango Blaze Pixie Powders all over a piece of white card.  Next I used the centre die from the Millie  die set to cut the design randomly all over into the card.  I added a piece of sticky adhesive sheet to a piece of white card and then attached the background to it.  I used Frosted Sparkle Glitterbitz on the remaining exposed adhesive areas.  I cut the Decorative Flag die and used it for my sentiment.  I cut the Get Well sentiment out of an extra piece of the pixied background and added a black shadow to it then glued it onto the flag die.  I used the Petal Pocket flowers and made one of each size in white.  I added centres to all of them cut from the pixied card with pearls in the very middle.  The Lace Edged Leaves were used in white as accents around the flowers.  I completed the card with white and black mats and layers.  The finished dimensions are 7"  x  8 1/4" in size.  All for now. Sue x


                                                       Follow my blog with Bloglovin

Thursday, 25 June 2020

For You

Hello crafters!  I thought you might enjoy another look at the new Aurora Flakes.  I started today's card by cutting the Double Stitched Squares twice to give me a staggered base.  Next I added some sticky adhesive sheet to white card and cut a smaller frame using the same dies.  I peeled the backing off and used the Blue Ice Aurora Flakes on both the frame and the inner section.  I added mounting foam to the frame then added it to the centre of the backing squares.  I recessed the centre down into the frame.  I cut the centre of the Eliza die in white and the For You sentiment and glued both of them into the recessed centre.  Using the Petal Pocket  flowers set, I made a flower and cut the centre out of a small piece of card leftover from the frame on which I used the Aurora Flakes.   I glued it to the centre of the flower and added a pearl.  I seated the flower in the lower corner and added Lace Edged Leaves in white as accents.  The card was completed with white mats and layers.  The finished diemnsions are 7"  x  7" in size.  All for now, Sue x


Follow my blog with Bloglovin