Friday, 31 January 2020

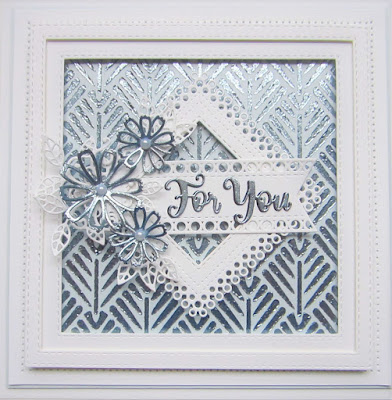
For You

Hello crafters!  I thought it has been awhile since I played with Luna Paste so I pulled out a mask and went to town!  I started by taping the Feathered Mask to a piece of aqua card.  I pulled Moonlit Sea Luna Paste through the mask using a plastic palette knife.side to dry well.  Once dry, I added a multi layered frame cut out of the Double Stitched Squares in white card, over the mask background.  Next I cut the middle die of the Decorative Squares and added mounting foam to raise it.   I set it in the middle of the frame on the diagonal. I cut a Decorative Flag  and added it across the centre.  I added some of the Luna Paste to a separate piece of card and allowed it to dry with the mask.  Once dry, I cut the For You Shadowed sentiment out of it and several of the Cosmos Flowers outlines.  I added a black shadow to the sentiment and glued it to the flag.  I seated the three Cosmos flowers on the left edge and added leaves in white cut from the Magnolia Corner as accents.  The card was completed with white and aqua mats and layers.  The finished dimensions are 7 3/4"  x  7 3/4" in size.  All for now. Sue x


                                                    Follow my blog with Bloglovin

Thursday, 30 January 2020

Sending Love & Hugs

Hi bloggers!  Today's offering a a rather quick card to make if you need a eye catching make on a time budget!  I started with a piece of card and used Opal Polishes across it.  Using  the Pink Thistle, Blue Parakeet and Lavender Blue Opal Polishes, I randomly added streaks across the card with all the colours until it was full, then allowed it to dry (just a few minutes as they  dry quickly).  I cut the Stella die out of it twice and the Sending Love & Hugs sentiment.  I glued the two Stella dies to the white card background so they extended off the card slightly.  I trimmed them even with the edge of the card.  I cut the sentiment apart and used the "Sending" at the top pf the card and the rest of the sentiment in the opposite lower corner.  I completed the card with white mats and layers.  The finished dimensions are 6 3/4"  x  8 1/2" in size.  All for now. Sue x


                                                       Follow my blog with Bloglovin

Wednesday, 29 January 2020

Many Thanks

Hi crafters!  I started with a piece of pixie powdered background from my craft stash (I love to make up a bunch of them to have ready in a pinch!)  This one was created using Midnight Blue, Aqua Lagoon and Emerald Green Pixie powders.  I cut five of the Stella's Border  out of coconut white card and glued them vertically across the card.  I used the cutting edge die from the Stella die set to cut an aperture in the middle of the background.   I added mounting foam to the background to raise it and added it over a piece of white card.  I used the outer most decorative die with the plain cutting edge to add a thin decorative border around the aperture in white.  I cut the Stella die in white and recessed it down into the aperture opening.  I sat the Many Thanks sentiment on a white circle and a smaller pixie powder circle and added it to the middle of the card with foam.  Using some extra bit of the pixied card, I made a flower using the Ruffled Edge Flower die set and added it with white leaves as accents.  The card was completed with white on white mats and layers.  The finished dimensions are 6 3/4"  x  6 3/4" in size.  All for now. Sue x


                                                     Follow my blog with Bloglovin

Tuesday, 28 January 2020

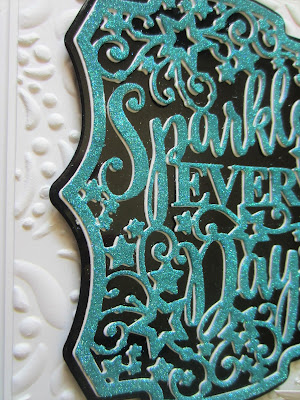
Sparkle Every Day

Hi bloggers!  I wanted to share another of the All In One Collection with you.  I started by cutting the Sparkle Every Day twice, once out of white card and once out of card covered with a sticky adhesive sheet.  I peeled back the adhesive sheet and coated the die cut with Peacock Satin Holographic Sparkle Shaker.  I used the white die cut as an offset shadow, then backed it with a Black Gloss card base.  I used the Dotty Flourish 3D embossing folder and embossed a piece of white card as the background.  I added the die cut with foam to the left side.  I cut some Cosmos Flowers out of the white card covered with the adhesive sheet and coated them with the same glitter.  I added the outlines to the flowers in white and assembled the flowers.  I added them on the right side of thee card with white leaves as accents.  The card was completed with white and black mats and layers.  The finished dimensions are 7"  x  9" in size.

     Just a little reminder, too, I posted the names of the die winners from the blog launch late yesterday.  Please scroll down to the post below this one to see if your name is among them!
There are still quite a few dies that have not been claimed yet!   All for now. Sue x


                                                      Follow my blog with Bloglovin

Monday, 27 January 2020

January 2020 Die Release Winners

Hi bloggers!  It is the time you have all been waiting for, the winners list for the blog launch of the January die release.  Thank you so much for all the lovely comments.  I wish everyone could win, but here is the list of names that have won from all the drawings.  They are:

Birthday Cake:  Theresa W in Berks!!!
Sparkle Every Day:  Yvonne May!!!
Heart Smile:  Judy Hollers!!!
Friendship:  Jean Phillips in Corsham!!!
Spread Your Wings:  Scottydog!!!
Decorative Squares:  Tres in Orpington!!!
Decorative Flags:  Princess Pixie!!!
Guess Who Thinks You're Special:  Jackie Trinder!!!
Dream Circle:  Dawn Holben!!!
Birthday Circle:  Sheila Barns!!!
Hope Circle:  Kim S!!!
Friend Circle:  Handmade by Donna (Donna O from Lancashire)!!!
Papillon Silhouette:  CCM (Carmen-Dorothy from Toronto)!!!
Rose Lady:  Karen Ladd!!!
Joanie:  Ang (Angela Jervis)!!!
Joanie's Border:  Krafty Kaz Kardz!!!
Tickled Pink:  Robin Sachs!!!
Be Unique:  Crafty Chris In Bournemouth!!!
Hello Sunshine:  Sandra Smith (Queen Creek)!!!
Magical Day:  Andrea H!!!
Tropical Background:  Karen Drew!!!
Tropical Flora:  Muriel Kelly!!!
Magnolia Corner:  Rose in Chester!!!
Pom Pom Flowers:  June Smith!!!


Congratulations all!  Please email me at americansue1@gmail.com to confirm your postal address and claim your prize.  In order to make it easier, please put the name of the winning die in the subject line of the email and your full name and address in the body of the email.  Thank you so much for all your support.  All for now. Sue x


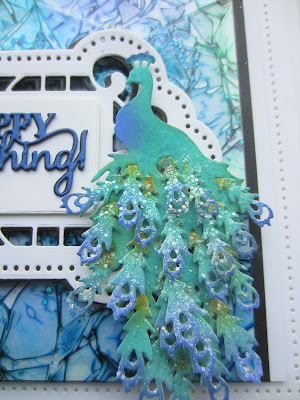
Happy Eveything!

Hello crafters!  Today's card is a bit of an experiment that I tried and really liked the results, however, it isn't something that you can make in a day!  I will explain.  I started with a piece of acetate and added drops of green, blue and violet crystal tints and a sprinkle of Midnight Marine Holographic Glitter to it.  I covered it with Cling Film and squished it all up so you can see all the interesting wrinkles.  I set it aside to dry and this is the part that takes awhile.  Since there is no card to absorb the product, it takes several weeks to completely dry.  Once dry the cling film is virtually cemented to the acetate though.  I did glue the entire piece to a piece of white card to bring out the colours in it.  It is definitely something you need to do and put in a drawer to dry way ahead of time, but the results are very pretty.  I added a thin black mat and another white mat to it.  For the focal element, I cut the Mallory die in white and added another one in black as a shadow.  I cut the Happy Everything sentiment in Cobalt blue and added a black shadow to it as well, then glued it in the centre of the card on a rectangle mat.  I cut the peacock from the Proud Peacock set and inked it with Blueprint Sketch and Peacock Feathers distress oxides.  I cut about twenty extra feathers and inked them with those colours and a bit of Forest Moss on the tips then glued them into the open spaces on the peacock.  I dabbed a bit of glue on them and sprinkled them with Frosted Sparkle Glitterbitz for a bit of bling.I added the peacock to the side of the Mallory die. The card was completed with white mats and layers.  The finished dimensions are 6 1/2"  x   8 1/4"  in size.   All for now. Sue x


Sunday, 26 January 2020

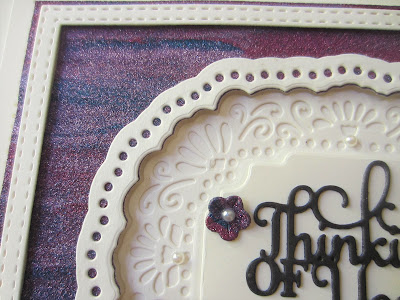
Thinking Of You

Good Sunday morning all!  Today's card started with a piece of card that I covered with various shades of Glitter Kiss.  I randomly applied Blue Teal, Lavender Kiss and Antique Rose Glitter Kiss and allowed it to dry well.  I used the cutting die from the Vivian die set to cut an aperture in the centre.  I added mounting foam to the back to raise it and added it to a piece of coconut white card.  I used the outer decorative edge from the Vivian die and made a thin white frame and glued it around the aperture opening.  I cut the inside die from the Vivian and recessed it down into the opening.  I cut the very centre as a base for the sentiment and added it with foam.  The Thinking Of You sentiment was cut in black and I cut a couple of small flowers out of leftover glitter kiss card and glued them around the phrase.  Using the Double Stitched Rectangles, I made a thin white frame and added it to the outer area of the background.  The card was completed with white on white mats and layers.    The finished dimensions are 6 1/2"  x   8"  in size.    All for now, Sue x


                                                      Follow my blog with Bloglovin