Sunday, 31 July 2016

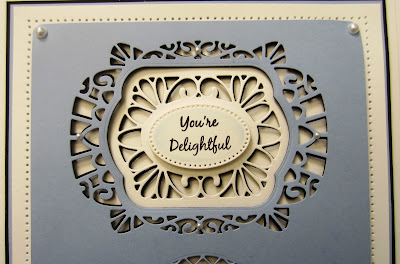
You're Wonderful

Good Sunday morning all!  I started by embossing a piece of coconut white card using the Regal Checkerboard embossing folder for texture to my background.  Next, I cut the Swiss Borders out of Iris card and Black card using just the solid outline die.  I cut them again out of vellum using both the decorative die and the cutting edge.  I glued them into place on the edges with the vellum over the iris then the back die peering out a bit as a shadow.  For the focal element, I cut the Zurich die in white and backed it in iris card.  I cut a black backing, then cut it down the centre and added it as a shadow to.  I stamped my sentiment and created a frame for it using the Swiss tag die.  I mounted it in the centre  of the card.  I completed the card with my pierced white mat, an iris and black mat and another white mat layer.  The finished dimensions are 6 1/2" x  8 1/2" in size.

The winners of this week's Comment Game are:

Lynda Mellor!!!
Patricia Youdell!!!
Nannieflash!!!

Congratulations all!  Please email me at americansue1@gmail.com to confirm your address and claim your prize.  All for now, Sue x


                                                       Follow my blog with Bloglovin


Saturday, 30 July 2016

Wedding Shadow Box Card


Hi bloggers!  The Shadow Box Collection is a lovely way to create a bespoke card for so many occasions!  Think Wedding or Anniversary for this one.  The video will hopefully give you some ideas for different ways that this die set can be used!

The winner of this week's Wednesday Card Giveaway is:

Crewe Trish!!!

Congratulations!  Please email me at americansue1@gmail.com to confirm your address and claim your prize.


The finished dimensions are 7" x  8" in size.  All for now, Sue x


                                                             Follow my blog with Bloglovin

Friday, 29 July 2016

Wish You Were Here

Hi bloggers!  Back to one of my favourite combos of black and white for today's card.  I started by cutting the Squared Tile Striplet using the decorative inner die only on both sides of the card.  I used the Bruges outside cutting edge to cut an aperture in the middle of the card.  Using my paper cutter, I cut both of the striplets in half down the middle of them.  I overlapped the cut off pieces back onto the other piece of the die and made them smaller, which resulted in a different look too them as well.  I added a thin black strip of card along the edge where the piece had been cut to disguise the cut lines.  I added mounting foam to raise the piece and added it to a piece of black card.  I finished cutting the Bruge die in white and recessed it into the aperture.  I used the smaller die from the set and cut it in black, backing it in white.  I cut it into a frame and added mounting foam to the back.  I stamped my sentiment and covered it with sticky adhesive sheet, peeled off the backing and seated the frame over it.  I glittered it with Diamond Sprinkles for a little bling.  The card was then completed with a white, black , white mat assembly.  The finished dimensions are  6 1/2" x  8 1/2" in size.  All for now, Sue x


                                                      Follow my blog with Bloglovin


Thursday, 28 July 2016

Using Tri-Geminis


Hi crafters!  The Tri-Gemini dies are a bit of a different twist to my Gemini collection.  They have more pieces to them, but they still fit together and have different sides that can used to create different looks with them.  Today's video will hopefully explain some of the ways in which they can be used to achieve unique styles for your crafting projects


 The finished dimensions are 7 1/4" x  7 1/2" in size.  All for now, Sue x


                                                       Follow my blog with Bloglovin


Wednesday, 27 July 2016

Wednesday Weekly Card Giveaway

Hello crafters!  Today's card giveaway is from the Birthday bundle shows.  I started with a piece of coconut white card taped to my craft sheet.  I lightly spritzed it with water and used my Pixie Powders to bring it to life.  Tapping the bottles gently to add powder across the card, I used the Midnight Blue, Teal Wash, Peacock Green and Aqua Lagoon to create a beautiful piece of background card.  I spritzed it again once all the powder was applied and watched it burst to life.  I dried it with my heat tool then cut the Birthday Shadow Box die out of it.  I also used bits of the leftover to cut the sentiments, cupcakes, balloons and present as well as a poppy as an accent.   I added a backing piece to my shadowbox by embossing white card with the Dot Matrix folder.   I used the Stitched Lattice Frame dies to add a tiered white frame to the card.  I cut the Bern die and nipped it in half and added it to the top and bottom of the card as accents.  I used Frilly Edged white ribbon and added a bow on the side and seated the poppy in the middle of the bow.  I completed the card with Cosmic Shimmer white PVA glue dots around the edge.   The finished dimensions are 7 1/4" x  8 1/2" in size.  Please leave a comment to be entered into the drawing to win this card and I will post the winner on Saturday's blog as usual.  All for now, Sue x


                                                        Follow my blog with Bloglovin


Tuesday, 26 July 2016

Striped Poppy Card


 Hi bloggers!  We are back to three a week videos for awhile.  Today's video card features a bit of dimensional layering and a pretty way to create a flower with a bit different look to it too.


The finished dimensions are 7 1/2" x  8 1/4" in size.  All for now, Sue x


Monday, 25 July 2016

Thinking Of You

Hello my crafty friends!  I love frames and I love circles, so what could be better than a card with frames and circles!! LOL  I began this one with an embossed piece of coconut white card using the Jacobean Floral embossing folder.  Next I used the Double Pieced Noble Circles to cut two frames.  The larger one was cut from the Classic Elegance Paper Pad and the smaller circle was cut from coconut white card.  I added a backing to the smaller circle of the same paper design then cut a white backing for the larger circle.  I stamped my sentiment and cut it with the Pierced Flags die set and extended it across the centre circle frame.  I made three flowers from the Classic Elegance papers using the Sweetheart flower die set.  I sugared them with Iced Snow and added them around the frame.  Lace Edged Leaves were added to them as accents and a bow of white satin ribbon as well.  I completed the card with a simple white on white mat with piercing.  The finished dimensions are
7 1/4" x  7 1/4" in size.  All for now, Sue x


                                                      Follow my blog with Bloglovin