Tuesday 31 October 2017

Industrial Chic Butterfly & Dragonfly


Hi bloggers!  Welcome back to the final post of the launch day.  We are showcasing another die set in the Industrial Chic collection; the Butterfly & Dragonfly die set.  Who says that steampunk can't be pretty??  The butterfly and dragonfly have been designed with cogs, wheels and pulleys throughout to give the steampunk feel to them.  They can also be used to accent any sort of card as you can see from this sample, they don't have to be grungy to work!  If you think you might enjoy winning this set, then you only have to leave a comment to be entered into the drawing.  Well that's it for day number one, but we have seven more days coming up, starting here at 6am tomorrow morning.  Hope to see you then! All for now, Sue x
                                                         Follow my blog with Bloglovin

Industrial Chic Mixed Essentials

Hi crafters!  Second up today is the new Industrial Chic Mixed Essentials die set.  This set includes all sorts of pieces that are just perfect for putting together that fabulous steampunk/ industrial look for your cards and projects!  From the steampunk silhouette man to the timepiece, wings, bolt, cogs, key, screw and wind up key, there is surely a die that will work for whatever you need.  If you are liking the look of this set, you only have to leave a comment to be included in the drawing to win this set.   I would really love to know what you think of the Industrial Chic collection as it is a bit of a new foray for me.   If you are unsure how to go about leaving a comment on any of the posts, there are full directions written out for you on the right hand side of the blog, it is ever so easy to do.  Just give it a try, you never know you may just be the winner of a die set!  The final blog post for our launch day will be up at 3pm today.  I would love to see you back here then.  All for now, Sue x


                                                       Follow my blog with Bloglovin

2017 Autumn Die Release Blog Launch --Industrial Chic Swirl

Hello there bloggers!  Welcome to the final die release of 2017.  There are 29 dies on offer this release and I will be showcasing each of them over the next nine days with either three or four posts per day (a bit different than previous launches).   I will be showing a single new die set per post and as always,  holding a drawing for one lucky person per post to win that die set!  Leave a comment on the post and the winners will be drawn and announced on Nov. 17th.  Again, I ask that you please sign your comments in a manner that there will be no confusion as to whose name it is when announced (ie.,  crazy crafter from Colchester, or cat lovin' crafter, or just some other funny alias you devise yourself!)  I only have one set of each die to give away so I don't want any one disappointed with two people trying to claim it!  Please feel free to leave a comment on each and every blog post, but only one per post please.
I am starting with one of my favourite new collections called Industrial Chic.  I have let my inner grunge go a bit and I think I have come up with a lovely collection of very easy to use dies, great for those pesky male cards or anyone that enjoys the sort of steampunk flair.  Starting the launch today, I am showcasing the I.C. (Industrial Chic) Swirl.  It works great in any corner and can easily be turned into a pretty sort of grunge look as well.  If this one floats your boat, please leave me a comment to be entered into the drawing to win this one.  The next post will be online at noon today for your inspection.  All for now, Sue x


Follow my blog with Bloglovin

Monday 30 October 2017

You Are The Best

Hi there my crafty friends!  You may have seen this one recently on some of Phill's shows!  I started by cutting two of the Petite Petal Striplet die in white.  At the same time I cut the white ones, I added another piece of black card behind the white card and it embossed the design into the black card while almost cutting through the outer shape, leaving me with a backing piece to use.  I had to nip a small area with my scissors.  I offset the white ones onto the black backing and then paper pieced the areas within using blue dusk, white card and glittered white card.  I glued them onto a larger piece of coconut white card on each edge.  For the focal element, I cut the Scarlet die in white and backed it in Blue Dusk card.  I cut the Victoria die in both black and white and cut them in half, the white one through the shorter side and the black one from the longer side (if that makes sense)  I attached the white one behind the Scarlet and then added the black cut pieces behind both of them.  I cut a smaller piece of white card and added a thin black mat and added it to the centre of the card (between the striplets) with foam, then attached my focal element.  I stamped the sentiment and cut it out with the centre of the Scarlet die, adding a cut black mat behind it.  White, black  and blue dusk mats and layers were added to complete the card.  The finished dimensions are 6 1/4" x  9" in size.

Just a quick note to let you know that the 2017 Autumn die release launch starts tomorrow here on the blog at 6am!  There are 29 dies to give away this time around.  I can't wait to share them with you!  All for now, Sue x


                                                      Follow my blog with Bloglovin

Sunday 29 October 2017

Best Wishes


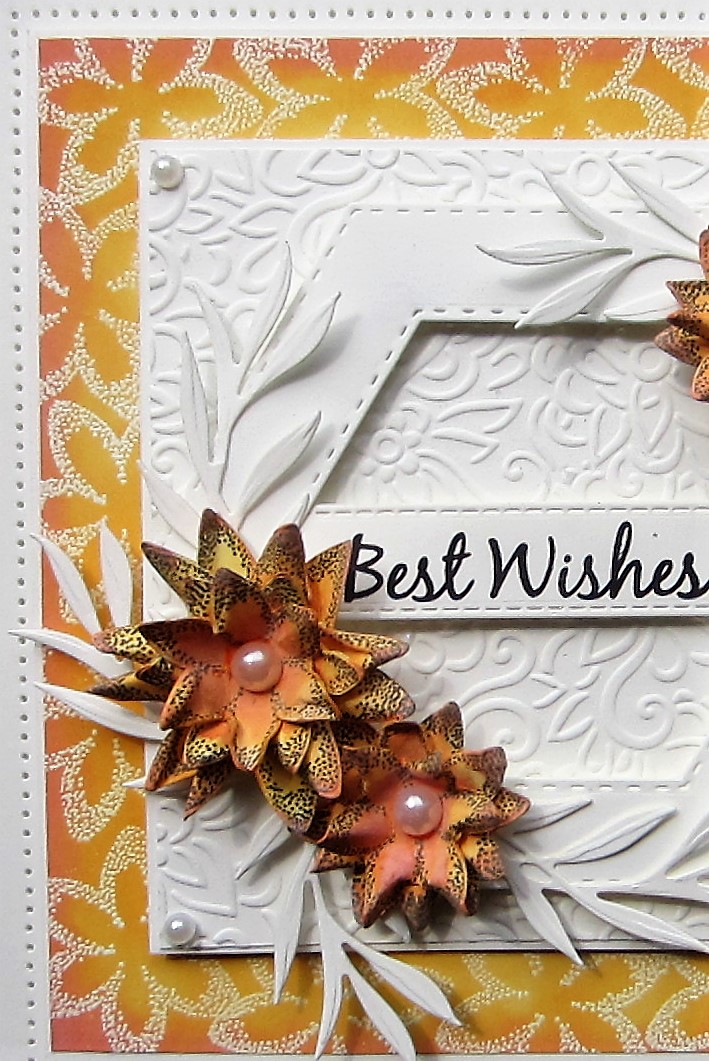
Good Sunday morning all!  I have a bright cheerful card to welcome you to the blog this morning.  I started by stamping the Pinwheel flower Stamp To Die For all around the edge of a piece of coconut white card.  I heat embossed them with true white embossing powder.  Next I inked the edges of the card with Worn Lipstick and Fossilized Amber Distress Oxide. The stamped images acted as a resist so the ink was easily wiped away from the tops of the images.  I cut a smaller piece of coconut white card and embossed it with the Jacobean Floral embossing folder for texture.  I added it to the centre of the card with foam, then cut a wide frame using the Double Stitched Hexagons.  I cut out an assortment of sizes of the Pinwheel Floral die in coconut white card (enough to make three flowers)  I inked them with the same distress oxides then stamped over them with Black Archival ink using the same stamps as the edge of the background.  I created three flowers and seated them on the frame with the Windswept Grass as accents.  I stamped a sentiment and cut it out with the Stitched Flags and added it across the frame.  White on white mats and layers were used to complete the card.  The finished dimensions are 8" x  8" in size.

The winners of this week's Comment Game are:

Margaret Rogers!!!
Barbara Gosden!!!
Littlelamb!!!

Congratulations all!  Please email me at americansue1@gmail.com to confirm your address and claim your prize.  All for now, Sue x


                                                        Follow my blog with Bloglovin

Saturday 28 October 2017

Grandad Workshop Card


Todays video card uses an technique from long ago called the Faux leather Background.  It works great for guy cards and gives a really interesting background on which to build your card, don't you think?

The winner of the Wednesday Card Giveaway is:

Lesley Sx!!!

Congratulations!  Please email me at americansue1@gmail.com to confirm your address and claim your card.


The finished dimensions are 7 1/2" x  8 3/4" in size.  All for now, Sue x

                                                         Follow my blog with Bloglovin

Friday 27 October 2017

Christmas Double Day

Hello crafters!  Two completely different cards today, both from my Christmas Hochanda shows.  First up is a navy blue and white card (I know it does look black but it is really blue).  I demoed this one but if you missed the shows, here's a quick rundown.  I started by cutting the Frosty Frame out of Navy Blue card and using the inner cutting die to create a frame.  I added a very thin bit of mounting foam around the solid edge to raise it.  I used the Lattice Ribbon die and cut it out of coconut white card twice extended it to create the background for the frame.  I attached it to a piece of white card with a sticky adhesive sheet on it and then glittered the exposed adhesive with Frosted Sparkle Glitterbitz.  I attached the Frosty frame then trimmed away the excess card from the background.  Next I create a thin framed area for it to sit inside by partially cutting the inside frame from the Gingerbread man.  I moved the frame along, extending it by slotting it back in at a further point.  This is easily done if you just leave the top cutting plate off of the original cut area, only to cut the new extended area.  I backed it with Navy blue card to show through the design, then added a double sided tape border around the edge which I sprinkled more white Glitterbitz on.  I seated the Frosty Frame in the centre of it.  .  I cut the tag from the Frosty Frame set in navy blue card then seated the Tis the season in white in the centre.  The card was completed with white and Navy Blue card mats and layers.  The finished dimensions are 6 1/2" x  8 1/2" in size.  Scroll down for card number two.


Card number two also uses the frame form the Gingerbread man die set, but in a different way.  I started this one by using the Nordic Christmas mask on a piece of coconut white card.  I used the Frosted Sparkle Glitter Kiss through the mask and allowed it to dry thoroughly.  Once dry, I cut the frame in white and added a ruby red card backing to it to show through the design and attached it over the mask, trimming away the excess card.  I added this to a larger piece of white card and cut four of the Snowflake Corners and Flourish dies in white and glued them into place around the corner edges.  I cut a gingerbread man in tan card, inked through the die with Worn Lipstick for her tummy and cheeks and added red buttons and bow.  I used a regular pencil to add in her eyes and I added a white pencil icing line to the arms and legs and a candy cane in her hand.  I cut the sentiment in red and added both of them to the inside of the frame.  White and red mats and layers were used to complete the card.  The finished dimensions are 7 1/4"  x  8 1/4" in size.  I hope you have enjoyed both of the double day offerings and have gained a bit of inspiration for your own cards.  All for now, Sue x


                                                     Follow my blog with Bloglovin