Sunday 31 May 2020

Guess Who Thinks You're Special

Good Sunday morning all!  I am switching gears today and have used the Lustre Polishes for this beauty.  I started with a piece of card and swiped the Tantalising Teal, Apple Fizz and Violet Vibe Lustre polishes across the card and let it dry.  I embossed it with the Flourish Border Frame.  I cut a rectangle out of white card and glued it to the centre of the embossed frame.  I cut the Guess Who Thinks You're Special die twice out of black card and stacked them and glued them into the centre.  Using the extra flower die from the Magnolia Corner, I cut several flowers out of an extra piece of the lustre polish card.  I added the flowers in opposite corners around the sentiment.  I cut the Magnolia Corner in white and mnipped it apart to use as accents around the flowers.  The card was completed with white and black mats and layers.  The finished dimensions are 7 1/4"  x  8 3/4" in size.  All for now, Sue x


                                                          Follow my blog with Bloglovin

Saturday 30 May 2020

Especially For You

Hello bloggers!  It is back to the Pixie Powders for today's offering.  I started with Scarlett Mist and Sun Yellow Pixies and sprinkled them all over a piece of white card, then spritzed with water.  Once dry, I embossed it with the new Quilted Pillow embossing folder.  I used the Double Stitched Rectangles to cut two different sized frames for it.  I added mounting foam to them both and added them to mybackground, one large one around the edge and one smaller one for my sentiment.  I added the Especially For You sentiment in the centre in white.  Using the Petal Pocket flowers, I made three flowers and added them in opposite corners.  I used a piece of leftover background and cut the centres for the flowers to match.  I used the Lace Edged Leaves as accents around the flowers.  The card was completed with white mats and layers.  The finished dimensions are 6 1/2"  x  7 1/2" in size.  All for now. Sue x


                                                      Follow my blog with Bloglovin

Friday 29 May 2020

Hope

Hello there my crafty friends!  Here's another really quick card but with quite a pop of colour!  I grabbed a background out of my premade background pile.  This one uses Yellow and Orange Crystal Tints on acetate, then scrunched up tissue paper is added to it and allowed to dry.  I usd the Double Stitched Squares to make a mukti layered frame in black and white to go over the background.  Next I cut the Hope Circle out of both white and black, shadowed it then glued it into the centre of the frame.  Clean and simple, but you can easily add flowers to dress it up if you desire.  The card was completed in white and black mats and layers.  The finished dimensions are 7 1/2"  x 
7 1/2" in size.  All for now. Sue x


                                                     Follow my blog with Bloglovin

Thursday 28 May 2020

Congratulations

Hello crafters!  I was having a play with the new colours of  Pearl Opal Polish for today's card.  I started with a piece of black card and used Red Pearl, Green Pearl and Blue Pearl Opal Polishes randomly all over it.  I used the sponge applicator that comes in the jar with the colour on it and pushed it into the card and turned it slightly.  I slightly overlapped them until I filled the card.  Once dry, I embossed it with the Rose Bed embossing folder for texture.  I stamped my sentiment and cut it out with the Decorative Flag die.  I attached it to the card with mounting foam, then added several of the Pom Pom Flowers cut in Powder Pink around it.  I cut the Magnolia Corner then nipped it apart and added it as accents around the flowers.  The card was completed with white and black mats and layers.  The finished dimensions are 7"  x  8 3/4" in size.  All for now. Sue x


                                                     Follow my blog with Bloglovin

Wednesday 27 May 2020

Spread Your Wings & Fly

Hi craftera!  Time for another quick, but beautiful card!  I started with my Pixie Powders, midnight blue and Aqua Lagoon.  I spritzed them with water, then allowed it to dry well.  I used the outer die from the Spread Your Wings All in One and cut the backing out of the pixie powdered background.  Next I cut the Spread YOur Wings die out of white twice and stacked them.  I used a couple of small pieces of card with sticky adhesive sheets attached and laid them over the area where the birds were and cut them.  I nipped away anything attached to the birds, then peeled the backing off and glittered the birds with Frosted Sparkle Glitterbitz.  I glued them on to the birds in the All in One and attached it to the backing piece.  I cut a white frame from the Double Stitched Rectangles and added foam to raise it.  I added it to another piece of white card, then attached the die into the centre of it.  The card was completed with white mats and layers.  The finished dimensions are 6 3/4"  x  8" in size.  All for now, Sue x


                                                        Follow my blog with Bloglovin

Tuesday 26 May 2020

For You

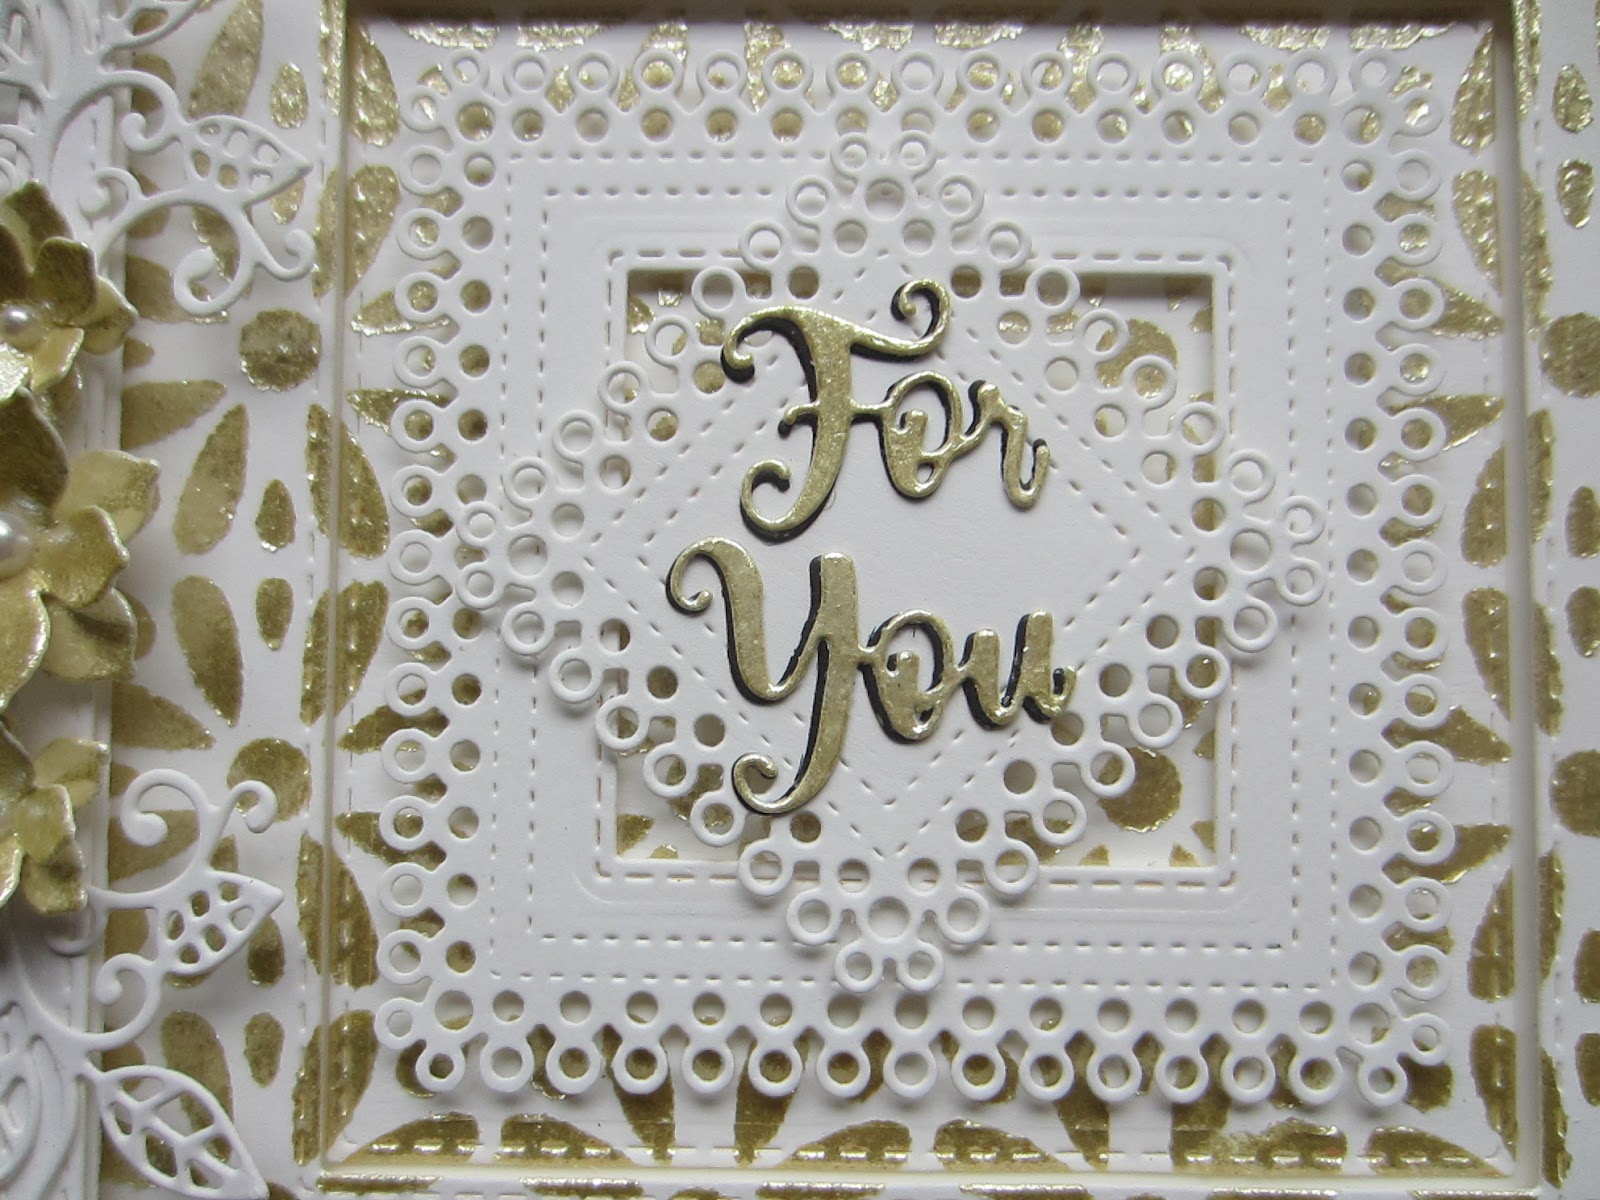
Hi bloggers!  I grabbed a mask to start today's card.  I taped the Daisy Patch mask to a piece of coconut white card.  I used Stellar Champagne Luna Paste through the mask and allowed it to dry over night.   I used the Double Stitched Squares and cut the dried mask into two pieces and added mounting foam to the outside frame shape to raise it.  I added it to another piece of white card then recessed the centre of the mask background int the centre.  Next I cut the Decorative Squares.  I cut one of them that fit into the centre and used the Stitched squares to cut the centre out of it.  I cut the smallest die in the Decorative Squares and set it in a diamond orientation in the centre.  I used the For You sentiment and cut it out of a piece of card I added the Luna Paste to and dried.  I added a black shadow to the sentiment then glued it in the centre of the card.  Using the Double Stitched Squares again, I made a multi-layered white frame and added it over the entire background.  I used the extra flowers from the Magnolia Corner and cut several out of the Luna Paste card.  I added them to the left side of the frame and used the Magnolia Corner cut into pieces as accents around them.  The card was completed with white mats and layers.  The finished dimensions are 7 3/4"  x  7 3/4" in size.  All for now, Sue x


                                                       Follow my blog with Bloglovin