Wednesday 31 May 2017

Wednesday Weekly Card Giveaway

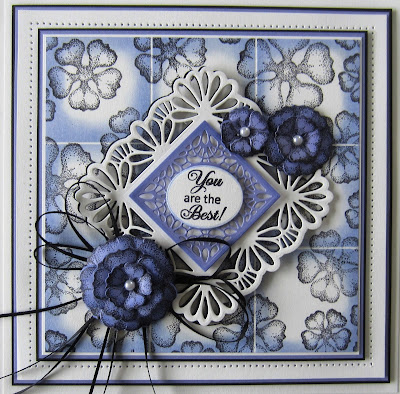
Hi crafters!  Today's card giveaway uses the Faux Tile technique.
I started with a piece of coconut white card that is 6” x  6” in size.    With a score board, make 2” score lines across and downward on the card (score at 2” and 4” across and turn the card and do the same again.)   Using the Shaded Succulent Stamp To Die For set, stamp the larger flower randomly across the background with a Black Archival ink pad.  Fill in some of the open areas with the same design in the smaller flower from the stamp set.  Next cover up the score lines using a post it note on each square, one square at a time.  Ink the edges of each square using Chic Viola Colour Cloud ink and a smoothie for blending.  Move the post it notes to do each section in the same manner.  Add a thin coconut white mat, an Iris card mat and a thin black mat and add mounting foam to the back.  For the focal element, Cut the Samantha die in white and black.  Offset the black die cut behind the white one as a shadow.  Add mounting foam and add it to the background in a diamond orientation.  Cut the centre die in the Samantha set out of Iris card and glue to the centre.  Stamp your sentiment in black and cut it out with the oval from the Azores die set.
Stamp the floral stamps again on to Iris card with a black Archival ink pad.  Cut each of them out with the matching Succulent Garden die set.  Use a large ball stylus to form the flowers from the back of the petals and stack and glue them together. Add white pearls to the centres.  Add the largest flower in the lower corner, seating it on a triple bow tied from black satin ribbon and add the two smaller flowers in the opposite corner.  Add a white paper pierced mat along with a thin iris card and black card mat.  Complete the card with a final white mat.  The finished dimensions are 7” x  7” in size.  Leave a comment if you would like to be entered into the drawing to win this card.  The winner will be announced on Saturday's blog post. All for now, Sue x


                                                       Follow my blog with Bloglovin

Tuesday 30 May 2017

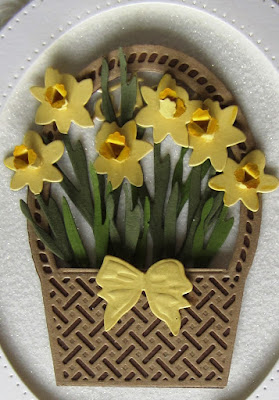
Daffodil Basket Card


Hi crafters!  I know it is too late for Easter, but with a small sentiment change, this card is just a gorgeous spring basket full of flowers for any occasion!


 The finished dimensions are 7 1/4" x  8 1/2" in size.  All for now, Sue x
                                                        Follow my blog with Bloglovin

Monday 29 May 2017

Jewelled Heart

Hi crafters!  Today's offering is a lovely shaker card using the new heart shaped treat cups.  I started by selecting lilac card for my background and cut the heart shape aperture in the top of the card.  I wanted a border beneath it so I used the Rippled Striplet pieces to create it.  I cut the striplet then cut the decorative inside piece apart and reassembled it with the straight edges back to back.  I added a thin piece of black card behind the side edging cut out area (it looks like ribbon, but it is card) and glued it below the aperture.  Next I filled my treat cup with lilac heart die pieces and sealed it with acetate.  I put the treat cup through the aperture and taped the edges to the back of the card.  I cut the inside from the Laced Heart in white and added it behind the treat cup and then cut the Jewelled Heart and added it over the top of the treat cup on the front of the card.  Next I made a scrunched flower using the solid flower from the Striped Nasturtiums.   I added it with a thin satin ribbon bow and some leaves as accents.  I seated the entire card on a thin black mat, which showed through the design behind the treat cup.  The card was finished with white, black and lilac mats and layers.  The finished dimensions are 7 1/4" x  7 1/2" in size.  All for now, Sue x


                                                     Follow my blog with Bloglovin
Sunday 28 May 2017

Just For You

Good Sunday morning all!  More gilding flakes and an oldie but goodie for today!  I started with the background and used the Swiss border without the outer cutting edge.  I cut it six times into a piece of milk card, turning the direction each time.  I added a sticky adhesive sheet to the back and gilding the exposed areas with Persian Dawn Gilding Flakes.  Once gilded, I used the large Oval die from the Geneva die set to cut an aperture in the middle of the background.  I added mounting foam to the back to raise it.  I used the Looking Glass Stamp to Die for and inked it with Flake and Glitter glue using a piece of cut n dry foam.  I stamped it onto black card and set it aside to turn clear while I cleaned the glue off of my stamp.  Once clear, I gilded the stamped image with Persian Dawn flakes too.  I used a piece of Rubit Scrubit to refine and remove the excess flake.  I seated the background over the image.  I stamped my sentiment and  cut a Swiss tag for it to sit on in the centre of the card.  I made a flower to match out of black card using the Exquisite Poppy and edged it with a silver paint pen.  I seated the flower on some black jute twine and Silver Metallic Linx as accents.  Milk and black card mats were added to complete the card.  The finished dimensions are 7 1/4" x  8 1/2" in size.

The winners of this week's Comment Game are:

Rose in Chester!!!
Margaret Driscoll!!!
Myra from Florida!!!


Congratulations all!  Please email me at americansue1@gmail.com to confirm your address and claim your prize.  All for now, Sue x


                                                        Follow my blog with Bloglovin

Saturday 27 May 2017

Gilded Stamped Card


Hi bloggers!  Pull out your gilding flakes for today's video card!  Using the Flake and Glitter glue is so easy when you see it step by step too!  I hope you enjoy today's video.

The winner of this week's Wednesday CardGiveaway is:

P. Austen!!!

Congratulations!  Please email me at americansue1@gmail.com to confirm your address and claim your card.


The finished dimensions are 7" x  8 3/4" in size.  All for now, Sue x
                                                        Follow my blog with Bloglovin

Friday 26 May 2017

Arched Window Front Door

Hi crafters!  I was having a bit of fun playing with the 3D Arched Window/Door set here.  I love it when you can make more than one thing with a set and this one is a great case in point.  I decided to make a front door scene for this card.  I started with a piece of coconut white card and embossed the Stone mask into the background.  Once embossed, I very lightly inked over the mask with Pumice Stone Distress ink, just enough to take the white off the stones.  I cut the Arched Window/Door die including the top arched area in white card.  I added a velum backing to it to give a softer look.  I added my mounting foam in thin strips behind the frame and added it to the centre of the card.  I cut a piece of white card and inked it a bit heavier with Pumice Stone to look like a front door step.  I used the topiary trees from the 3D Window box accessories set and made two out of white card.  I inked the top with Forest Moss and the stem and pot with Brushed Corduroy ink and attached them on either side of the door.  Lastly I cut the Spring Foliage die out of green card (from my stash) and added some small pink flowers and attached it so it was overhanging the door area.  The card was completed with white and grey mats and layers.  The finished dimensions are 6 3/4" x  7 1/4" in size.  All for now, Sue x


                                                      Follow my blog with Bloglovin

Thursday 25 May 2017

Heartfelt Thanks

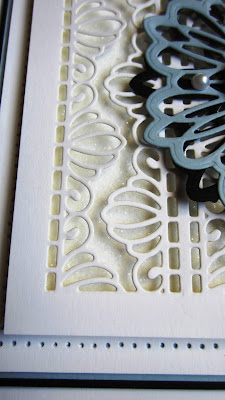
Hi bloggers!  Here is a  card that could be used for just about any occasion or any person.   I started by cutting the decorative die from the Rippled Striplet into a piece of coconut white card.  I cut it four times to create the background.  To give it a bit of dimension, I added mounting foam to the back and raised it and attached it over another piece of coconut white card.  I left a wide border around it so the foam had a place to go and added a bit more in the very centre where I knew it wouldn't show.  Next I cut the Olivia die twice, once in Blue Dusk card and once in black.  I offset the black die cut behind and attached the two to the centre of the card.  I stamped my sentiment and cut it out with a small pierced oval.  I inked the edges lightly with Stormy Sky distress ink and added it to the centre of the card.  I completed the card with white, black and blue dusk mats and layers.  The finished dimensions are 6 1/2" x  7 1/4" in size.  All for now, Sue x


                                                       Follow my blog with Bloglovin

Wednesday 24 May 2017

Wednesday Weekly Card Giveaway

Hello bloggers!  Back around to another Wednesday card giveaway, they do come around quickly, don't they? LOL  I started this one by simply embossing a piece of coconut white card with the Tulip Twist embossing folder for texture.  I rubbed over the top of it with Silver Dream gilding Polish, then buffed it with a piece of kitchen roll.  Next I cut the Infinity Striplet twice out of a piece of coconut white card using just the inner decorative die.  I backed it with a piece of Silver Shine card and added mounting foam to the back of it.  I cut the Cape Verde die out of Silver Shine card twice.  I cut one in half across the shorter part of the die and the other one in half across the longer part of the die.  I added the halves to the striplet so they were peeking out from around it on all sides.  I added this to the centre of the embossed background.  I cut just the centre section of the Cape Verde out of silver and backed it with white and added it with foam to the centre of the card.  I stamped my sentiment and ct the very centre die from the Cape Verde and used it as a frame around the sentiment.  I added that piece to the middle of the card.  Finally I added a floral element to the card by scrunching the Striped Nasturtiums cut out of white card.  Once assembled, I added the same silver gilding polish to the edges of the petals and seated the flowers around the sentiment.  I added leaves from the set as well.  I made two matching stick pins and seated the flowers on a thin white satin ribbon bow and attached the stick pins.  The card was completed with white and silver mats.  The finished dimensions are 7 1/2" x  9" in size.  Leave a comment to be entered into the drawing to win this card.  The winner will be announced on Saturday's blog post.  All for now, Sue x


                                                      Follow my blog with Bloglovin