Friday 31 August 2018

Christmas Double Day

Hi bloggers!  I think it is about time that I start my Friday Christmas double days back up or I will never get through the vast myriad of cards that I have made! LOL  First up today is an almost all white one.  I started by cutting the Netted Star Background in white.  I attached it over a piece of coconut white card with a sticky adhesive sheet added to it.  I used Frosted Sparkle Glitterbitz on all the exposed adhesive areas, then added small pearls to the stars.  I used the Double Pierced Noble Squares to add a multi layered white on white frame over it. In the lower corner, I cut a bunch of pine sprigs from the Robin die set and added tips of gold from a paint pen.  I arranged them in the corner and added a robin and pine cones to it.  I used a little bit of Vintage Photo and Worn Lipstick inks on the robun.  I used the Swirly Silent Night in the centre cut out of both vintage gold and black, used as a shadow.  White on white mats were used to complete the card.  The finished dimensions are 7" x 7" in size.  Scroll down for card number two.


Staying with that almost white look, the second card is more of a clean and simple look.  I started with a piece of coconut white card as my background.  I cut a wide strip of white card then embossed it with the Ice Crystals embossing folder for texture, then matted it with silver card and attached it across the top of the card with foam.  I cut three of the wreath from the Star Wreath set, two in gold and one in silver and glued them across the strip, overlapping the silver on top, I added the sentiment from the Merry Christmas mini expressions in silver at the bottom of the card and finished with white and silver mats and layers.  The finished dimensions are 7 1/2" x  8 1/4" in size.  All for now, Sue x


Thursday 30 August 2018

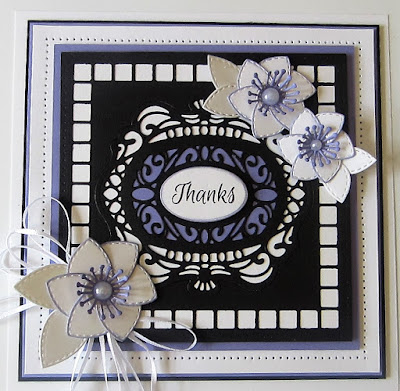
Thanks

Hi crafters!  It's black, white and iris for today's card.  I started by cutting the Caroline die in the centre of the card and one of the Squared Squares around the edge.  I decided to put the Caroline back into the aperture I had cut so you can see the outline of it.  I backed the very centre of the Caroline die with Iris card and the rest of the background with white card so it really pops out.  I stamped my sentiment and cut it out with the centre oval from the Caroline die set and mounted it in the middle.  I made several of the Petal Pocket flowers out of white card and inked all the edges with Shaded Lilac ink.  I cut centres for them out of Iris card and added pearls.  I seated the largest one on a satin ribbon bow and added some leaves to all of them.  The card was completed with white, black and Iris mats and layers.  The finished dimensions are 7" x  7" in size.  All for now, Sue x


                                                      Follow my blog with Bloglovin

Wednesday 29 August 2018

Just For You

Hi crafters!  Here's a blush and milk card for you.  I started by cutting three of the Isobel die and layering it up.  I added it to another piece of mil card.  I cut two of the Climbing Floral vine out of milk card.  I cut it again twice out of blush card and used the fall away pieces and glued the to the original die on the sides.  I cut the Just for you from the Isobel die and spayed it with adhesive then it with Frosted Sparkle Glitterbitz.   I glued the Isobel in the centre between the two Climbing Vines dies.  Next I cut several of the Petal Pocket dies out of milk card.  I inked the edges with Spun Sugar Distress ink, assembled them and attached them to the card.  I tucked an antique white satin ribbon bow underneath the flowers.  The card was completed with milk and blush card mats and layers.  The finished dimensions are 6 1/2" x  8 1/4" in size.  All for now, Sue x


                                                        Follow my blog with Bloglovin

Tuesday 28 August 2018

Ultra Sparkle Snowman


Hi bloggers!  I am back to using the Ultra Sparkle Texture paste again!  It really does have a lovely sparkly quality to it, perfect for those festive creations!


The finished dimensions are 7" x  7" in size.  All for now, Sue x
                                                      Follow my blog with Bloglovin

Monday 27 August 2018

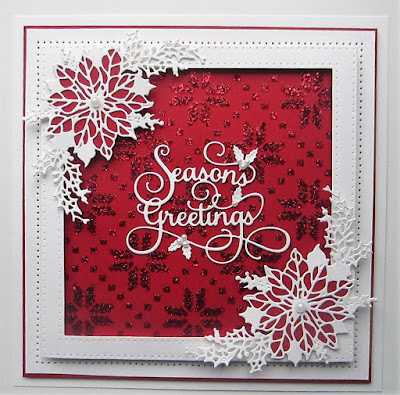
Season's Greetings

Hi there crafters!  I really do need to start showing some Christmas cards, even though you might not be ready to see them!  You will thank me later if you start on them now so hopefully here is some inspiration for you!  I started with the Poinsettia Quilt mask on a piece of ruby red card.  I used the Red Ultra Sparkle texture paste through it and set it aside to dry well.  Next I cut  a white frame for it using the Double Pierced Noble Squares and added it with foam over the dry background.  I cut two of the Poinsettia Garland die in white and added red flowers and glued the, into opposite corners.  I cut the Season's Greeting die in white and glued it to the centre of the card.  White and red mats were used to complete the card.  The finished dimensions are 7 1/2" x  7 1/2" in size.  All for now, Sue x


                                                      Follow my blog with Bloglovin

Sunday 26 August 2018

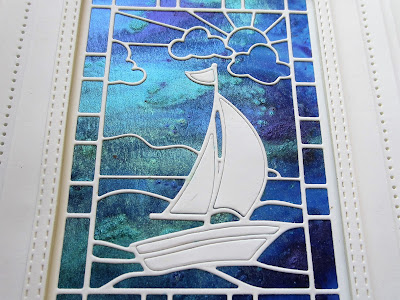
Sailboat

Good Sunday morning all!  It's a really quick, easy card for today's offering.  I started with the background (which I already had in my background pile) but it is Pixies Powders.  I used Midnight Blue and Aqua Lagoon, fairly heavily to cover the entire piece.  I cut the Sailboat Stained Glass and glued it on top of the dry background.  Next I used the fall away pieces from the boat and paper pieced them back into the boat to make it more focal.  I just put a bit of Cosmic Shimmer dries clear glue on the back of each of the pieces then pieced them in.  I had left a wide border around the sailboat when I initially cut it so I just made a thin border to add to it using the Double Stitched Rectangle die set.  I mounted it with foam for a bit of dimension to it. White on white layers were used to complete the card.  The finished dimensions are 5 3/4" x  7" in size.  all for now, Sue x


                                                       Follow my blog with Bloglovin