Tuesday 21 May 2024

You're The Best

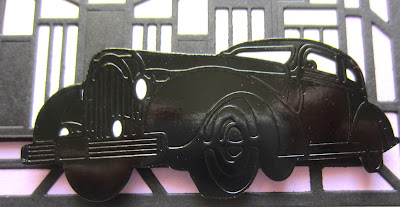
 Hello bloggers!  I started toay's card by cutting the Art Deco Diamond Radiance Background out of black card.  I just used the outer die from the set, so I backed it with soft lavender card and cut the centre out of it.  Next I cut the Skylines Background in black and backed it in white.  I added mounting foam to the back to raise it then added it to the centre of the card. I cut a strip of clear acetate and tucked the end under the back of the card and folded it downward.  I cut the plane from the Travel In Style  die set out of black gloss card and added the banner cut in white that I stamped you're the best on to.  I cut the car out of black gloss card and added it with mounting fom to the bottom corner of the card.  The card was completed with white, black and soft lavender card.  The finished dimensions are 6 3/4"  x  8 1/4"  in size.  


The winner of the May die release blog launch is.................................................................................................................................................................................................Snuffy Snoo!!!

Congratulations!   Please email me at americansue1@gmail.com to confirm your postal address and clain your winning die collection!  All for now, Sue x


                                                          Follow my blog with Bloglovin

Monday 20 May 2024

Happy Birthday

 Hello crafters!  I cut the Magnolia Cover Plate with a piece of black card on top of a piece of white card.  I used the white card to colour the image.  I used alcohol ink markers to colour it.  I glued the black die cut on top of the white coloured piece.  I covered a piece of white card with a sticky adhesive sheet.  I peeled the backing paer off and coated it with Frosted Sparkle Glitterbitz.  I cut the Magnolia Cover Plate die and used the fall away pieces from the background and I paper pieced them back into the coloured die cut.  I cut the Happy Birthday sentiment from the Birthday Wordie Sheets and added it with mounting foam.  I matted the piece with whie, arctic blue and black mats.  The card was completed with white mats and layers.  The finished dimensions are 6"  x  7 1/4"  in size.  


All for now, Sue x


                                                           Follow my blog with Bloglovin

Sunday 19 May 2024

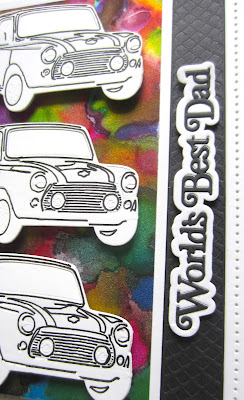
World's Best Dad

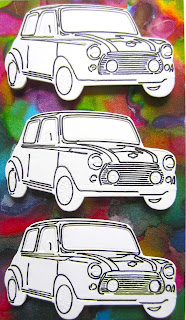
 Good Sunday morning all!  I selected a piece of silver sparkle card and used a variety of alcohol inks all over it.  I cut a larger piece of card and glued the piece down the centre of it.  I cut  two of the Tyre Tracks in black.  I glued them to each side of the alcohol ink piece.  Next I cut the Mini Cooper from the Classic car die set in white three times.  I used a fine tipped black felt pen and filled in the detail from the car dies.  I added each one with mounting to the middle of the card.  I cut the World's Best Dad sentiment in black and glued it to a white shadow backing piece.  I added it vertically on the right side of the cars.  The card was completed with white mats and layers.  The finished dimensions are 7 1/4"  x  8"  in size.  All for now, Sue x


                                                            Follow my blog with Bloglovin

Saturday 18 May 2024

Fabulous Friend

 Hello bloggers!  For today's card I cut the Fan Border die in white three times.  I covered a piece of white card with a sticky adhesive sheet then peeled the backing sheet off anf lai down the three borders next to each other.  I used Frosted Sparkle Glitterbitz on the exposed adhesive areas.  Next I cut the Ornate Label die in white and backed it in white.  I added it across the centre of the card with mounting foam.  I cut the Fabulous Friend sentiment in black and glued it across the label die.  Using the Floral Extravaganza set, I cut three flowers out of antique gold card, assembled them then added them in opposite corners.  The card was completed with white mats and layers.  The finished dimensions are  6 1/2"  x  7"  in size.  

https://www.creative-expressions.uk.com/product/creative-expressions-sue-wilson-art-deco-collection-fan-border-craft-die/

All for now, Sue x


                                                         Follow my blog with Bloglovin

Friday 17 May 2024

I Smile When I Think Of You

 Hello crafters!  For today's card, I started by stamping the crackle stamp from the Sending Sunshine stamp set in black all the way around a piece of white card.  Next I inked it with a combination of  Picked Raspberry and Worn Lipstick.  I cut the Della die with a piece of black card on top of a piece of white card.   I used alcohol ink markers to colour the leaves but I paper pieced the flowers with raspberry card.  I glued the black die cut on top of the white one, then added it to the middle of the card with mounting foam.  I cut the sentiment with a piece of black card on top of a piece of white card.  I used the middle die from the Della to cut them.  I added the word to the white die cut and taped it to the centre of the card.  The card was completed with white, raspberry and black mats and layers.  The finished dimensions are 8"  x  8"  in size.  


All for now, Sue x


                                                        Follow my blog with Bloglovin

Thursday 16 May 2024

You Make My Heart Bloom

Hello there my crafty friends!  Welcome to the final post of this release.  We are dedicating this post to the second of the two sentiments in this release;  You Make My Heart Bloom.  This sentiment has been done in two pieces.  Each of the words in the sentiment are hooked together, but not to each other so you can freely use this in any orientaion that you desire.  There is a shadow backing die, however, that can be used if desired but only in the single line configuration as seen in this sample card.  For the final time, leave a comment on this post and then check back the morning of the 21st of May to see if your name was the lucky name drawn out to win the collection.  All for now, Sue x
                                                       Follow my blog with Bloglovin

Bountiful Butterflies

Hello bloggers!  The next die to be showcased is the Bountiful Butterfies die set.  This set has eight different biutterflies in it including several different sized butterflies, a side view butterfly and three different sized solid butterflies.  There is literally a butterfly for any and all needs in this set.  You only have a couple more chances to leave a comment so you can be entered into the drawing to win the entire collection.  The final post of the blog launch will be online at 3pm.  All for now, Sue x


                                                         Follow my blog with Bloglovin

Fabulous Foliage

 Hello crafters!  Welcome to the final day of the May die release.  We are starting out with the Fabulous Foliage die set.  There are fourteen dies in this set, including five or six different types of foliage with several right and left facing pieces included.  Shown here, you can see what a nice addition this set makes with the Wild Birds.  Don't forget to add your comment on this post if you want to have the maximum entries into the drawing.  I have also included the Pinterest pinit button at the bottom of each post if you would like to save any of the samples or dies for later inspiration, please feel free to do so.  The next post will be along at noon.  Hope to see you back here then.  All for now, Sue x


                                                         Follow my blog with Bloglovin

Wednesday 15 May 2024

Wild Roses

Hello bloggers!  The next set on offer is the Wild Roses.  This set has ten dies including two different sizes of flowers, a side view flower, two different stems, a couple  leaf clusters as well as a couple of single leaves and several flower centres.  If this is a set that you would find very useful, then leave a comment on the post.  I would love to know what you think of the blog launch so far.  Do you have a favourite die set yet?  We have one more day to go and I will be back here at 6am for the start of the final day.  All for now, Sue x


                                                          Follow my blog with Bloglovin

Floral Medley

Hi bloggers!  The next set to be released is the Floral Medley.  There are fifteen dies in this set which includes several different styled flowers, as well as leaves and flower centres.  Shown  here, you can see how well they all work together!  If you think this set would make a great addition to your crafty goodies, then just leave a commet on this post.  If you have never left a comment and are unsure of how to do it, there is a complete set of instructions on the right hand side of the blog.  I will be back for the last post of the day at 6pm.  All for now, Sue x


                                                          Follow my blog with Bloglovin