Monday 31 December 2012

Orphan Cards


Hi bloggers!  Happy New Year's Eve!  Last year I put up my orphan card post and thought I'd make this an annual thing.   By "orphan cards" I mean those cards that I made that I haven't felt were either good enough or just didn't come out like I had envisioned so they were never blogged.  So they are, in effect, orphans.  Last year I drew a name from the list of those who left comments about the cards to win the cards and give them a home (so they were no longer orphaned!)  If you feel like you can give a loving home to these poor cards, then please leave me a comment.  I will draw a name and announce the winner on Wednesday's post.  Have a safe and wonderful new year's eve!  All for now, Sue x


Sunday 30 December 2012

Sweet And Simple


Good Sunday morning all!  I just want to say "aah" when I look at this card as it has such a sweet, simple look to it.  Yes I did make it, even though it is a far cry from my usual look.  I used milk coloured card for the background and stamped my sentiment in the lower corner with a coffee archival ink pad.  I embossed the background using the Garden Lattice Embossibility folder to give a bit of texture.  I cut the largest size of Decorative labels 8 out of milk card.  I used the Cherry Blossom set to cut my branch out of brown card.  I glued it to my decorative label shape.  Next I cut a very small heart out of the basic heart die set. I added a tiny flatback pearl to my heart after I inked it with Victorian velvet distress ink.   I used a bit of mounting foam to attach it then I used a fine tipped pen to do some freehand faux stitching from the branch to my heart.  I personally like the simplicity of the single heart, but if that is too much white area for you, it would be quite cute to have an assortment of hearts hanging at different levels too.  I wanted to balance the rose heart a bit so I added a rose coloured mat before my pierced milk mat layers.  Sometimes, less is more I think, don't you?  Finished dimensions 6 1/2" x 7" in size.

It's Sunday and time for more winners to be announced (my favourite part, giving stuff away,  tee hee!) LOL
This week's Comment Game winners are:           
 Ruth Jamieson!                         
Jacqui AKA Morgana !!!  
  Dragonswing!!!        

 Congratulations!  Please email me at americansue1@gmail.com  to confirm your address and claim your prize.  Don't forget you only need to leave comments on the blog to be entered in the weekly game drawing!  All for now, Sue x                      

Saturday 29 December 2012

Merci

Good morning all!  Can't  stay away from the teal card for too long you know!  I have used it here for my background embossed with the Garden Lattice Embossibility folder.  Atop that, on white card, I have stamped the JustRite Fragrant Garden background using a clear Perfect Medium pad and heat embossed with Cosmic Shimmer True White embossing powder.  It is difficult to see in my pic, but it adds a lovely textural dimension to the card in person.  I cut an Asian border in white card and added it to the left of the stamped background.  I used white silky crush ribbon and wrapped a piece around and tied a double bow.  I added a matching teal Dazzler and two pearl stick pins to my bow.  I cut the dressform out of black card and embossed it to bring out the detail.  Be sure to use wax paper when cutting this one so it is easier to remove from the die (sandwich the wax paper between the die and the card before cutting).  I glued the dressform to the card and mounted the bodice on foam for dimension.  I stamped the tag and sentiment from the French Frills set by JustRite in black on white card.  I coloured the flowers with Broken China distress ink and cut it out with one of the small dies from the Resplendent Rectangles set.  I cut one more of these dies out of black and cut it in half to add to the top and bottom of my tag as a shadow accent. I added some flatback pearls to my tag corners and to the dressform as a necklace.   I finished the card with Cosmic Shimmer white PVA glue dots around the edge as a frame.  Finished dimensions 6 1/2" x 8 1/2" in size.


Friday 28 December 2012

Grey and Peach Floral

 Hi Bloggers!  I was busy yesterday adding some tutorials that I had done to the top section of my blog.  I had some help with it, but I finally learned how to do it.  There are a couple more that I need to add, but hopefully this will make it easier for you to refer back to them in the future.
   For today's card it's a floral frenzy of sorts!  I love this colour combo myself, grey and a warm peach tone.  I  started by cutting the fancy Lattice background die out of dark grey card.  I extended the pattern by an inch or two so I would have room for all my flowers.  I left an edge to the background so I had room for mounting foam to raise it for dimension.  I stamped my sentiment and cut it out with one of the resplendent Rectangle dies.  I inked it with Tattered Rose and Rusty Hinge to get the colour to match my flowers.  I cut the larger shape in the Resplendent Rectangles to mat my sentiment.  I used a combination of cardstock and felt and the Jewelled Flowers and Flourishes and Spiral Flower Four to make my flowers.  I added some flatback pearls to the centres of some of the flowers.  I tied a messy bow from the white seam binding and tucked it under the corner flower.   I cut a few accents from the Jewelled Flowers to use as accents for my flowers.  I used a single butterfly from the set as an accent in peach for my sentiment.   I used a pale grey as a mat for my card and pierced the inner layer to finish off my piece.  This is one of my favourite cards, I hope you like it too!  Finished Dimensions 8" x 8 1/2" in size.  All for now, Sue x


Thursday 27 December 2012

Best Wishes

Hello my crafty friends!  Are we all recovered from our festive past few days!  I hope we can get back to some serious crafting now!  Today's card is a really easy one to make.  I started with a page from my trusty thrift store dictionary to use as my background (oh and by the way, hard back books are not recycled like paperbacks,  I have just learned, so if you can use them to upcycle into a fun project, no guilt about the whole book thing!)  I distressed the edges with Black Soot.  I wanted to add an embossed panel so I used the Garden Lattice embossibility for this.  I added a thin mat of red for a pop of colour behind it.  Using the Cherry blossoms die, I added some twigs going across the card and cut some small red flowers for them.  I added 3mm black pearls to the centres of all the flowers.  Next I stamped the tag from the justrite french Frills set.  I coloured it with Fired Brick distress ink.  I stamped my sentiment in the centre in black.  I wanted this to be a tad smaller than the die so I cut it by hand as it is a very simple shape.  Out of black card, I cut the matching tag shape which is part of the French Frills set by Samantha Walker.  I wanted to dress up the tag a bit so I added one of the accent pieces from the Asian Accents set.  I cut it in half and added it behind my tag, top and bottom.  Finally I cut a small Labels 28 in red for the bottom layer in my sentiment focal piece.  I pierced the edges of the kraft card with which I matted my finished card.  A very easy, but striking card I think.  I hope you like it!  Finished Dimensions  7 1/2" x 8"   All for now, Sue x


Wednesday 26 December 2012

Beaded Black And White

 Happy Boxing Day!  I hope everyone enjoyed a really nice day yesterday.  I was truly delighted to see that so many of you were able to stop by the blog to say hello, thank you so much for that.  Today's card is a black and white design using the Venetian Motifs and Accents exclusively.  I started by micro beading  the white background.  I then cut four of the Venetian Accent borders in black.  I glued them to the edges of the background and mitred the corners.  Next I cut four of the Venetian borders in white.  Don't forget to use your wax paper when cutting these as they are so detailed!  I wanted the white borders to be raised, but since there isn't much room on them for mounting foam, I had to make some.  I did this by cutting thin strips of black card and gluing it the the back edge of the borders.  This allowed me to add my mounting foam and raise the borders for dimension.  I wanted the black borders to show so I offset the white ones so you can see the tips of the ones underneath.  Again, I mitred the corners.  Next I cut a Venetian motif in black card (with wax paper).  I stamped my sentiment (from Creative Expressions) on white card and then cut it out with the Venetian motif also.  I glued the centres of the two motifs and offset them also.  I added my focal element in the centre of my card with mounting foam.  I pierced the black mat and added a final white then black mat to finish my card.  I still say these dies are so pretty and work so well with anything you put with them, don't you think?  They are truly some of my favourites!  Finished Dimensions 7 3/4" x 7 3/4"   All for now, Sue x


Tuesday 25 December 2012

Merry Christmas (And The Rest Of The Cards)

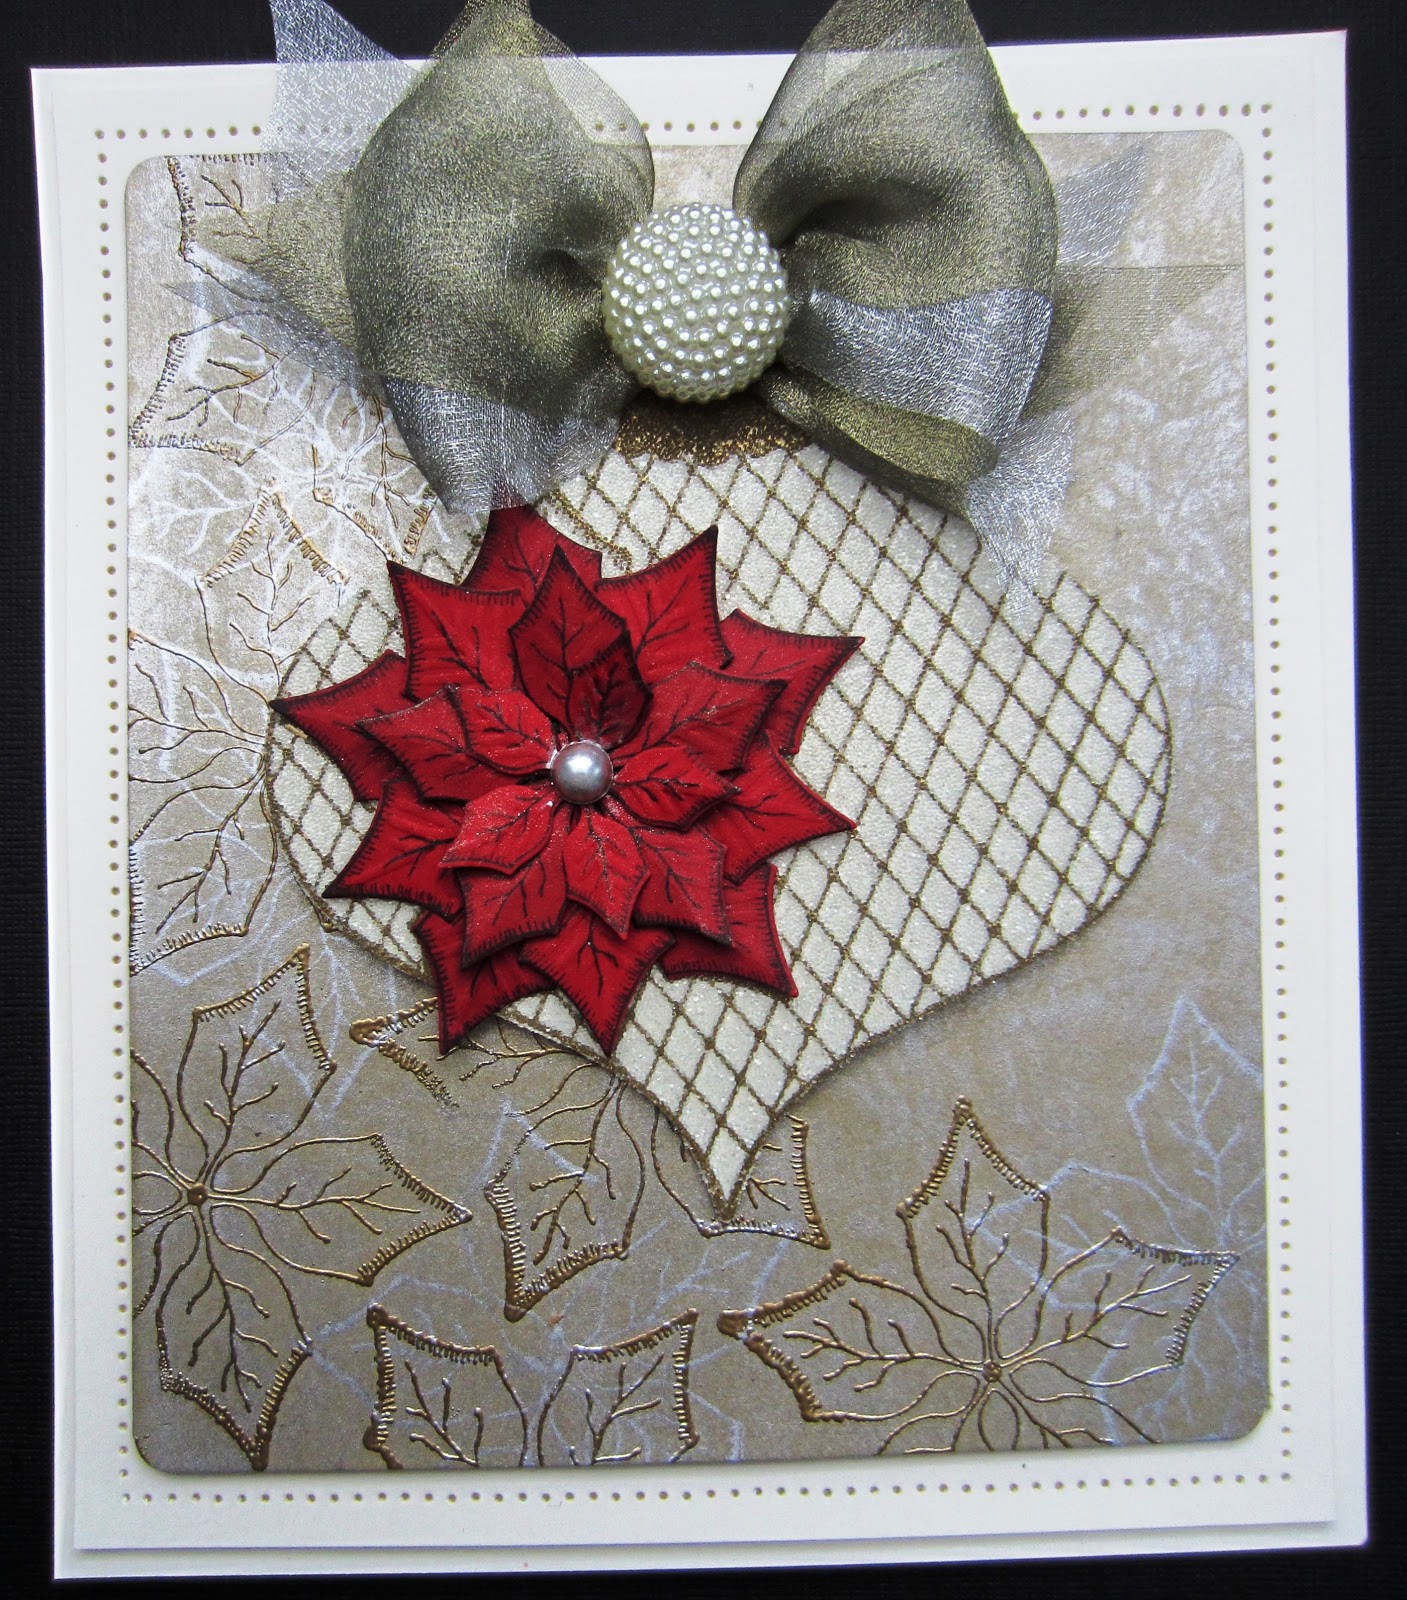
MERRY CHRISTMAS EVERYONE!  I hope everybody is enjoying a lovely, relaxing day (too much food, drink and fun included!)  I decided to do all the remaining Christmas cards in one go today.  No more until at least next June, I promise!  I'm not going to give you rundowns on them today, but if you have any questions about any of them, just email me and I will be happy to answer them for you.  The first one, I have included a couple of close ups, one of the background which was stamped using the new metallic distress stains and the other of the micro beaded bauble.  Other than that, these are all the remaining Christmas cards that I have.  I'm not sure that they are all completely blog worthy, but you may find some you like in the lot. Just a final note to add that I know that I am truly blessed having all the great blog friends.  You stop by for a visit and have made my daily blog a joy for me.  Thank you again ever so much!   Enjoy your Christmas!   All for now, Sue x


Monday 24 December 2012

Follow Your Dreams

Happy Christmas Eve!  I realised yesterday as I started to update my blog that I had a box of samples for the show last week that never made it with me to the studio!  I was working on three different shows while I was away.   I had nicely separated all the samples by show, or so I thought!  I found this box with a sample for the shows that I am doing in January on top of five or six samples for last weeks shows!  This card is one of them.  Today's card is another fun use of the Butterfly Magic die.  Don't cut, emboss!  This die makes a great embossed background.  If you want to emboss only, just skip the cutting step and put your die on your card, cover with the tan mat and pink plate and run it through your GC.  I used Broken China distress ink and sponged lightly while the die was still in place to add some interest to my background.  I covered a small piece of coconut white card with our sticky adhesive sheets and placed it on the Butterfly Magic die over the butterfly to cut just that particular area.  I nipped it out of the background once cut and peeled the backing paper away and covered with micro beads.  I glued it in place directly over the butterfly, raising the wings  for movement.  Out of teal card, I cut one of the butterflies from the Les Papillon set and added it to the bottom of the card.  I stamped my sentiment in black archival ink and cut it out with one of the smaller Labels 28 dies.  I inked it with Broken China ink too.  I mounted it in the corner and added a messy bow tied from white seam binding.  The centre was adorned with a heart Dazzler. I added some double score lines around the edge of the background before I matted it with teal card (which looks very crooked due to my photo angle! LOL   It isn't IRL ) and pierced the edges of my final white mats. 
Last year on Christmas Day, I showed you pics of all my past Christmas trees.  Since you have seen them all, I had to come up with something different.  So if you have played Santa, eaten too much and can't watch another Christmas movie why don't you stop by to see what's on the blog tomorrow.  All for now, Sue x


Sunday 23 December 2012

What If...

Good Sunday morning all!  I chuckle every time I look at this card because it was the result of that age old question, "what if."  In this case, I wondered what if I just used all the edgeability inserts on one card at one time!  So I lined them all up, taped them into place and sent them rolling through my machine!  I may not do it again as it was a bit difficult to cut them all.  It took multiple passes through the machine and I had to turn the orientation of the dies too.  In the end, though, I thought it was rather interesting so I decided to use it for my card.  I stamped my sentiment in black at the bottom, then matted my white piece over some of my teal card so it would show through the cut away bits.  I used one of the inserts to make a border too, but added a cutting edge to it this time.  I did one side then moved the dies over to do the other side.  I matted it on a teal background strip.  I tied a messy bow out of green gem seam binding and added a pearl embellishment and two stick pins to it.  I had a piece of white netting in my craft stash so I used it behind my bow.  I pierced the edges to finish.  I do think that this would be pretty with a red backing and a Christmas sentiment to it for a quickie card!
It's Sunday and time for the Comment Game Winners to be announced.  This week's winners are:
Sandra F!!!
Mol!!!
Debbie Tinks!!!
Congratulations!  Please email me at americansue1@gmail.com to confirm your address and claim your prize!  I do hope all your Christmas preparations are coming along smoothly.  Thank you for taking time to visit the blog during this hectic time, I really appreciate it!  All for now, Sue x

Saturday 22 December 2012

Butterfly Blocks

Morning all!  Have you got little bits of decorative papers and scraps of coloured card left all around your craft room?  I do, so I used some of them to make this card.  I started with a small square of decorative paper from my craft stash (it was about 5" square).  I cut two small squares out of some scrap coconut white card.  I taped my butterfly from the Les Papillons set in the centre and cut and embossed it on both of the pieces.  I mounted the negative piece with some mounting foam diagonally from each other.  I used the cut out butterfly and mounted them diagonally from each other, giving me the appearance of four butterfly blocks.  I finished it off with some flatback pearls in the corners and down the centres of the butterflies.  I added white mats and pierced the inner mat for a frame.  Finished dimensions are 6 1/2" x 6 1/2" in size.  It is a really quick, easy and striking card to make too!  Hope you will give it a go with some of your craft scraps!  All for now, Sue x


Friday 21 December 2012

Demo Tutorial and Card

Good morning all!  On the run up to the last weekend before Christmas, I decided to do a tutorial and put off my wrapping for another day!  I had a slew of emails asking about the embossing folder resist technique that I did on my first demo last Sunday.  While I have done this technique in the past, it was always a bit hard to source the wax paper then.  Look no more, it is here now and raring to be used.  I will give you a quick rundown on the card and then the tutorial for the background will follow below.  For the focal element, I cut two Marvellous Squares out of white card.  I nipped away one corner from each of them.  I taped the squares on the diagonal, then used the corners on either side to peek out between the the side points.  I added some mounting foam to the back and attached to to the middle of the card.  I used a section of the background that I created and poured clear embossing powder over it.  I cut a small frame from it using two of the Labels 28 dies.  I mounted the frame over my stamped sentiment and then cut away the excess white card.  I tied a messy bow from seam binding and added it to the corner of my focal element.  I cut a spiral flower four out of white felt, rolled it and added it to the centre of my bow.  I cut an Asian border and glued it to the left side of the card and finished it off with Cosmic Shimmer white PVA glue dots.


Embossing Folder Resist Tutorial      Start by picking an embossing folder with an all over type pattern for best results.  I am using the A4 Garden Lattice Embossibility folder here.   Cut a piece of Reynolds  Cut-Rite wax paper the same size as your folder.

Next, insert the wax paper piece in your folder and run it through your die cutting machine.  If you are using the Grand Calibur, you will need to use your gray base plate, the folder and wax paper and the raspberry adaptor plate (no tan mat for this).

 Next, remove your embossed piece of wax paper and sandwich it between two sheets of gloss card.  It must be gloss for this technique to work at it's best.  The gloss side of the card needs to be facing the wax paper on the top and on the bottom for the technique to work properly also.
Next step is to use an iron to melt the wax on to your gloss card.  I have used a regular sized iron, but have emptied any water from the iron.  You do not want steam for this.  I find the best results if I turn my iron on high and wait until it is good and hot then it only takes a few passes across the card to do the trick.  You do not want to continue ironing too long as it will cause the melted wax to lose it's pattern.  Your card will take on a bit of a heated bend to it, but don't worry it is fine.  You can also use a small craft iron on high for this too.  If using the family iron, be sure that non of the wax paper is sticking out from between the card or you will get it on the bottom surface of your iron!

 This is a picture of what your gloss card will look like when it is ready.  You will see the pattern has transferred to the card, but you will also get wrinkles from the wax paper too.  It isn't an exact copy of the pattern and that is the fun.  It will always look different every time you do it!
Pick an ink to cover your piece with.  I prefer to use the darker distress inks straight from the pad.  The colour will always look lighter when you are finished too.  Don't be afraid to use dark colours, once covered, you will wipe with a tissue to smooth the colour and take off any residue.

Last step is to cut your background to size and use it how you like.  The card above uses the same folder and technique for the background, then I added some clear embossing powder to a small piece and cut my frame, giving it a different look all together.  Don't forget, you will have two usable pieces since you sandwiched your wax paper between two pieces too.  Use one and save one for later!  I hope you have enjoyed this quick tutorial and have fun creating your own backgrounds with all different embossing folders you may own!  All for now, Sue x