Saturday 30 November 2013

Best Wishes

 Hello my crafty friends!  Sometimes it is just hard to resist doing a really quick card to get the creative juices revved up a bit.  This is one of those.  There really isn't too much in the way of a description that you need, but I used the larger die in the Filigree corner set by Becca Feeken for this card.  I cut it four times and overlapped them at the edges to create a pretty panel design.  I glued them into place against a bright blue card for a crisp contrast.  I stamped my sentiment on coconut white card and cut it out with the Fancy Tags two die (it is from an older set, but it is one of my favourite tag shapes).  I inked through the die with Weathered wood to create a frame for my sentiment, then mounted it in the centre of the card using foam pieces.  I finished the card with a double white pierced mat layer and some flatback pearls in the corners.  Nothing hard or tricky about this one (I hope you aren't disappointed!)  Finished dimensions are 7 1/2" x 7 1/2" in size.

And since you have read to the bottom of the post, you are probably looking to see if your name was drawn for the card giveaway! LOL

The winner this week is:
Hot Potato!!!
Please email me at americansue1@gmail.com to confirm your address and claim your card.  All for now, Sue x


Friday 29 November 2013

Christmas Double Day

Hi crafters!  Welcome to another double day Christmas post.    This first card is a personal favourite of mine, I have to confess.  I just love the simplicity of this design, remember I told you that it is a "go to" layout for me.  It always help jump start my creative juices.   I started with the white background and stamped snowflakes all over it using a clear perfect medium pad.  I heat embossed them with white powder for a tone on tone look (which can be seen in the close ups below).    I matted it with silver card then went to work on my focal element.  I used the snowflake background and stamped it on white card using a clear perfect medium pad.  I love this background as it has been drawn in negative.  The actual space around the snowflakes is what you are stamping, leaving the snowflakes to show up in whatever colour card you pick.  I heat embossed it with Silver Shine embossing powder.  I covered the entire piece with a sticky self adhesive sheet, then peeled the backing paper off and covered it with Iced Snow.  I trimmed it to size and backed it with a thin white mat.  I mounted it with foam atop my white background.  I stamped the sentiment and cut it into a strip and backed it with a matching silver mat.  I attached it across the card and added a silver messy bow, tulle and a crystal sparkler to complete my focal element.  I finished the card with double white pierced mat layers for a simple but elegant Christmas card.  Finished dimensions are 7" x 8 1/4" in size.


For card number 2, I have done some baubles in stained glass style.  I have to admit that I only had a few Christmas colours of glitter on hand when I made these so I decided on just red and white.  You could easily make them more interesting with the addition of another colour to the mix.  I stamped the baubles on acetate using a black archival ink pad. Acetate is slippery and not the easiest thing to stamp on, but if you use an anti- static pad over it before stamping, it does help.    I let it dry overnight (as my acetate was not heat resistant so I couldn't emboss them!)  From the back side of the acetate, again I used an anti-static pad over the area then I used Cosmic Shimmer dries clear glue to fill in the areas that I wanted to use the red polished silk glitter.  I sprinkled it on then tapped off the excess.  I did the same with the white glitter areas then set them aside to dry overnight.  Once dry, I cut them out by hand (I didn't want to risk using the die on them), but I cut a white mat for each one using the dies and glued them together.  The white backing helps to pop out the colour of the glitter used.    I created an embossed background with a glitter edge for my card.  I place double sided sticky tape all the way around the edge of the card, then sprinkled Diamond Sprinkles over it.  Then,  using the Tapestry embossing folder, I embossed the piece.   I arranged the baubles in a cluster and made them look as if they were suspended by pearl swirls.  Using the thin red ribbon, I plaited a strip to create a side border for my card (directions for this are in the tutorial section at the top of the blog under Ribbon Wreath).  I used the wider version of the ribbon to tie a double bow and added it with glue dots.  I finished the bow with a pearl embellishment.  I matted the card with a thin red mat before finishing with my double white pierced mat layers.  You could easily add a small sentiment tag if you like, I decided to leave it simple this time.  Finished dimensions are 7 1/2" x 8 3/4" in size.  All for now, Sue x


Thursday 28 November 2013

Monochrome Poinsettia

Hi crafters!  Happy Thanksgiving to those who celebrate our quaint American holiday.   Please enjoy the last of the Christmas cards videos in the "Crafting My Style" series.  There are lots of other videos coming your way still twice a week from this point on.

Buy from Joanna Sheen


Finished dimensions are  7 1/2" x 8 1/2" in size.  All for now, Sue x

Wednesday 27 November 2013

Wednesday Weekly Giveaway

 Hi bloggers!  I know there seems to be quite a few lavender themed cards on my Wednesday giveaway, but it is only because I always see comments that it is a favourite colour of many of you.  Just trying to please!  You know the drill by now, leave a comment on today's post if you would like to be in the drawing to win this one.  By the way, I am still waiting for PAPER JUNKIE to claim last weeks card!  You have to email me by Friday or I will draw another name and add it to the announcement for this one on Saturday's post.  This is the first card I made with the new background die called Crisscross.  I really like this one, mainly because it just cries out for pearls in those little squares (I had to oblige! LOL)  It also looks nice with ribbon woven through it although I think that is what most people first see when they look at it cut out.  I added some mounting foam to the back and mounted it over lavender card for dimension.  Next I used the Gold Elements Four and cut the two largest sizes of them for the back layer to my focal element.  I cut the largest one in half and to shorten it a bit and placed the other one atop it so they appeared more similar in size.  On lavender card, I stamped the Vintage Birthday stamp by Justrite using a clear perfect medium and white embossed it.  I cut it out with the Vintage Labels four die.  I stamped my sentiment from the set  in black and cut it out with the oval die in the Vintage Labels four set.  I inked through the die lightly with Milled Lavender distress ink.  I made a lavender flower using the method listed under my  tutorials at the very top of the blog, then "sugared" it using the Diamond Sprinkles.  I tied a messy bow with mauve seam binding and seated the flower with some Bakers twine.  I added a lavender mat before finishing with my double white pierced mat layer.  And of course, I added all the small flatback pearls as finishing touches!  Finished dimensions are 7" x 8" in size.  Let me know if you would like to win this one!  All for now, Sue x


Tuesday 26 November 2013

Beaded Snowflake


Buy from Joanna Sheen

Hi crafters!  One of the last of the Christmas card videos today (I think there is actually one more), but is an easy technique and you always get unique results every time.  Let me know what you think about it!


Finished dimensions are 7" x 8 1/2" in size.  All for now, Sue x

Monday 25 November 2013

You Make Me So Proud

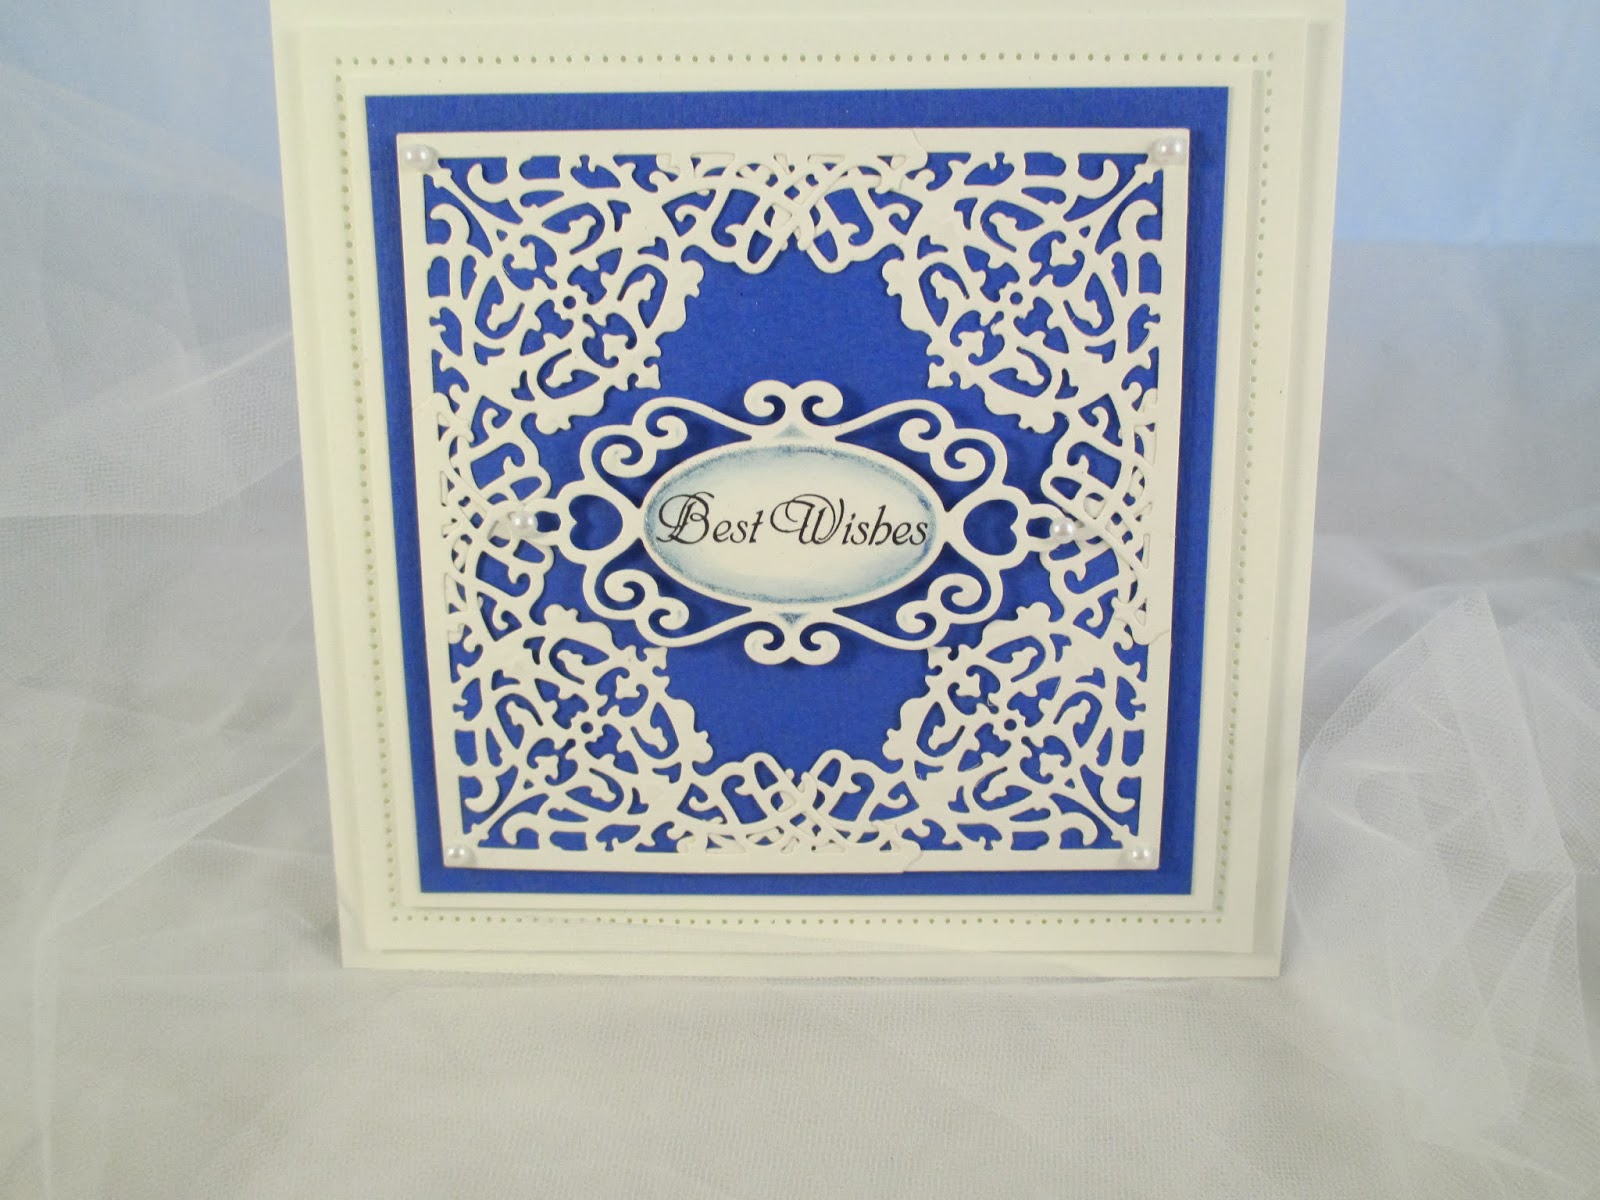
Hello all!  This is one of those cards that I could never deny that I made as it looks so much like my taste!  I love to make all white cards that have a pop of colour on them!  I started with the Majestic Labels 25 die set and I cut a frame using the largest die shape.  I added mounting foam to the back.  I stamped the background with 
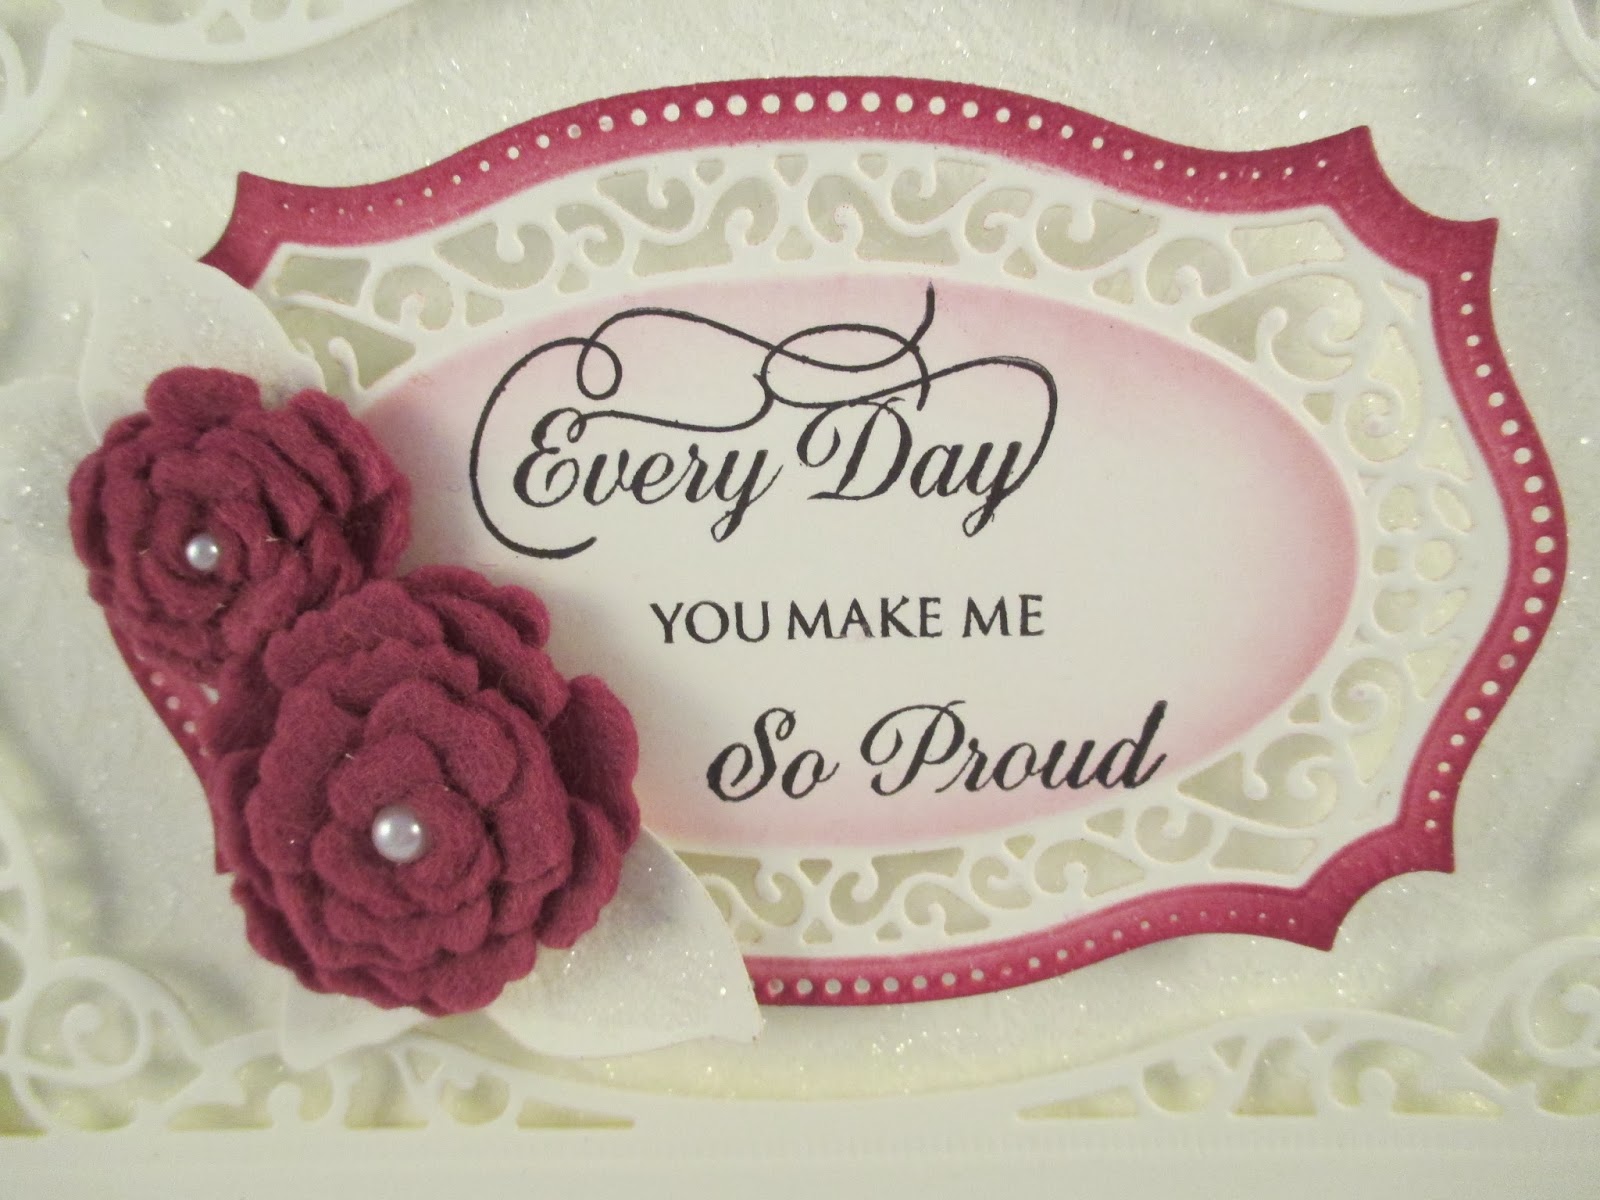
Justrite Leafy Swirl background and embossed it with white embossing powder.  I covered it with a sticky adhesive sheet and then used the Diamond Sprinkles glitter all over it.  It is very difficult to see in the photos but one of the close ups does show the white embossed areas underneath.  I placed the frame over it, giving it dimension.  Next I skipped a die in the set and went to the cutting edge with the piercing holes and inked the die with Picked Raspberry distress ink.  I cut this first so as to transfer the ink on to the card before it dried too much, then I went back and added in the next decorative die and cut the pretty detail around the sentiment.  I stamped the sentiment (from the Justrite Mix and Match sentiment set by Becca Feeken) after the cutting on this one, something I usually do first.  However, I thought that would be easier to do than to lay down an inked die straight around my sentiment without moving it, especially since the sentiment was a clear stamp!  Once I stamped my sentiment, I replaced the die and lightly inked through it with the Picked Raspberry colour.  I cut two flowers from the matching raspberry felt using the Bitty Blossom dies.  I rolled them and added them to the side of my focal element, placing small flatback pearls in the centres.  I added a few leaves around them as well.  I completed the card with my usual pierced mats and added some flatback pearls to the corners as accents.  Finished dimensions are 6 1/2" x 8 1/2" in size.


Sunday 24 November 2013

Every Day

Happy Sunday!  This is a card from some of the shows that I did in September.  I picked a peach coloured card accented with black as my colour theme.  I embossed the background with the Heart Lattice embossing folder for a delicate embossed background.  I wrapped some black seam binding around the opposite corners and matted it on black card.  Next I stamped the Lace Oval frame by Justrite using a black Archival ink pad on to peach card.  I used the Tattered Rose distress marker to give it some soft colour.  I used a Rusty Hinge to accent the centres a bit.  I cut out the centre with an oval die and stamped my sentiment from the Mix and Match sentiments and placed it behind the opening.  I used a bit of Tattered rose around the sentiment for a soft halo effect.  I cut two oval frames, one thicker one out of peach card and a thinner black frame and glued them over the aperture for my sentiment.  I cut a Spiral Flower 4 out of black felt and rolled it as an accent in the lower corner.  I finished it with a few pieces of the Bella Rose swirl cut in peach card.  A double pierced mat layer in peach finished the card off nicely.  Finished dimensions are 7" x 8 1/2" in size.

Now for the fun stuff, time to give prizes away for the Sunday Comment game.  We have two sets today.  For the first set, the winners are:
weefortune!!!
Sandra M!!!
Rosie!!!

For the extra qualifying post of Wed. Nov. 20th, the winners are:
Cinders61!!!
sonja_w!!!
Lydia Jordan!!!

Congratulations to all!  Please email me at americansue1@gmail.com to confirm your address and claim your prize.

I also wanted to let you know that Julia Watts will be on C & C today at noon for Toolshed with Nigel and then a later show at 5pm with Dawn.  She has some new Heartfelt Creations, the Sweet Juliet Collection and the Floral Key collection.  Don't forget to tune in to see some outstanding demos!  All for now, Sue x


Saturday 23 November 2013

Gilded Flower


Buy from Joanna Sheen

Hi crafters!  It's another video day and a little break from all the Christmas cards too!  Today's video has a couple of really nice techniques for you.  I hope you have a few minutes to sit and enjoy!
And...
The winner of the Wednesday Card giveaway is:
Paper Junkie!!!
 Email me at americansue1@gmail.com to confirm your address and claim your card.


Finished dimensions are 7 3/4" x 7 3/4" in size.  All for now, Sue x