Friday, 30 June 2017

Home Sweet Home

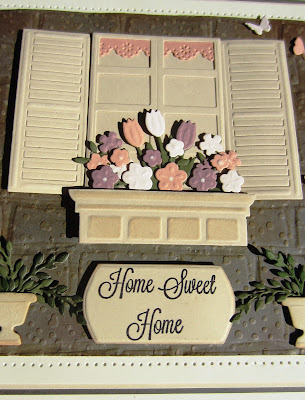
Hi there my crafty friends!  A little bit different with a 3D window box card for you.  I started with a piece of mocha card and wanted to create a background that looked like an exterior wall.  I first embossed it with the Falling Snow embossing folder to give it a texture that sort of looked like stucco (that may be an American word, not sure what the English equivalent would be), then I embossed it with our Stone mask to give it a further brick sort of appearance.  I added some Vintage photo distress ink to it around the edges and lightly across the top of the "stucco" too.  I cut the window box out of taupe card and lightly inked it with Antique Linen and folded it on the scored lines.  I cut the window and shutters too out of taupe card and I added a valance of a deep peach colour from my stash.  I cut the flowers for the window box out of green card, then cut them again out of the flower colours and cut and glued them on to the green ones and added them to the window box.  I cut two of the topiaries and nipped them off the top and kept the planter part of it.  I cut several Olive Branches and added them to each of the pots and attached them on either side of the window.  I stamped the sentiment and cut it out and added it in the centre of the potted plants.  A couple of small butterflies were added around the background as accents.  The final mats and layers were added to complete the card.  The finished dimensions are 7" x 7 1/4" in size.

There are still about four unclaimed winning dies!  Please scroll down to the post on the 28th and check the list to see if your name is among them!  All for now, Sue x


                                                        Follow my blog with Bloglovin

Thursday, 29 June 2017

Heartfelt Thanks

Hi bloggers!  Silver, dusty rose and white are the colours for this one.  I started by embossing a piece of dusty rose card from my stash with the Butterfly Dreams embossing folder.  I used Pearl Lustre gilding polish over the top to highlight the butterflies.  I cut the Atlantic Ocean Border twice out of coconut white card and backed it with silver mirror card.  I accented them with pearls and added mounting foam to raise them for dimension and attached them to the edges of the card. I cut the Megan die twice out of white card.  I backed it with dusty rose card on one and cut the centre out.    I cut the inside die and backed it with vellum and reseated it in the same opening.  I cut the second Megan die in half , adding the centre die to it and adding each half to show on the top and bottom of the focal element.   I stamped my sentiment and seated it in the centre of the card, adding a small flower as an accent.  White, silver and dusty rose mats and layers were added to complete the card.  The finished dimensions are 8" x  8 1/4" in size.  All for now, Sue x


                                                          Follow my blog with Bloglovin

Wednesday, 28 June 2017

2017 Christmas Die Release Winners

Hello crafters!  Once again thank you for the overwhelming show of support for this latest die release!  I am always on the edge of my seat wondering how they will be received every single die release, but I am so pleased that you really seemed to like these.  IT has been one of my personal very favourites to design and launch.  Considering the sweltering heat that was upon us during the launch, I thank you for getting into the Christmas spirit so early!  What I didn't want to confess to too early was that I probably made more Christmas cards with this release than I have with any of my previous releases so you will be seeing a serious amount of them (so sorry!).  Now on to the winners!

The 2017 Christmas Angel:  Nanny Joo Joo from Sunny Scunty!!!
Three Wise Men: Barbara W (Worchestershire)!!!
Poinsettia Stained Glass: Denise Hancock!!!
Robin Redbreast Stained Glass: Stitchingranny (Helen)!!!
Twinkle Star Frames: Yvonne 19856!!!
Lattice Holly Frame: Heather R (Oxfordshire)!!!
Noelle Frame: Di B in Tasmania!!!
Twinkle Star Background: Jen from Bognor!!!
Radiating Star: June Smith!!!
Poinsettia Star: Sammy Onion!!!
Reindeer Snow Globe Scene: Annie Stamps!!!
Here Comes Santa Snow Globe Scene: Jane the Craft Bucket!!!
Forest Animals:  Bejay Roles!!!
Winter Wonderland:  Hazel Young!!!
Birch Tree Background: Wendy IOW Downes!!!
Snowflake Edger:  Rosemary Powell!!!
Garland Edger: Jan Sayer!!!
Merry & Bright: Cathie Weary!!!
Stitched Snowflake Striplet:  Clai01!!!
Frosty Frames:  Patricia Howarth!!!
Tidings Of Comfort & Joy:  Myra (friend of Maureen)!!!
Lace Snowflake Frame: Lynne L (Havorfordwest)!!!
Let It Snow Snowflakes: Chris Curry!!!
Art Deco Snowflake: Lorraine Eastwood!!!
Gingerbread Man: Sue Mac!!!
From Our House to Yours:  Bridget CG!!!
Gingerbread House:  Jan Moogie!!!
Gingerbread House Roof:  Gailgale!!!
3D Fireplace:  Eileen Elder!!!
Looped Snowflake: Jacqui oakes-alcock!!!
Checkerboard Poinsettia Border: Anne (Northampton)!!!
Scalloped Snowflake Frame: Evis M!!!
Lattice Ribbon:   Karene  M from Australia!!!
Poinsettia Flourish:  Ivy Ling!!!
Snowflake Flourish and Corners: Veronique L!!!
Pine Cone & Greenery:   Nana on the Hill!!!
Merry Little Christmas:  Craft Cornicopia!!!
Holly Swirl:  Karen M Plymouth!!!
Berry Bough:  Patricia Youdell!!!
Poinsettia Cluster:   CCM Carmen!!!


Congratulations all!!  Please email me at americansue1@gmail.com to confirm your address and claim your die.  Please put the name of your winning die in the subject line as this really helps to keep things organised and get the correct die to you! All for now, Sue x

Wednesday Weekly Card Giveaway

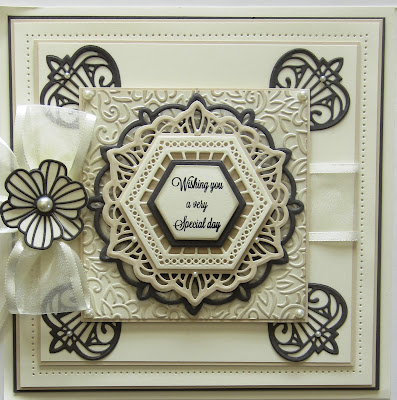
Hi crafters!  I first want to mention that today is the day that I will be doing the die drawings and posting the winners so don't forget to check back later this afternoon!  First though, we have this card on offer for the giveaway this week.  I selected milk card as the background colour and I wrapped a piece of satin edged organza ribbon around the centre and taped the ends to the back.  I cut four of the Pacific Ocean Corners out of mocha card and glued them into each corner.  Next I cut a smaller piece of milk card and embossed it with the Jacobean Floral embossing folder for texture.  I inked it lightly over the top with frayed burlap. I cut the Bora Bora die in Mocha as a base, then added the Fiji die cut out of taupe card.  I cut the centre of the Bora Bora out of milk and added the Tahiti centre to it and attached it to the centre.  I stamped my sentiment and cut it out with the small hexagon and added a slightly larger mat to it.  I tied a bow and added it to the side and topped it with a matching flower cut from the Striped Nasturtium set.  Milk, taupe and mocha mats and layers were added to complete the card.  The finished dimensions are 8" x  8" in size.  Leave a comment to be included in the drawing to win this card.  All for now, Sue x


                                                        Follow my blog with Bloglovin

Tuesday, 27 June 2017

Tropical Silhouette Card


Hi bloggers!  There is nothing prettier than a silhouette against a sunset sort of background!  I will show you how to achieve this very easy look in this video.


 The finished dimensions are 7 1/4"  x  9 1/4" in size.  All for now, Sue x


Follow my blog with Bloglovin

Monday, 26 June 2017

You Are The Best

Hello there my crafty friends!  I do have to confess that I designed this card entirely around the embossing folder (that I had just received in the post!)  I really love the way it frames everything.  I embossed the Jasmine Frame embossing folder using coconut white card as my background.  I added some flatback pearls in the corners and matted it with a thin black mat.  For the focal element, I cut the Azores die out of white and backed it with silver mirror card.  I cut one more backing piece in black and cut it in half and added it to the top and bottom edges as a shadow.  I cut the Atlantic Ocean tag out of white and backed it with black, then cut it down the centre.  I attached one piece of it to the sides of the Azores so it was just peeking out the left and right sides.  Next I cut the same tag again but in vintage silver card twice and in black card twice.  I used the black as a shadow on booth of the silver tags, then crisscrossed them and attached them to the middle of the card.  I stamped my sentiment and cut it out with the centre of the tag and added a black shadow to it as well using the slightly larger centre of the other tag in the set.  I cut the Chrysanthemum die using two of each of the sizes in the set, offset them and glued them all together.  I used a silver paint pen on the tips.  I seated the flower of a black satin ribbon bow and added a few leaves from the set as accents.  White, silver and black mats were used to complete the card.  The finished dimensions are 7 1/4" x  9" in size.  All for now, Sue x


                                                        Follow my blog with Bloglovin

Sunday, 25 June 2017

Stork Double Day

Good Sunday morning all!  I have two simple cards to share with you today, both using the Stork and Baby die set.  For this first card, I embossed a piece of coconut white card with the Dotted Matrix Pinpoint folder for texture.  I cut a strip of decorative paper from my Classic Elegance paper pad and added it to the bottom of the card.  Out of Iris card, I used the Striped Swirl Edger and backed it in white and added it to the card where the two sections met.  I used Wisteria, Iris and white card and made two flowers from the Stitched Doodle Flowers die set and seated them on the border with some pale green leaves cut from the die set as well.  I used the Double Pierced Noble Ovals and made a base for my stork.  I cut him in white and added a wisteria hat and heart on the baby pouch cut in Iris card.  The sentiment was cut in both white and Iris and added to the left.  White, wisteria and Iris mats and layers were added to complete the card.  The finished dimensions are 7" x  8 1/2" in size.  Scroll down for card number two.


Card number two has been down in Duck Egg blue and chestnut brown colour tones.  I used the same embossing folder for the background on a piece of coconut white card.  I tied a piece of  two tone organza ribbon from my stash around the bottom of the card and added a bow to the right side with a pearl embellishment.  I cut a smaller piece of Duck Egg blue card and added a border around the edge that was made by cutting the sides of the Stitched Lattice Frames down in size.  I cut the stork in white, adding a brown hat and heart to the duck egg blue baby pouch.  I cut the It's A Boy in duck egg blue and used it in Chestnut brown card  as an offset shadow.  White, duck egg and chestnut mats and layers were added to complete this card.  The finished dimensions are 6 1/2" x  8" in size.  I hope you have enjoyed the simplicity of today's double day!  All for now, Sue x


                                                      Follow my blog with Bloglovin