Wednesday, 31 January 2024

Best Wishes

 Hello there my crafty friends!  I selected a piece of blush pink card to use as the background.  I cut the Stained Glass Sunflower outer die twice out of white card.  I offset them and matted them together and added it to the top of the card.  I cut the middle die in black and added it on to the previous layers.  I cut the centre die with two pieces of white card.  I used the second piece (that was just embossed with the design) and coloured it with markers.  I added a piece of sticky adhesive sheet and trimmed it to the edge of the circle.  I peeled the backing paper off and added the white die cut to it.  I used Frosted Sparkle Glitterbitz on the exposed adhesive.  I cut the Best Wishes in black and added it to a white shadow backing die.  The card was completed with white and black mats and layers.  The finished dimensions are 7"  x  8 1/2" in size.  All for now, Sue x


                                                          Follow my blog with Bloglovin

Tuesday, 30 January 2024

Just Because

Hello crafters!  I embossed a piece of black card with the Tidal Sands embossing folder.  Next I cut a white frame using the Double Stitched Rectangles.  I added mounting foam to the back of the frame and I added a piece of white card with a sticky adhesive sheet added to it, then strips of Silver Sparkle card added to it. I used Frosted Sparkle Glitterbitz on the remaining exposed sticky areas.   I cut Buddy in black and added the floppy ears and a small red flower and a white envelope with a red heart.  I cut several daisies from the Delicate Daisies set in red.  I assembled them and added them in opposite corners of the frame. I cut the Magnolia Corner in white and nipped it apart to use as accents with the flowers.  I cut the Just Because sentiment in black and glued it inside the frame.  The card was completed with red, white and black mats and layers.  The finished dimensions are 8"  x  9"  in size.  All for now, Sue x


                                                      Follow my blog with Bloglovin

Monday, 29 January 2024

For A Special Friend

Hello bloggers!  I selected a piece of Amethyst card to use as the background.  I ran a strip of double sided tape all the way around the edges and coated it with Regal Purple Iridescent Mica powder for a lovely sheen.  Next I cut a piece of black card and matted it with white card and attached it to the middle of the card.  I cut the Layered Tulips out of two shades of purple card.  I assembled the flowers, then cut the leaves and stems in two shades of green.  I attached the five tulips across the card.  I cut the For A Special Friend sentiment in black and glued it to a white shadow backing piece.  I attached the sentiment above the tulips.  The card was completed with amethyst, black and white mats and layers.  The finished dimensions are 8"  x  9"  in size.  All for now, Sue x


                                                        Follow my blog with Bloglovin

Sunday, 28 January 2024

Thinking Of You

Good Sunday morning all!  I was trying out a technique that I saw online in this card.  I started with a piece of white card and I randomly added ink all over the card.  I used Peacock Feather,  Blueprint Sketch and Crushed Olive Distress Oxide inks.  Next I embossed the piece with the Peony Blooms Embossing folder.  Once embossed, I used a black sharpie to colour in the floor areas between the flowers.  The next step was to lightly go over the top of the design with a clear Perfect medium pad.  I sprinkled gold embossing powder over it and heated it.  It gives a rather distressed look while adding a pretty shine when the card is moved around.  I cut the Noble Thinking Of You sentiment in black and glued it to a white shadow backing die.  I added it to the card with mounting foam.  The card was completed with white mats and layers.  The finshed dimensions are 7" x 7"  in size.  All for now, Sue x      


                                                       Follow my blog with Bloglovin

Saturday, 27 January 2024

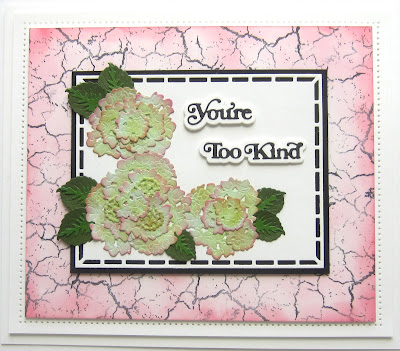
You're Too Kind

Hello bloggers!  I selected a piece of white card to use and stamped it in black with a texture stamp with veins in it (sorry, its from an old set and I don't recall the name of it).  I inked the card with Worn Lipstick distress ink all around the edges.  Next I cut a Stained Glass Rectangle in white and added a black backing piece behind it.  I cut the Layered Hydrangeas in white and inked thm with Worn Lipstick and Antique Linen distress inks.  I layered up the Hydrangeas and glued them to the centre, then added green leaves around each of the flower heads.  I cut the You're Too Kind sentiment in black and added it to a white shadow backing piece.  I added them to the card with mounting foam.  The card was completed with white mats and layers.  The finished dimensions are 7 3/4"  x  9"  in size.  All for now, Sue x 


                                                       Follow my blog with Bloglovin

Friday, 26 January 2024

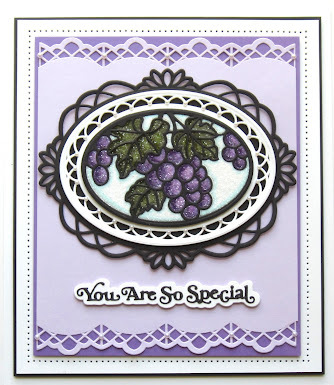
You Are So Special

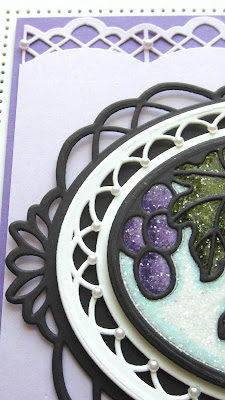
 Hello crafters!  I selected a piece of Wisteria card for the background.  I used one of the dies from the Ornate Lattice Border die set and cut it into the top and bottom edges of the card.  I backed it with Amethyst card.  Next I cut the Stained Glass Grapevine die.  I cut the outermost die in black and layered the middle die cut in white on to it.  I cut the Grapevine die with a piece of black card on top of a piece of white card.  I used the white card to colour the image with markers.  I added a piece of sticky adheisve sheet over it and trimmed it to the edge of the oval, then attached the back die cut version on top.  I coated the entire die cut with Frosted Sparkle Glitterbitz, then I used the markers to add some shading directly onto the glitter (it gives it a very intresting look in real life).  I attached the Grapevine die cut to the centre of the card.  I cut the You Are So Special sentiment in black and added it to a white backing shadow.  The card was completed with white and black mats and layers.  The finisged dimensions are 7 1/4"  x  8 1/4" in size.  All for now, Sue x


                                                                      Follow my blog with Bloglovin

Thursday, 25 January 2024

Thank You For Pet Sitting

 Hi bloggers!  I started today's card by stamping hearts from the Pet Pals Stamp set all over a piece of white card.  I used Picked Raspberry and Spun Sugar Distress inks to stamp the heart.  I cut an aperture in the middle using the Double Stitched Ovals.  I cut a white frame to go around the aperture and added it with mounting foam.  I added mounting foam to the back of the background and attached a piece of blush pink card.  I cut Milo out of tan card.  I added two darker brown ears.  I cut the doggie sweater in raspberry card and I added a white envelope with a pink heart to his mouth.  I stamped the sentiment from the Pet Pals stamp set and cut it out with the Double Stitched Rectangles.  I inked the die befor removing it with Picked Raspberry ink.  I added the sentiment to the frame with mounting foam.  I also added a small pink flower to the edge of the frame and pink hearts inside the frame.  The card was completed with white mats and layers.  The finished dimensions are 7"  x  8 1/4" in size.  All for now, Sue x


                                                        Follow my blog with Bloglovin

Wednesday, 24 January 2024

Just For You

Hello there my crafty friends!  I covered a piece of red card with a sticky adhesive sheet then cated it with Fire Red Polished Silk Glitter.  Next I cut a white frame using the Clipped Corner Rectangles.  I added mounting foam to the back and attached it to another piece of white card.  I cut the Layered Rose out of white card and inked the centres with Festive Berries Distress ink.  I cut the leaves and stems out of green card.  I assembled all the rose pieces then glued it into the frame.  I added some clear water crystals as accents.  I attached the frame to the red glittered background.  I cut the Just For You sentiment in black and added it to a white shadow backing, then attached it above the focal element with mounting foam.  The card was completed with white, red and black mats and layers.  The finished dimensions are 7"  x  8 1/2"  in size.  

The winner of the January Blog Launch Die Release is....................................................................................................................................................................................................................................................................................................

                                                               Ann Topp!!!

Congratulations!  Please email me at americansue1@gmail.com to claim you winnings and confirm your postal address.  All for now. Sue x


                                                        Follow my blog with Bloglovin