Hi bloggers! Gold and white are the colours for today's creation and my favourite Bed of Roses folder is back (no surprise there, huh?!) I started by embossing the background coconut white card with the folder for texture. Next I cut the Pavo die in white using all three pieces. I backed it in white and also cut another backing piece in gold to use as a shadow. I mounted the Gemini die and shadow with foam and added it to the lower portion of the card. I stamped the Shaded Peony stamps an embossed them in white on to gold card and cut them out. I created one larger flower and two smaller ones. I "sugared" the larger flower with Iced snow. I seated all three flowers along the top middle of the Pavo die. For the focal element, I stamped my sentiment and embossed it in gold, then arranged the Montreal die so it was centred over it and cut it using all the decorative pieces. I backed it in gold, then added the cutting dies to create several layers. I added mounting foam to raise the outer layer. I sprayed the inner white layer with spray glue, then added Diamond Snow, then added the gold backing and recessed the sentiment down into the centre. The Elegant Lace Edger corner was cut in white and added to each side as an accent piece. I completed the card with a pierced white layer, a thin gold mat and a slightly larger white mat. The finished dimensions are 7 3/4" x 8 1/4" in size. All for now, Sue x
Follow my blog with Bloglovin
A daily papercrafting blog which features my handmade cards showcasing Creative Expression's products including my own line of cutting dies and embossing folders, Cosmic Shimmer, Ranger and more which use various techniques and ideas to hopefully inspire the creativity in you.
Tutorials
- Home
- My Ribbon Flower Tutorial
- Fancy Nestie
- Blossoms Five Flower Bud
- Blossoms Five Full Flower
- Easel Tutorial
- Wax Paper Embossing Folder Tutorial
- Caught In Crystal
- Shaving Foam Tutorial
- Quilt Card Tutorial
- Paved Pearl Technique
- Faux Leather Technique
- Plaited Ribbon Wreath Tutorial
- Paper Rose Tutorial
Monday, 30 November 2015
Sunday, 29 November 2015
Thank You
Good Sunday morning all! Yes it's a channel card, you know how much I love doing them! LOL I used the Vancouver decorative die to cut into the top portion of a piece of coconut white card. I used the outer die from the Lattice and Lace Striplet to cut the channel in the bottom of the card. I added mounting foam to the backs of the two pieces to raise them, creating the channel. I matted them with Sky blue card behind, showing through the die cut. I cut the Lattice and Lace Striplet in white and recessed it into the matching channel on the lower portion of the card. I stamped my sentiment then used the inner section from the Montreal die to create a frame to put over it. I mounted it in the centre of the Vancouver die cut. The card was then completed by adding a white pierced mat, a thin blue mat and another white mat. The finished dimensions are 6 1/2" x 8 1/2" in size.
Now for the winners of the weekly comment game. This week's winners are:
Yvonne May!!!
Sunshine Pen!!!
Sparrow!!!
Congratulations all! Please email me at americansue1@gmail.com to confirm your address and claim your prize! All for now, Sue x
Follow my blog with Bloglovin
Now for the winners of the weekly comment game. This week's winners are:
Yvonne May!!!
Sunshine Pen!!!
Sparrow!!!
Congratulations all! Please email me at americansue1@gmail.com to confirm your address and claim your prize! All for now, Sue x
Follow my blog with Bloglovin
Saturday, 28 November 2015
Polished Stone Technique
Hi bloggers! Here is a technique that has been around for a long time (I think it was created by Tim Holtz initially!), but it does yield beautiful backgrounds!
The winner of this week's Wednesday card giveaway is:
Lorraine Eastwood!!!
Congratulations! Please email me at americansue1@gmail.com to confirm your address and claim your card.

The finished dimensions are 7 1/2" x 9 1/2" in size. All for now, Sue x
Follow my blog with Bloglovin
Friday, 27 November 2015
Christmas Double Days
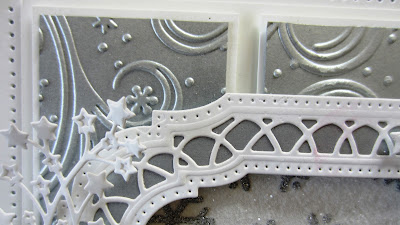
Hi bloggers! We are getting closer and closer now to Christmas so I hope you have finished up on your festive cards, but if not, here is a bit more inspiration for you. The first card was started by embossing a piece of silver card with the Frosty Swirls folder, then cutting it into three panels. I mounted them on a piece of white card and this served as my background. I cut the Ornate pierced Design Noble in white and backed it with silver, cutting it into a frame. I used the Snowflake mask and pulled Silver Moon Sparkle texture paste through it and allowed it to dry overnight. Once dry, I sprayed it with permanent adhesive and glittered it with Diamond Sprinkles. I mounted my frame over it. I stamped my sentiment and cut it out with the Pierced Flags set, using a slightly larger die to create a mat in silver. I mounted it through the centre of my frame and created several poinsettias out of vellum to cover the end of the flag die and add some accents on the opposite side of the frame. I used the Elegant Poinsettia stamp on the vellum and then cut them out with the matching Classic Poinsettia die. I seated them on white tulle and added Star Sprays in white around them as accents. I complete the card with white and silver mats which I pieced and layered. The finished dimensions are 8" x 8" in size. Scroll down for card number two.
I started the second card by cutting a pierce of sky blue card with the Ornate Pierced Noble Rectangle die then embossing it with the Illusion embossing folder for texture. I backed it with gold card and added pearls in each of the corners. Next I cut the Ornate Pierced Noble Design in white as a backdrop fro the Debossed Snowflake which I cut in gold. I stamped my sentiment and cut it out with the pierced flag dies and matted it with blue card. I tied a double bow from silky crush gold ribbon and added it at the side of the sentiment. I topped it with Snowflakes cut from both gold and blue card and added some gold threads below it. I completed the card with a white pierced mat, then added both gold and blue mats and then added another white mat. The finished dimensions are 6 1/4" x 7 1/.2" in size. Two very different cards, but I hope you see something you like! All for now, Sue x
Follow my blog with Bloglovin
I started the second card by cutting a pierce of sky blue card with the Ornate Pierced Noble Rectangle die then embossing it with the Illusion embossing folder for texture. I backed it with gold card and added pearls in each of the corners. Next I cut the Ornate Pierced Noble Design in white as a backdrop fro the Debossed Snowflake which I cut in gold. I stamped my sentiment and cut it out with the pierced flag dies and matted it with blue card. I tied a double bow from silky crush gold ribbon and added it at the side of the sentiment. I topped it with Snowflakes cut from both gold and blue card and added some gold threads below it. I completed the card with a white pierced mat, then added both gold and blue mats and then added another white mat. The finished dimensions are 6 1/4" x 7 1/.2" in size. Two very different cards, but I hope you see something you like! All for now, Sue x
 | |
  |
Thursday, 26 November 2015
Four Square Frame
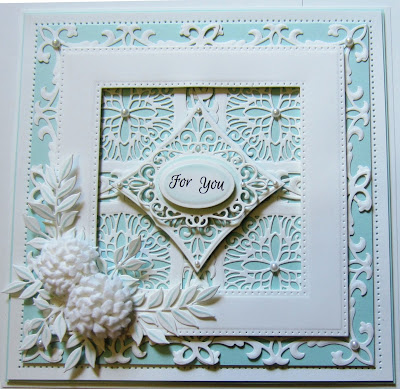
Hi crafters and Happy Thanksgiving to my American blog followers! Here is another use for the beautiful Heraldic Square die. I just love all the ways this one can be used!
Follow my blog with Bloglovin
Wednesday, 25 November 2015
Wednesday Weekly Card Giveaway
Follow my blog with Bloglovin
Subscribe to:
Comments (Atom)


