Thursday, 8 February 2024

You're Too Kind

Hello crafters!  I started by embossing a piece of white card with the Rope Chain Embossing Folder.  Using the Layered Garden Rose, I cut three of the full sized flower out of shades of purple.  I cut four of the Rose Buds too and added the flowers and buds to the stems and leaves.  I arranged them in an oval shape and added a white oval frame using the Double Stitched Ovals in the middle of them.  I cut the You're Too Kind sentiment out of lavender card and shadowed it in black.  I glued it inside the oval frame.  The card was completed with white and black mats and layers.  The finished dimensions are 7 1/4"  x  8 1/4"  in size.  All for now, Sue x


                                                        Follow my blog with Bloglovin

Wednesday, 7 February 2024

Just A Note

Hello crafters!  I selected a piece of pixied card to use for the background.  I used white gloss card and sprinkled it with Midnight Blue Pixe Powder and spritzed it.  I covered it with a piece of cling film and scrunched it up and set it aside to dry overnight.  I cut two Looped Circles in white and matted them together and attached them to the pixied background.  I cut Rufus in brown and added his eyes in black.  I cut a white envelope and added a red heart then added the envelope in his mouth.  I cut a small red flower with green leaves and added it to his head.  I cut the Just A Note sentiment out of white card and glued it below the Looped Circles.  I made two dimensional flowers using the Magnolia Corner flowers, then glittered them with Frosted Sparkle Glitterbitz. I accented the flowers with the magnolia Corner cut in white and added around the flowers.  I added several red hearts at the top of the card.  The card was completed with white mats and layers.  The finished dimensions are 7 1/4"  x  8 1/4"  in size.  All for now. Sue x


                                                        Follow my blog with Bloglovin

Tuesday, 6 February 2024

For A Special Friend

 Hi there my crafty friends!  I started today's card by cutting the Hexagon Background out of white card.  I added a white backing piece to it.  Using the Layered Hibiscus die set, I made six flowers out of reds, yellows and pinks.  I assembled all the pieces and added the flowers across the card diagonally.  I cut green leaves to add to each of the flowers.  I cut the For A Special Friend sentiment cut in black.  I glued the sentiment into the lower right corner of the card.  The card was completed with white mats and layers.  The finished dimensions are 7 1/4"  x  7 1/4" in size.  All for now, Sue x


                                                       Follow my blog with Bloglovin

Monday, 5 February 2024

Wish Big

Hello bloggers!  I went to my cut card stash pile again for the background of today's card.  I selected some custard, blush and Arctic Blue card and cut them in one inch strips.  I added them to another piece of card with a sticky adhesive sheet added to it.  I lined up the colours next to each other and then embossed the entire piece with the Balloon embossing folder for texture. I had to extend the design so I moved it along and embossed the rest of the piece.   I cut the Stained Glass Birthday die starting from the outer die, I cut it in white.  I added the next die cut in arctic blue card.  I cut the birthday die with two pieces of white card at the same time.  I used the bottom piece to colour the image with pastel markers.  I covered it with a piece of sticky adhesive sheet and trimmed it to the edge of the oval.  I added the white die cut on top then coated it with Frosted Sparkle Glitterbitz.  I cut the Wish Big sentiment out of arctic blue card and added it to a white shadow backing die.  I used foam mounting tape and added it below the focal element.  The card was completed with white mats and layers.  The finished dimensions are 7"  x  7 3/4" in size.  All for now, Sue x 


                                                        Follow my blog with Bloglovin

Sunday, 4 February 2024

Happy Valentine's Day

 Good Sunday morning all!  I had this card from a year or so ago and never posted it so I thought I had better post it before we get to Valentine's Day!  I used some decorative papers from my stash (these were from Hobby Lobby in the US).  I cut the Pressed Shirt out of some coordinating striped paper. I added a red pocket to the shirt and a black collar and sun glasses to the pocket.  I cut a thin black strip of card and glued it across the join in the two background papers.  I cut the Happy Valentine's Day sentiment in white and glued it to the bottom of the card.  The card was completed with white and black mats and layers.  The finished dimensions are 6 3/4"  x  8 1/4"  in size.  All for now, Sue x


                                                          Follow my blog with Bloglovin

Saturday, 3 February 2024

For My Friend

 Hello crafters!  I started with a piece of brown Kraft card and used the Stained Glass Rectangles to cut into the card.  I added a piece of aqua card covered with a sticky adhesive sheet behind it. I used Frosted Sparkle Glitterbitz on the exposed adhesive areas.   I cut the Layered Asters next out of shades of aqua and ocean card.  I assembled the flowers then cut the stem and leaves in green.  I arranged the flower on the card and glued it in place.  I cut the For My Friend sentiment in aqua card and shadowed it with Ocean card and glued it to the bottom of the frame area.  The card was completed with white and ocean card.  The finished dimensions are 7 1/2"  x  8 3/4"  in size.  All for now, Sue x


                                                         Follow my blog with Bloglovin

Friday, 2 February 2024

Birthday Wishes

 Hello bloggers!  It was back to the scrap box for today's card background.  I used black, white and silver sparkle card cut into one half inch strips.  I covered a piece of card with a sticky adhesive sheet then lined up the strips of card tightly to each other.  Next I cut two of the Looped Ovals in white and matted them together and attached them to the centre of the card.  I cut  Mittens the cat in white and used a black marker to fill in her patches.  I cut the envelope out of blush card and added a darker pink heat to it then added it in her mouth.  I cut the Birthday Wishes sentiment in black and added the words to a white shadow backing die and added them in opposite corners.  I cut several hearts out of old rose card and scattered them on the top and bottom of the card.  The card was completed with white, black and old rose mats and layers.  The finished dimensions are 7 1/2"  x  8" in size.  All for now, Sue x


                                                         Follow my blog with Bloglovin

Thursday, 1 February 2024

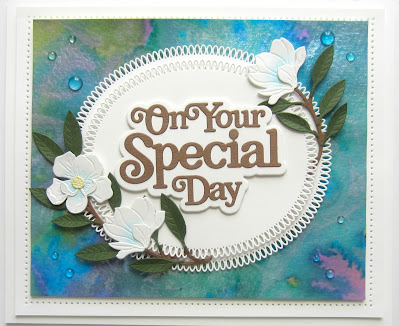
On Your Special Day

Hello there my crafty friends!  I found this pixied card in my craft stash to use for the background on today's card.  I used Aqua Lagoon, Golden Mint and Candy Pink Pixie Powders.  I cut the Noble Looped Ovals and matted together two of them cut in white.  Using the Layered Magnolia die, I made two sections and lightly inked the flowers with Tumbled Glass Distress ink.  I cut the stems out of brown card and added green leaves to them.  I added the two sections on opposite sides of the ovals.  I cut the On Your Special Day sentiment  in brown and added it on to a white shadow backing die cut and attached it in the middle of the card.  I added several clear water crystals to the background as accents.  The card was completed with white mats and layers.  The finished dimensions are 7 1/4"  x  8 1/2"  in size.  All for now, Sue x
 
Available to purchase here:
https://www.creative-expressions.uk.com/product/creative-expressions-sue-wilson-layered-flowers-collection-magnolia-craft-die/


                                                          Follow my blog with Bloglovin