Monday, 31 August 2020

Hello Sunshine

Hello crafters!  It's a purple kind of day today! LOL  I started with a piece of coconut white card and cut the Joanie decorative die out of it four times.  I backed it with a piece of lilac card then used the inside cutting die from the Joanie set and cut an aperture in the centre.  I added mounting foam to the back to raise it then added it over a piece of white card.  I used the two outer cutting dies from the Joanie set and cut a thin frame using Iris card and glued it around the aperture opening.  I cut one more Joanie die out of white card and added it to a white backing with sticky adhesive sheet on it.  I used Frosted Sparkle Glitterbitz on the exposed adhesive, then recessed it down into the aperture.  I cut two Decorative Flag dies and extended them both to varying lengths, giving them both forked ends.  I stacked them then attached them across the opening.  I cut the Hello Sunshine sentiment out of Iris card and glued it to the flags.  I used a small lilac flower as an accent next to it.  The card was completed with white and Iris mats and layers.  The finished dimensions are 8 1/4"  x
8 1/4" in size.  All for now. Sue x


                                                       Follow my blog with Bloglovin

Sunday, 30 August 2020

Happy Birthday

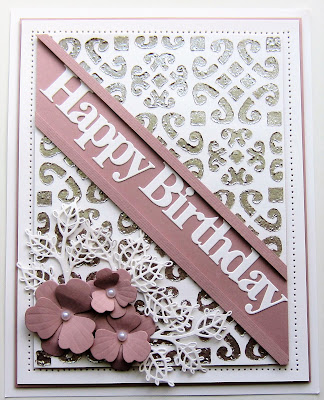
Good Sunday morning all!  I started this card by taping the Lattice mask to a piece of white card.   I used the Mink Luna Paste through the mask and allowed it to dry well.  Once dry, I cut it on a diagonal and added the two pieces to a piece of Old Rose card, leaving a gap in the centre.  I cut the Noble Happy Birthday in white and glued it into the gap area.  I added two thin strips of Old Rose card on foam on either side of the gap.  I used the Striped Nasturtiums flowers cut in Old Rose and made three flowers.  I seated the flowers in a cluster in the lower portion of the card.  I used Lace Edged Leaves as accents cut in white.  The card was completed with white and Old Rose mats and layers.  The finished dimensions are 6 3/4"  x
8 1/2" in size.  All for now. Sue x


                                                     Follow my blog with Bloglovin

Saturday, 29 August 2020

To A Dear Friend

Hello crafters!  I am trying out a new colour of Glitter Kiss on today's card.  While it looks rather dark in the pictures unfortunately, it is a really lovely rich wine colour in real life and quite beautiful (better in the close ups) too!  I used the Garnet Glitter Kiss to cover a piece of card and allowed it to dry thoroughly.  I cut it in half and used the Quilted Heart embossing folder on it.  I cut it on the diagonal and embossed a piece of white card with the same folder.  I lined up the pattern on the two, then added a thin white strip across the two sections.  Using the Camilla die, I cut the outline out of the leftover piece of the Glitter Kiss card.  I also cut the solid flowers from the Striped Nasturtiums.  I cut the Camilla die again out of white card and glued it to the backing piece.  I stamped my sentiment then cut a small frame for it out of the Double Stitched Circles.  I added the frame over the sentiment with foam, then glued it into the centre of the Camilla die,  I attached it to the upper portion of the card.  I cut the striped die from the Striped Nasturtiums and glued them onto the solid ones and assembled two flowers.  I seated them along the border and added Magnolia Corner cut into pieces as accents.  I cut the To A Dear Friend sentiment twice out of white card and stacked them, then glued them to the lower portion of the card.  The card was completed with white mats and layers.  The finished dimensions are 6 1/4"  x  7 3/4" in size.  All for now, Sue x


                                                    Follow my blog with Bloglovin

Friday, 28 August 2020

Let It Snow

Hi crafters!  Yesterday you saw the Opal Blaze on black card.  Today, it is the Opal Blaze on white card!  Completely different look, but the same product!  I used each of the seven colours of Opal Blaze on to a piece of white card.  The funny thing is that the colours do not actually even come off looking like what you would expect on white card either!   As you look at the close ups, you can see the subtle tones of green, red, gold,  lilacs and blues.  I used the Snowflake Silhouette and cut into the card and backed it with a piece of white card.  The look is more of a mother of pearl look, but you can see the differing colours when you move the card in real life.  I cut several of the Classic Poinsettias out of vellum and rubbed them with the Opal Blaze colours as well.  I seated them in the lower right corner and used Evergreen Branches as accents.  I used the Snow die/stamp combo cut out of silver mirror card with a black shadow, then stamped the "Let It" onto white card and cut it out.  I mounted it above the main word in the upper corner.   This is one of my personal favourite Christmas cards from this year's release,  I love just love that it is not like anything you would expect for a Christmas card, but it is so elegant!   The card was completed with white mats and layers.    The finished dimensions are  6"  x  8 1/4" in size.  All for now, Sue x


                                                      Follow my blog with Bloglovin

Thursday, 27 August 2020

You Make My Heart Smile

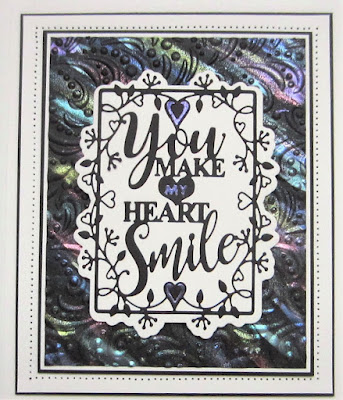
Hello there my crafty friends!  Today's card was actually not going to be a card.  I was just given the new Opal Blaze products and wanted to see what they looked like.  These products are designed specifically to show up on dark card so I used a piece of black card and swiped a bit of each colour on it.  When I was done, I liked the look of it so much that I just had to use it as a background!  All seven colours of the Opal Blaze are on the background.  I decided to emboss it with the Dotty Flourish embossing folder for texture.  I cut the You Make My Heart Smile All In One in black and glued it to a white backing.  I added some Opal Blaze to a few of the fall away elements; two hearts and the word "my" and paper pieced them back into the design.  The card was completed with white and black mats and layers.  The finished dimensions are 7"  x  8 1/4" in size.  All for now, Sue x


                                                     Follow my blog with Bloglovin

Wednesday, 26 August 2020

Miss You

Hello there my crafty friends!  I started this card by embossing a piece of white card with the 3D Flourish Border Frame embossing folder.  Next I used a piece of Pixie Powder background from my stash.  It used Emerald Green, Teal Wash and Rich Gold Pixie Powders.  I cut the Vivian die out out it.  I use the outer cutting die from the Vivian to cut a black backing piece and attached the two pieces with foam.  I cut the centre of the die out of white card and layered it in the middle.  I used the Miss You sentiment cut in black and glued it to the centre.  I attached a sticky adhesive sheet t a  piece of white card and cut the flowers from the Magnolia Corner out of it.  I glittered them with Frosted Sparkle Glitterbitz then assembled them into three flowers.  I seated them on the left side of the die and used Lace Edged Leaves as accents around them.  The card was completed with white and black mat"  x  8" in size.  All for now, Sue x


                                                      Follow my blog with Bloglovin