A daily papercrafting blog which features my handmade cards showcasing Creative Expression's products including my own line of cutting dies and embossing folders, Cosmic Shimmer, Ranger and more which use various techniques and ideas to hopefully inspire the creativity in you.
Tutorials
- Home
- My Ribbon Flower Tutorial
- Fancy Nestie
- Blossoms Five Flower Bud
- Blossoms Five Full Flower
- Easel Tutorial
- Wax Paper Embossing Folder Tutorial
- Caught In Crystal
- Shaving Foam Tutorial
- Quilt Card Tutorial
- Paved Pearl Technique
- Faux Leather Technique
- Plaited Ribbon Wreath Tutorial
- Paper Rose Tutorial
Monday, 31 January 2022
Here's To New Beginnings
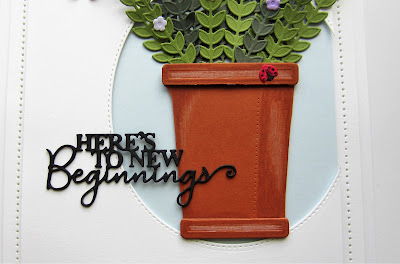
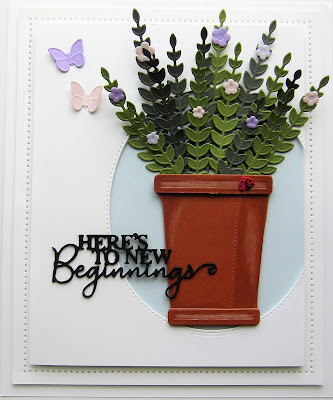
Hi there my crafty friends! I started with a piece of white card and cut an aperture in it using the Double Stitched Ovals. I cut the aperture so it went off the edge of the card (just for interest). I added mounting foam to the back and attached it to a piece of Arctic Blue card. Next I cut the Watering Can Shaped die out of rust card. Yes this is the watering can! I cut away the spout and handle and made it into a flower pot shape. I cut it again and just used the top and bottom edging and added it with mounting foam. I added some shading to it using some coloured pencils. Using the Floral Bouquet die set, I cut a bunch of the long narrow leaf in various shades of green and added them to the pot so it looked like a plant. I added a few small flowers for interest and a lady bug (american name) to the top edge. I attached the pot to the aperture opening with mounting foam. I cut the Here's To New Beginnings in black and glued it across the card onto the pot. I added two small butterflies as accents to the top corner of the card. The card was completed with white mats and layers. The finished dimensions are 7" x 8 1/2" in size. All for now, Sue x
Sunday, 30 January 2022
Hope Your Birthday Is Out Of This World
Good Sunday morning all! Start with a piece of white card and sprinkle Green
Bay Pixie Sparkles all over it and spritz with water. Cut the Out Of This World Slimline All In One in white and leave a wide margin. Add clear acetate to the back of the die cut,
then add mounting foam all the way around the back edge of the die cut. With the die sitting upside down so it forms a
bit of a bowl, sprinkle in three or four tablespoons of Crystal Stars. Peel the backing paper off the mounting foam
and cover with another piece of clear acetate to seal in the stars. Using the Slimline Stitched Rectangle Frames
die, cut a white frame and add with mounting foam to the front of the card. Using the Slimline Essential Frames, add a thin
black frame to the front of the card. The card was completed with white and black mats and
layers. The finished dimensions are 5¼” x 9 ½”
in size. All for now, Sue x
Saturday, 29 January 2022
Sending Love
Hello bloggers! I selected a piece of black card and embossed it with the Hearts On A String embossing folder for texture. Next I cut the Dandelion Stained Glass Circle out of both black and white card. I nipped away the dandelions out of the white die cut and used the black die cut in whole. I glued it to a piece of pearlescent watercoloured card (from my background stash pile) I used Turquoise Cascade, Jade Sparkle and Lilac Sapphire watercolour inks on it. I cut two Double Stitched Circles and matted them and glued the Dandelion Circle to them. I used the white dandelions as accents spraying out from the main focal element. I cut the Sending Much Love out of some leftover watercoloured card and added a white shadow behind it, then glued it in the upper corner. The card was completed with white and black mats and layers. The finished dimensions are 7" x 8 1/2" in size. All for now, Sue x
Friday, 28 January 2022
Happy Valentine's Day
Hello crafters! I have an easy and fun Valentine's card to share today. Using the Noble Decorative Hearts die set, I cut the smallest die out of custard, aqua, duck egg blue, powder pink and amethyst card several times. I glued them randomly all over the card. Next I cut three sequentially sized larger hearts and stacked them in the centre of the card. I cut the Happy Valentine's Day sentiment in black and glued it to the centre heart. The card was completed with white and black mats and layers. The finished dimensions are 7 1/4" x 8 1/2" in size. All for now, Sue x
Thursday, 27 January 2022
Lace Heart
Hello bloggers! I started today's card by using some Pearlescent watercolour inks on a piece of white card. I used Lemon Glacier, Jade Sparkle and Turquoise Cascade randomly all over. Once dry, I used the Double Stitched Squares and cut a frame in the centre of the card. I added mounting foam to raise the frame, then attached all the pieces to another piece of card. I added a slightly larger white frame around the outside. Next, I inked and cut the Lace Heart Stampcut die twice. I used Distress markers to colour one full heart and just the inner heart on the second die cut. I glittered the base heart then I cut around the inner heart and added it with mounting foam and glue to the other heart. I added the heart inside the frame with foam. Using the Heart Leaf Flowers, I made three flowers and glittered them with Frosted Sparkle Glitterbitz. I arranged the flowers in opposite corners around the heart. I used the Magnolia Corner cut in white and nipped apart to add accents around the flowers. The card was completed with white and black mats and layers. The finished dimensions are 7" x 7" in size. All for now, Sue x
Wednesday, 26 January 2022
Lift Your Spirits
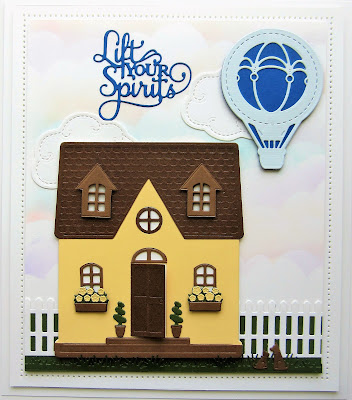
Hello crafters! I began today's card by sponging a light cloud background. I just hand cut a cloud shape and used it by inking around it with Spun Sugar, Tumbled Glass and Shaded Lilac Distress inks very lightly. I cut a couple of clouds from the Twinkle Twinkle Clouds and Stars die set. Next I cut the Cottage die in custard card as the base and cutting it again out of Chestnut card for the roof, windows and door. I used Nutmeg card for the dormers and steps. I added a white card backing to the cottage then glued it to the background. I cut some window boxes and topiaries from the House Accessories die set. I added yellow flowers to the window boxes and glued them under the windows. I added some greenery to the topiary pots then glued them next to the door. I cut some white fencing and strips of grass from the Garden Circle Scene and tucked some green card behind it. The dog and cat were added on the grass. I cut the Hot Air Balloon in shades of blue and added it above the house as well as the Lift Your Spirits sentiment which are both from the Lift Your Spirits die set. The card was completed with white mats and layers. The finished dimensions are 8 1/4" x 9 1/2" in size. All for now, Sue x
Tuesday, 25 January 2022
All Things Grow With Love
Hello crafters! Today's offering is an actual shaped card (they are a little hard for me to photograph, so sorry!) I started by cutting the Watering Can Shaped die out of silver card. I then folded a piece of white card and used the outer cutting die so that the handle of the watering can is slightly off of the fold on the white card (you can just see the folded part showing in this pic). I used a bit of white pencil to shade and highlight the watering can. I used some Black Soot Distress ink around the edges too. Using the dies from the Floral Bouquet, I cut several different flowers out of pastel colours. There is a stem with a large circle on it that is for gluing the flowers to. I arranged the flowers and added some leafy bits and attached the ends to the back of the watering can, then I glued it to the white folded base to hide the stems. I added a small butterfly to the top of the can too. I cut the All Things Grow With Love sentiment out of both white and black card and shadowed it, then glued it to the watering can. The finished dimensions are 4" x 6 1/4" in size. All for now. Sue x
Subscribe to:
Comments (Atom)


