 Hi blog friends! A quickie card here which is always nice if you need an all occasion type card. This one is workable in any colour combinations to so you can use up left over papers like I have done here. I used one of the edgeabilibity dies to create a border between my two decorative papers. I used a small piece of the striped paper behind the butterfly. I used the outside edge of the die to cut a faux nestie shape for this so you would see the stripes through the lacy look of the butterfly. On a whim, I decided to use a pair of decorative pins for the butterfly antennae. It's a large butterfly die so size wise it kind of works okay (it was a bit of fun!). I stamped the sentiment directly on the background papers and added some swirls of rhinestones for fill in accents. All for now, Sue x
Tuesday, 31 January 2012
Fluttering By
Hi blog friends! A quickie card here which is always nice if you need an all occasion type card. This one is workable in any colour combinations to so you can use up left over papers like I have done here. I used one of the edgeabilibity dies to create a border between my two decorative papers. I used a small piece of the striped paper behind the butterfly. I used the outside edge of the die to cut a faux nestie shape for this so you would see the stripes through the lacy look of the butterfly. On a whim, I decided to use a pair of decorative pins for the butterfly antennae. It's a large butterfly die so size wise it kind of works okay (it was a bit of fun!). I stamped the sentiment directly on the background papers and added some swirls of rhinestones for fill in accents. All for now, Sue xMonday, 30 January 2012
Beauty In The World

Sunday, 29 January 2012
Ethel And Friends!
 Good morning blog friends! Be prepared for a good giggle at today's post. I have loaded four cards for you to see today, mostly because they are all very similar and a bit of fun. The sentiments are the best! I shouldn't laugh at them as they are hitting really close to home these days! My 55th is looming only a few months away now and I will officially get my senior citizens discount here in Florida, (maybe even in the UK, I'll have to check on that!) but if you can't laugh at yourself.... then everyone else will do it for you, huh! LOL These characters are part of our Murray and Ethel line of rubber stamps. This first card is Ethel herself! Don't you just love that mug (and those hairy legs, really Ethel!) I feel her pain where that sentiment is concerned, though! The ladies in the last three cards haven't been officially named yet. Maybe you could help me out there and give me some ideas. What do they look like?
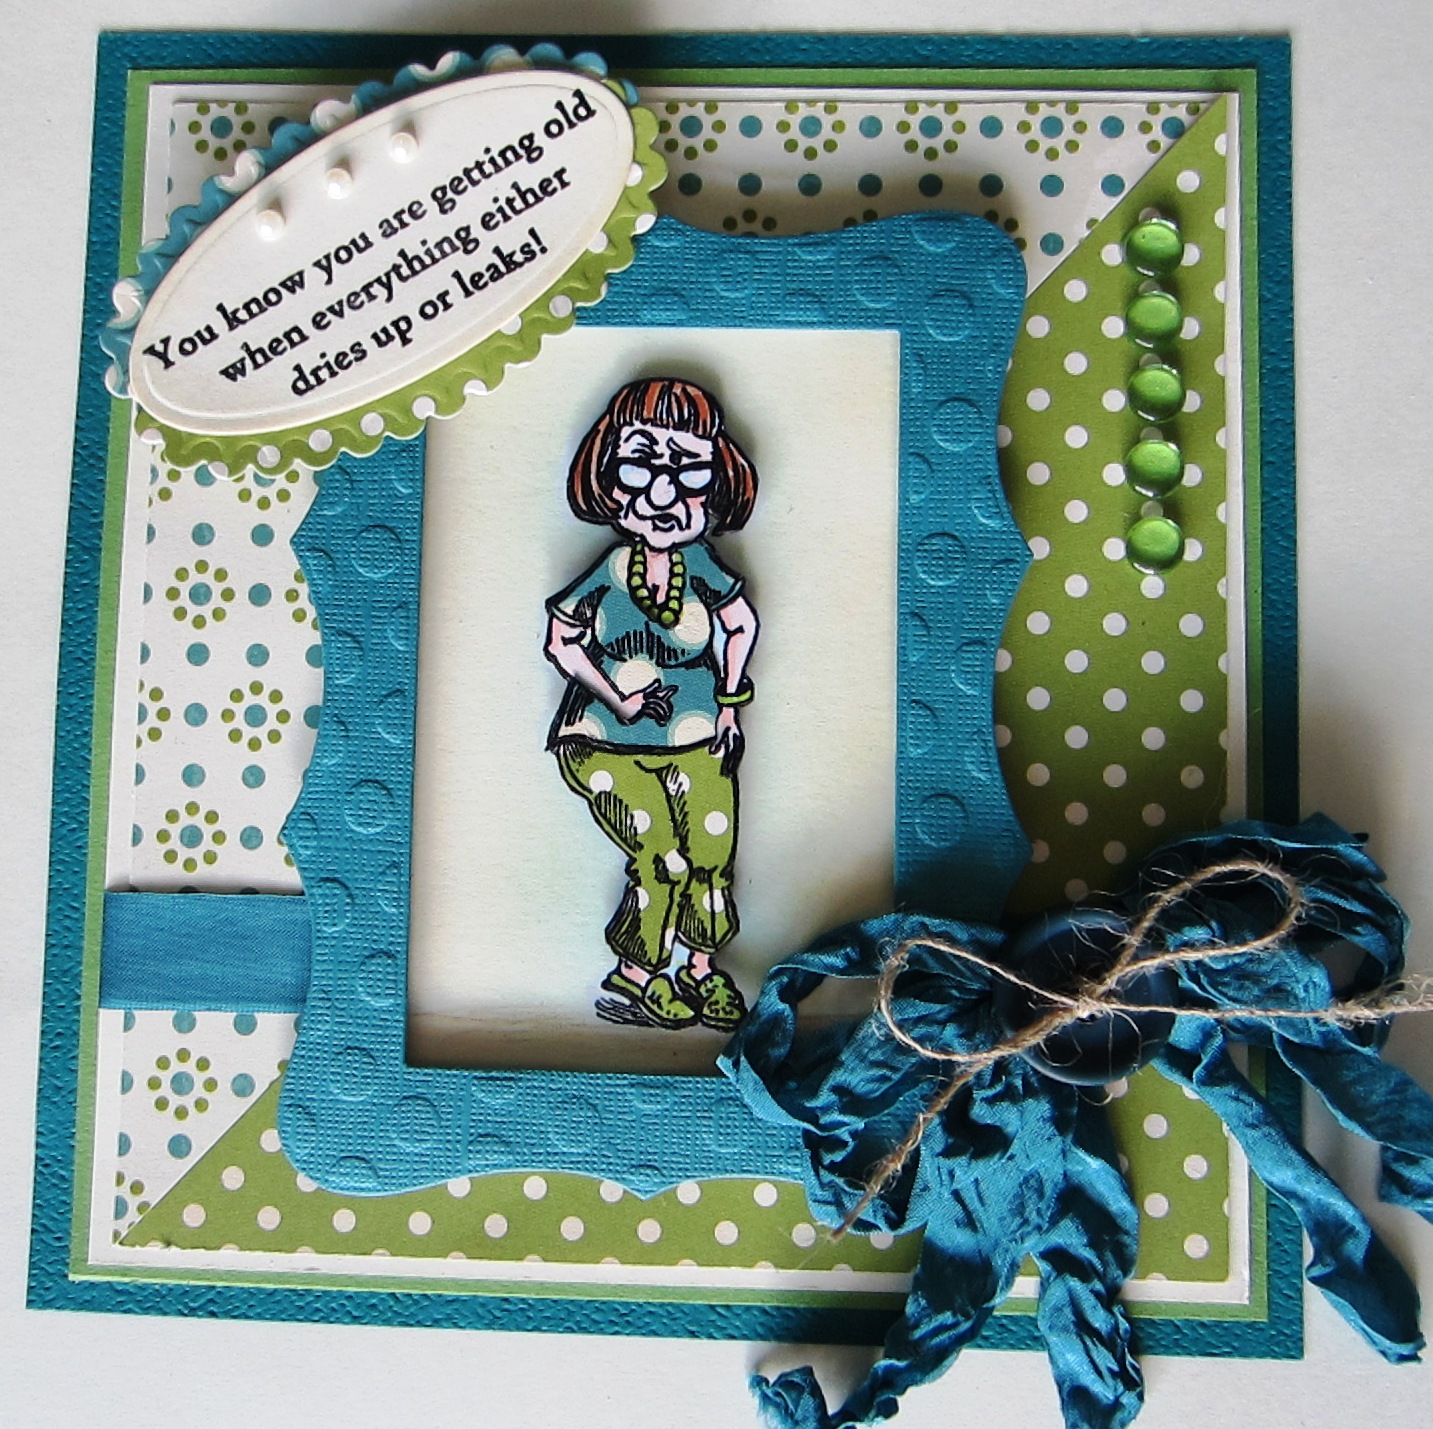


Saturday, 28 January 2012
I Had This Idea
 Hi guys, I should have titled yesterday's post "the love/hate card" as I thoroughly enjoyed reading all the different reactions to it! It really polarised the comments you left, but that is what makes crafting fun for me. I don't even like every card I make so I certainly don't expect you to either. As long as you kind (remember thin skin here), please be honest and let me know what you think as I love to read every ones opinions! Today's post was truly an exercise in patience! Whenever I say "I have this idea", I should listen to myself and think about this card! I had this idea and I just had to do it, but about half way through, I thought "what am I doing!" I was too far committed at that point not to finish. It is probably difficult to see this in the picture but with some explanation, I think you will follow. I stamped the leaves on white card so that all of them were just barely touching each other in some way. I embossed them with clear powder (black archival ink was used) and I inked them using mustard seed, fired brick and rusty hinge distress inks. Then, and this is where the fun started (not!), using an exacto craft knife, I cut away all the background white area. The leaves have this kind of wood block look to them so I thought cutting around them and leaving it a bit jagged would add to this look and give a very rustic look to the left over piece. After about an hour of cutting because there were way more tiny spaces than I realised, I finished. What a task! I mounted that piece using double foam pieces so it really looks like it is floating above the background piece of white card. I cut a double black frame for it and pierced the top piece. I matted all of it on a final piece of black card and stamped a sentiment in white on a die from the Samantha Walker Twisted metal tag set. I cut another tag in white and cut it in half to use as a reverse shadow for the black tag. After I got the whole card assembled and taped together, I thought it might have looked nice to stamp the leaves again in the background in a pale colour just to add interest (but I wasn't taking that puppy apart after all that!) LOL So, it is what it is! Another different looking card for me!
 I have been very bad lately in keeping up with the comment game, but I am getting it caught up now!
Jan17th post: randomly selected number 5 which is Inkypinkycraft!!!
Jan18th post: randomly selected number 33 which is Desiree!!!
Jan19th post: randomly selected number 50 which is Nattyboots (Elaine H)!!!
Jan 20th post: randomly selected number 125 which is Tracy Heaton!!!
Jan. 21st post: randomly selected number 10 which is Heather!!!
Jan. 22nd post: randomly selected number 58 which is Sue Parish!!!
Jan. 23rd post: randomly selected number 21 which is Jacqui's little piece of England!!!
Jan. 24th post: randomly selected number 42 which is Nzillingworth (Nadine)!!!
Jan. 25th post: randomly selected number 73 which is Elaine W!!!
Jan. 26th post: randomly selected number 56 which is Crafty Jo!!!
Jan.27th post: randomly selected number 23 which is jean.phillips1!!!
I need all the winners to email me at americansue1@gmail.com to verify their addresses
and claim their prizes please.
All for now, Sue x
Friday, 27 January 2012
Naughty or Nice?

Thursday, 26 January 2012
Lace It Up
 Hi to all this morning! This card should have been added to the post from January 1st which listed my favourite cards from 2011, however, I hadn't posted it in 2011 so technically I didn't feel it should be included then. It is one of my favs though as I love the way it came out. Anytime I can lace ribbon on a card, I take it as I think it is just so stunning to see. This is one of my favourite papers (Graphic 45) to use too and even though the vintage ribbon doesn't match it exactly, I like the way it adds some extra colour to the card without making it feel too busy. I cut both sides of the paper with the edgeability die insert and scalloped cutting edge. The insert has nice wide open holes to lace your ribbon through. I found it easier to do if I attached my card with foam mounting pieces to my black back layer and then lace the ribbon through the holes. I started on one side and tucked the ends around the back of the card and secured them and then laced one colour through every other hole til I reached the other side. The other colour went through the remaining open holes and I tied the loose ends into a bow at the end. I added a black organza rose and two decorative stick pins to it. I stamped my sentiment on some teal card and lightly inked it with forest moss distress ink. I cut a frame from labels eleven for it and mounted the sentiment in the corner with mounting foam. I added a black rhinestone swirl around it for drama and interest. A few black glints in the top corner and some paper piercing around the edges completed the card. I hope you enjoy it as much as I did making it! All for now, Sue x
Wednesday, 25 January 2012
Rusty Ironworks

Hi guys, I hope everyone is doing well. I am enjoying my time here with my Mom and thank you for all your lovely warm wishes. I have really been enjoying all the comments you have been leaving on the blog too! Before I forget, on yesterday's ribbon tutorial, I noticed that I had incorrectly listed the size of the redline tape as 1/4". I edited it later in the day to read 1/2" size, but in case you read the blog in the morning, I thought I should let you know I corrected my error!
Today's card is a tad bit grungey and a tad bit frilly too. Almost masculine, but not quite. I'm not sure about it, but it did the job of showing the dies and the grand impressibilities, swirls, inks and glues that were on the show at the time I made it. I am always limited to a list of products that I can use for any given set of samples that I am making. Sometimes that is a blessing because it helps make decisions, but sometimes I feel like I am crafting with one hand tied behind my back. The latter was the case with this one! One of my goals this year with the blog was to try to post all different types of samples even if they weren't necessarily my favourites. In fact, in the next week or two I have probably the widest variety of cards planned that I have ever put on my blog!
Enough waffling, on to a rundown of this card for you! The background (below) was done using the Butterfly Garden Impressibility and rust coordinations card. I embossed it in the Grand Calibur then sanded it to highlight the impressibility design. The focal element is simply two of the Ironworks Motifs cut and offset to give a medallion effect. I stamped my sentiment on cream card and cut it out with one of the ironworks accent pieces. The border is three of the Ironwork pieces cut and interlocked and matted on to rust and black card. I added a black rhinestone swirl and some black PVA glue dots to frame the entire piece. Easy peasy card, would look really nice in my much beloved teal I think too!
Tuesday, 24 January 2012
My Ribbon Flower Tutorial
 Good morning crafty friends! Finally, I found some extra time to put together my promised ribbon flower tutorial! There were a few issues with it such as getting the first picture to load the right direction. I finally gave up on that one so you will have to turn your head to the right to view it! LOL Also, apologies for having to look at my much loved and well used craft mat. I did have every intention on getting a new one for the tutorial. I have never done one of these on my blog, but I will try to walk you through each picture and explain what I am doing. If you have any questions, feel free to email me for further clarification. 1. Begin with a length of ribbon that is about 18" long and no wider than 1/2". You may use wider ribbons for this, but cut them down the centre and attach the tape to the cut edge. I am using basque red vintage ribbon for the tutorial. Lay it out on your craft sheet and attach 1/2" wide redline tape to the lower edge. The tape needs to be just catching the bottom edge of your ribbon firmly (probably 1/16" of the ribbon)

 4. Once you have the centre of the rose, peel up the entire piece of ribbon and tape off your craft mat. You will start to give your flower more fullness now. This is accomplished by rolling the ribbon but gathering the tape slightly as you go. This will cause the ribbon to become wider at the top slightly.
 6. Continue pinching the tape in at the bottom as you roll. I am right handed so I use my thumb nail on my right hand to tuck a bit of the tape inward and then hold it from behind with my left hand as I pull my thumbnail away from the sticky tape.
 7. Here is a view from the top of your flower as it progresses. You will be able to see the small pleats as you look down into the flower. I like a bit of unevenness to the pleats as it gives the flower a shabby chic sort of look.
 8. As you reach the end of your ribbon, fold the end down onto the tape as you did in the beginning. This will give your flower a nice finish without an unfinished edge showing or fraying. Wrap this piece to the bottom of the flower and firmly press the end into the tape at the bottom.
 9. Sometimes, there is an excess of tape on the underside of your flower. This can be easily cut away with a sharp pair of scissors. This will also give your flower a flat spot to sit nicely on your card or project. I always attach my flowers using large glue dots. The bottom of the flower will already be somewhat sticky from the redline tape, but you will find it isn't enough to attach the flower firmly since you have been handling the tape as you roll your flower. Cosmic Shimmer dries clear glue also works well to attach these flowers to your projects.
 10. A close up of your finished flower! You can make them more or less full depending on how much pleating and gathering you do with the tape. Also, if you get the the end of your tape and decide you want a larger flower, just cut another piece and continue adding it on in the same manner until you get the desired size for your flower. You can use virtually any type or size of ribbon to make these too. They look lovely in organza, cotton hemp, American seam binding , lace or metallic crocheted ribbon. You will be able to see all kinds of ribbons used on my cards made into this type of flower using the same method as in my tutorial. I hope you have enjoyed it! All for now, Sue x
Monday, 23 January 2012
Tied Together Again
 Hi guys! I had forgotten that I had this card as it was made for some shows last August that I did. It was going to be one of the demos then we had to pull the embossing folder from the show at the last minute as the shipment did not show up in time! This is still one of my favourite embossing folders to use. It is called Tied Together. It is quite lovely to use with the Cosmic Shimmer PVA glues as I have done here. A little drop of it at each of the junctions really sets off the background, don't you think? This is a really quick card to put together if you make some of these backgrounds up ahead of time so the glue is good and dry. I stamped my sentiment and cut it out with one of the fancy tag die templates. I cut a second one out of a slightly darker card, then cut it in half and used it as a shadow for my sentiment tag. I added a big bow out of the frilly edged ribbon, matted and layered and added some black PVA glue dots to the last mat layer. Just to add a final bit of interest to the background, I added some black rhinestone swirls. I included a close up for you since they are difficult to see.
 I see that we have hit our goal for the big blog candy drawing. Yeah!! It will have to be put on hold until I return to England, but anyone that joins as a follower until then will be included in the drawing so not to worry! I have changed it to read 2300 followers on the blog, but if we hit that goal too before I return, we will just draw for both of the candy prizes then! All for now, Sue

Sunday, 22 January 2012
Believe, Imagine, Achieve


Saturday, 21 January 2012
Just Because

Friday, 20 January 2012
A Friend For All Seasons
 Good morning all! Another card from past POTW shows in either November or December, a while ago anyways. How quickly it passes, huh? I was playing with some different colour combinations when I thought how lovely the purple and brown were together. I don't recall using those two together for quite some time so I thought, why not?!

Thursday, 19 January 2012
Dreams Take Flight
 Good morning everyone! Today's post is of a card that I did last summer, but it is a nice bright cheery card and if the weather in the UK is anything like it was today in Florida, this will be a welcome surprise! It rained all day yesterday so the good news is that I got a bunch of cards made! There is nothing like sequestering myself in the crafty area I have set up at my Mom's house and being creative! The bad news is that it is still several weeks before I can post any of them and I really want to show them to you! I hope this one will do for today though! I started with a large circle cut out of copy paper to use as a stencil for my sun. I inked through it with a combination of mustard seed and rusty hinge around the edges. I heat set it with my heat tool so I could do a bit of stamping around it. Then I used my anti-static bag over the entire piece to make sure it wasn't going to pick up my embossing powder. I stamped the sentiment with a black archival ink pad just off the corner of the sun and clear embossed it. Then I stamped two sets of swirls above and below my sun, one to the lower left and one set to the upper right side and clear embossed those also. I cut three sizes of the nested butterfly dies out of some decorative paper (Stella Rose, I believe) and mounted them on my sun. Using a fine tipped black pen, I drew a line forming a corner opposite my swirls. Three black glints were added to each area too. I pierced around the edge of the next mat and layered it all with black to complete the card. I hope it helps you feel cheery and bright today. All for now, Sue x
Wednesday, 18 January 2012
Black And White Wedding

I just added a few of the white organza roses that Creative Expressions carries to the top and bottom of the ribbon accent ( I don't make these type of flowers as they are quite fiddly and so much easier to use when you purchase the premade ones and very inexpensive too). For the main of the card, I used the CE Lattice embossing folder. I cut three consecutive sized ovals out of silver, black and white. On the white one, I had stamped the wedding cake in black archival ink and clear embossed it. I had a few left over Fancy Pants swirls in my craft stash so I painted them black with the Eco Green paint and added them to the top and bottom of the ovals. I added a few pearls and some small ribbon roses too. I stamped my sentiment and cut thee small sizes of the ovals for these and added them to the bottom corner with a few pearls to complete my card. I hope you enjoy the change to a wedding card for today! All for now, Sue x

Tuesday, 17 January 2012
A True Friend
 Hi guys! I just love working with Kraft card and out it came again for this card. I like mixing different textures and putting things together that don't always look like they should go together. The most fun about cardmaking for me is there really aren't any rules. If you like it, if it works for you, if it makes you do the happy dance, then go for it! Here I have mixed felt flowers with ribbon flowers and paper flowers. I mixed different patterns in cardstock and used both ribbon and jute twine. All the things I love to play with in fact. I liked the result (I even did the happy dance) and didn't break any rules either (cuz there aren't any to break, remember!) For the focal element, I used the Picot edge circles, labels fourteen and the beaded oval die templates. I inked the top two dies using tea dye distress ink while still in the die. The paper and the felt flowers were created using the Spiral flower die template, while the ribbon flower was rolled using the cotton hemp ribbon. I used a small border that was cut with an edgeability insert. The entire piece was framed with black Pva glue dots. I was really happy with it when I finished it and I hope you'll like it too. You will have to let me know!
 Now for the week's winners!
For the post dated January 10th, comment number 18 which corresponds to
Vicki Sharkey!!!
For the post dated January 11th, comment number 32 which corresponds to
Linda!!!!
For the post dated January 14th, comment number 120 which corresponds to
Sheila!!!
For the post dated January 15th, comment number 26 which corresponds to
Jane P.!!!
For the post dated January 16th, comment number 65 which corresponds to
Helen O!!!
Please don't forget to email me at americansue1@gmail.com to verify your address to collect your prize!
All for now, Sue x

Monday, 16 January 2012
Beautiful Wishes
 Hello everyone! Like the sentiment says, I wish you all beautiful wishes for a beautiful day! Such a nice sentiment to send a friend anytime! This card uses the Grand Labels Twenty three die templates as a base for the card. I have used the largest three sizes here. I pierced the middle one for interest. I used the Intrinsic embossing folder on the smallest Grand die. I love the swirly background it gives you. I inked it with Tattered Rose Distress ink and then used the pad to hit the embossed area for some deeper colour. I cut a cream coloured frame using Labels eleven. I stamped my sentiment in black and inked it with Tattered Rose, leaving the centre a softer, lighter shade to bring your focus to the sentiment. I made a flower using the Rose Creation dies. I cut all the pieces for the flower out of cream card and inked them while still in the die with Tattered Rose distress ink. I shaped the flower die cuts and stacked and glued them. I added a pearl to cover the centre hole. I backed it with a bow of pearls and some tulle cut ragged at the ends. The close up pic below shows the flower in better detail. I hope you like it. All for now, Sue x
Sunday, 15 January 2012
Mint And Grey Valentine
 Hi guys, What do you think of a mint green and grey Valentines Day card? I know it isn't very traditional but I think that Valentines Day should be more about fun and less about tradition, don't you think? This is another card that I made for Christine Emberson's POTD shows coming up on the 18th (Don't forget to tune in!). I had this background paper from Kaisercraft that had this beautiful soft mint tone to it and I just wanted to use it. Of course you probably have to take my word on the colour since the pic doesn't pick it up incredibly well. I used the largest size of the Heart square die templates with the next size down inside to cut an aperture frame. I then cut several more of the medium heart square, two in silver and one more in the grey. I mounted the two silver heart squares diagonally, top and bottom of the large heart frame using the two grey dies as a shadow, just peeking out from underneath the silver squares. I stamped my sentiment and embossed it in silver to match. Using bundled sage and tumbled glass distress inks, I inked the background to the sentiment so it picked up the colour in the background paper. This is where my photo really fails (and I did try several times) to catch the subtle shade matching. In real life, it is very pretty. I added some clear rhinestone swirls for interest and I pulled out a corner punch I hadn't used in ages for the corners. There is some paper piercing and a tiny, itty, bitty bow (I contained myself, yes I did!) What can I say, it's different! All for now, Sue x
Saturday, 14 January 2012
For You

What I really like about today's post is that it is a a card for any occasion, any person, and can be done in any colour combo you like. This is a card that you can put together quickly if you need something on the spur of the moment too. We like those kinds of cards with our busy schedules, don't we? Working from the focal point, I cut the largest size of the Heart Squares in black card. Next, I used the Spellbinders Heart Circle die templates and I cut the largest heart circle with the next size down inside of it to cut an aperture out of it. I mounted the large circle upwards with mounting foam, while securing the smaller heart circle directly in the centre where it was cut from, but without any mounting foam behind it. You can see the dimension levels to the card in the close up photo below. The background for the card was created using half of the Lotus border die (If you have read the blog earlier, please note that I have corrected the name of the border. I am forever getting those two mixed up. It is not the In Spades border!) on each side of the square. This border is unique in that it cuts half completely through and the other side of it cuts out sections of the die but leaves the entire piece attached to the card. It allows you to do things that other dies cannot do and because of that it is very versatile. I just wanted a little bit of an edge to frame my focal point so using half the die cut was perfect, just enough to draw the eye in I felt. If you don't own that die, try just embossing the background with an embossing folder as that will add nice interest also. The card was completed with my favourite paper piercing edge and a few mats and layers of cream and black. The really nice thing about this sort of card design is that it uses all the sizes of the heart circle dies so you really are getting value for your money. No sense in not using them if you have them, right?
I have decided to post the comment game winners weekly while I am away. I will site the post date and then the random number and corresponding comment that has won and list them all together. I hope you don't mind, it is just easier for me to keep track of that way.
All for now, Sue x

Friday, 13 January 2012
At Play With Vellum
 . Hi there crafty friends! Today's card was a bit of an experiment and the judgement is still out on this one for me. In my minds eye, I thought it would be a really pretty combination of the pastel pink and burgundy with the vellum overlay on the sentiment and the butterfly. It wasn't one of my favourite cards but I didn't think it deserved orphan status either. It has grown on me a bit though. I used the Washed Away embossing folder to create both pale pink background pieces. Both were matted with ivory card then burgundy. I added a bow from the burgundy frilly edged ribbon with a decorative pin for an accent. I stamped my sentiment on ivory card and cut it out with the lacy oval dies. I cut one more in burgundy and one in vellum also. The burgundy die was mounted slightly offset to look like a shadow and the vellum was mounted over the sentiment to give it a softer look. I hid the adhesive with tiny pearls around the edge. I cut the large butterfly out of burgundy card and also vellum and mounted them together with some pale pink pearls for the body. Maybe it just needs some piercing! What do you think? All for now, Sue x
Thursday, 12 January 2012
Anemone Dies


Wednesday, 11 January 2012
Hearts And Swirls
 A very good morning to everyone! I am hoping that Blogger plays nice today and allows my post to show up as scheduled. As this post is scheduled to go up, I will be on my way to the airport, heading back to the States to spend some time with my Mom first, then on to California for CHA and some time with my daughter after that! I'll be back home in about four weeks time, but I promise not to let you down on the blog. On occasion, there may be a slight blip like I had earlier this month (the post went up but minus the picture!) Not sure how that happened, but I will make sure that I have posts scheduled for every day. Today's post is a card I did using some of the dies that Christine Emberson will have on her POTD shows coming up later this month on the 18th and 19th. Be sure to check her blog http://hope-chances.blogspot.com/ for the exact times. The focal element was created using the Heart Squares and Labels 13 to cut an aperture. I cut a Fleur de lis rectangle in brown card as a backdrop and added a few of the heart pieces that were cut out of the edge of the heart squares for tint. I added a bit of Cosmic Shimmer Aurora sparkle glitter to it for some bling. The swirl added a bit of dramatic flair to the card (plus it allowed me to show off the background paper that I really liked). I pierced around the edges (again) and then tied a big bow using some pink organza ribbon (again, from my craft stash) and added a fun antique looking button and some pins to complete the card. I was rather pleased with how it turned out even if it was a bit (okay, who am I kidding, a lot!) OTT. I was in the mood for a ribbon/bow frenzy. Remember, you were warned! A winner in the comment game from yesterday's post is number 72 which corresponds to the comment left by Lockedinmycraftroom!!!! Don't forget to email me to claim your prize! All for now, Sue x
 Tuesday, 10 January 2012
Negative Ironworks
 Good morning blog friends! For my money, I think that the Ironwork dies by Spellbinders have one of the prettiest negative pieces left from cutting the die. I just marvel at the look of this die every time I cut it out. So it goes without saying that I have used it on more than one occasion in this way. However, if you need a quick card that is guaranteed to wow the recipient, I think this is the die to use. I am hoping that the card looks cream to you (but if it doesn't, just imagine it in cream, okay?) Once I cut the Ironwork Motif out of the centre of my cream card, I left it in place and lightly inked around it with Antique Linen distress ink to highlight the negative piece. I cut two of the ironwork corners and actually used them in the corners, adding a black rhinestone to cover the hole in the centre. I stamped my sentiment in black on one of the smaller Ironwork accent pieces and added some foam mounting to the back to raise it in the centre of the card. Next, I wrapped a length of the black crocheted ribbon around the back and secured the ends, then tied a nice big bow with another piece of it and added it to the front. Just a little cheater tip, if you do this as two separate pieces then add them together with a glue dot, it is so much easier than getting your bow to stay the way you want it when you have wrapped it around the card then tied the bow with the ends. I hope that makes sense? I added a cream button with some Bakers Twine (you can't have naked bows or naked buttons, now can you? LOL) I mounted a piece of black glitter card behind my cut out ironwork area, which of course you will have to imagine also since my photography skills are, well, let's just say, nonexistent to be polite. The entire piece was matted on to another piece of cream card that I pierced the edge with my Tim Holtz design piercing ruler. What a great tool! The card was finally matted on to black card and a couple of decorative pearl pins were added to complete the card. Sooooo easy and it looks great in any colour background you like.
 And now for the winner of yesterday's comment game, I have randomly picked number 32 and that was the comment left by Toni!!!! Don't forget you must email me to claim your prize at americansue1@gmail.com All for now, Sue x
Monday, 9 January 2012
Thanks Bernadette!

 Yet another winner in the comment game from yesterday's post! Random number of 38 was drawn this time and that corresponds to the comment left by Carole Z!!! Give me an email to claim your prize at americansue1@gmail.com
 Sunday, 8 January 2012
Carte Postale
 Hi crafty friends! I am trying to mix it up a bit this month for you. This card was done using Sam Poole's Carte Postale stamp set. I just love this set as they let you get really messy and have a bit of fun with them. If you like them, Sam has them in her online shop too. The background was stamped on Kraft card with a black archival pad using the various stamps in the set. Then I crumpled the card and brought out the lines by taking the Tea Dye Distress ink pad (direct to paper method) lightly over the top of the card. I used my scissors to distress the edge of the card even more then added some ink to those edges. The smaller background piece was achieved by using the heated pearl technique. If you have never tried this, it is quite fun and a bit messy. There is a section on it on my DVD, but to give you a quick rundown, you need to apply a layer of dries clear glue to black (I use glossy) card. Next step is to cover the glue with a layer of mica pearl powder all over it. Use an old brush to tamp the mica in to the glue a bit, then heat it until it bubbles. It is best to do that from underneath so as not to blow away your mica. It always comes out different each time but it is a great background for a multitude of things (especially guy cards!). I stamped the postcard on ivory card and cut it out, distressed the edges with my scissors and inked it lightly with Antique Linen to age it even more. I used a Tim Holtz memo pin to hold one of his tickets and added a few of his sprockets and gears for another bit of interest. I mounted the entire piece askew on to dark brown card, distressed the edges a bit more, added a few more worker stamps to the edges (those little stamps on the sets that aren't really large enough for a focal element, but are great for this sort of thing) and voila, finis! I love doing this kind of card as well as "my usual" and if you like it, I will show you some more scattered through this month's posts.
 Another winner today! From yesterday's post (Jan. 7th), I have randomly selected number 10 which was the comment left by Crafty Mop!!! Congratulations!! Email me to claim your prize americansue1@gmail.com All for now, Sue x
Saturday, 7 January 2012
Bird Flourishes
 Hi crafty friends, I hope everyone is doing well this morning. This is probably not what you expected to see, I bet. I'm trying to mix it up a bit this month for you. I still have a bit of a backlog of cards from last year and this was a card that I made last summer for the POTW shows then. It uses the bird flourish die set. I found these to be quite fun to play with as they were very different from the usual type of dies that I use. This card was quite fun as I used the butterfly circle die and cut it out of copy paper. I then used that as a template to stencil through to make the background. I used Dusty Concord distress ink the ink the butterflies that are cut out of the circle. Once I was happy with them, I used the negative piece of copy paper and lined it up so the butterflies were centred and inked the circle with Broken China distress ink. I then cut my bird flourish using black glitter card and I did not emboss it (that is important here ) I then cut another bird flourish, but this time I put the black glitter card over the die facing the opposite direction. This gave me two bird flourishes both cut out of black glitter card, but facing each other. By not embossing it, you get the same look to both of them. I added a few swirls that were stamped in clear perfect medium and embossed with Cosmic Shimmer aurora sparkle embossing powder. This just added a bit of bling to the top and bottom to help draw the eye in a bit. I stamped the sentiment in black archival ink and paper pierced around the edge to finish the card. Pretty fun, huh?
 You are keeping me on my toes with the comment game as we have yet another winner. I have randomly selected number 89 which corresponds to Craftylicious!!!! Don't forget to email me at americansue1@gmail.com to claim your prize. All for now, Sue x
Friday, 6 January 2012
Life's Moments

For today's post, how about this for a really quick, simple card when you don't have too much time to fuss about. I have let the decorative papers do all the work really. I added a piece of my favourite lace from my craft stash and a flower cut from the spiral blossoms two die to frilly it up a bit since the paper was so dark. I also found this ribbon in my stash and thought it matched quite well. Notice, there isn't actually a bow, just a know below the flower. You say, what no bow! Well that is because I didn't think it needed it and that was all the ribbon I had! Sometimes we just have to make do, don't we? LOL I love the sentiment though and just thought the postage stamp dies worked well with these papers. I didn't pierce the edge but I did double mat it to give it a bit of character. Finally, I added three black glints to the corner for interest. These, by the way, are recycled glass pieces from Eco-Green Products and they are really nice for use in those areas that just need a little something, you know what I mean! I hope this one appeals to some of you out there in blog land! All for now, Sue x
Subscribe to:
Comments (Atom)