Tuesday, 24 March 2015

Vertically Challenged


Hello my crafty friends!  Don't forget you can use your Gemini dies in a vertical orientation for a completely different look.  Enjoy the video!
On another note, I know that we have reached our target for the next blog candy drawing, but I am a bit under the weather at the moment so I will get the drawing done and posted when I am feeling a bit better, hopefully within the week.

Buy from Joanna Sheen


Follow my blog with Bloglovin

Monday, 23 March 2015

You're Wonderful

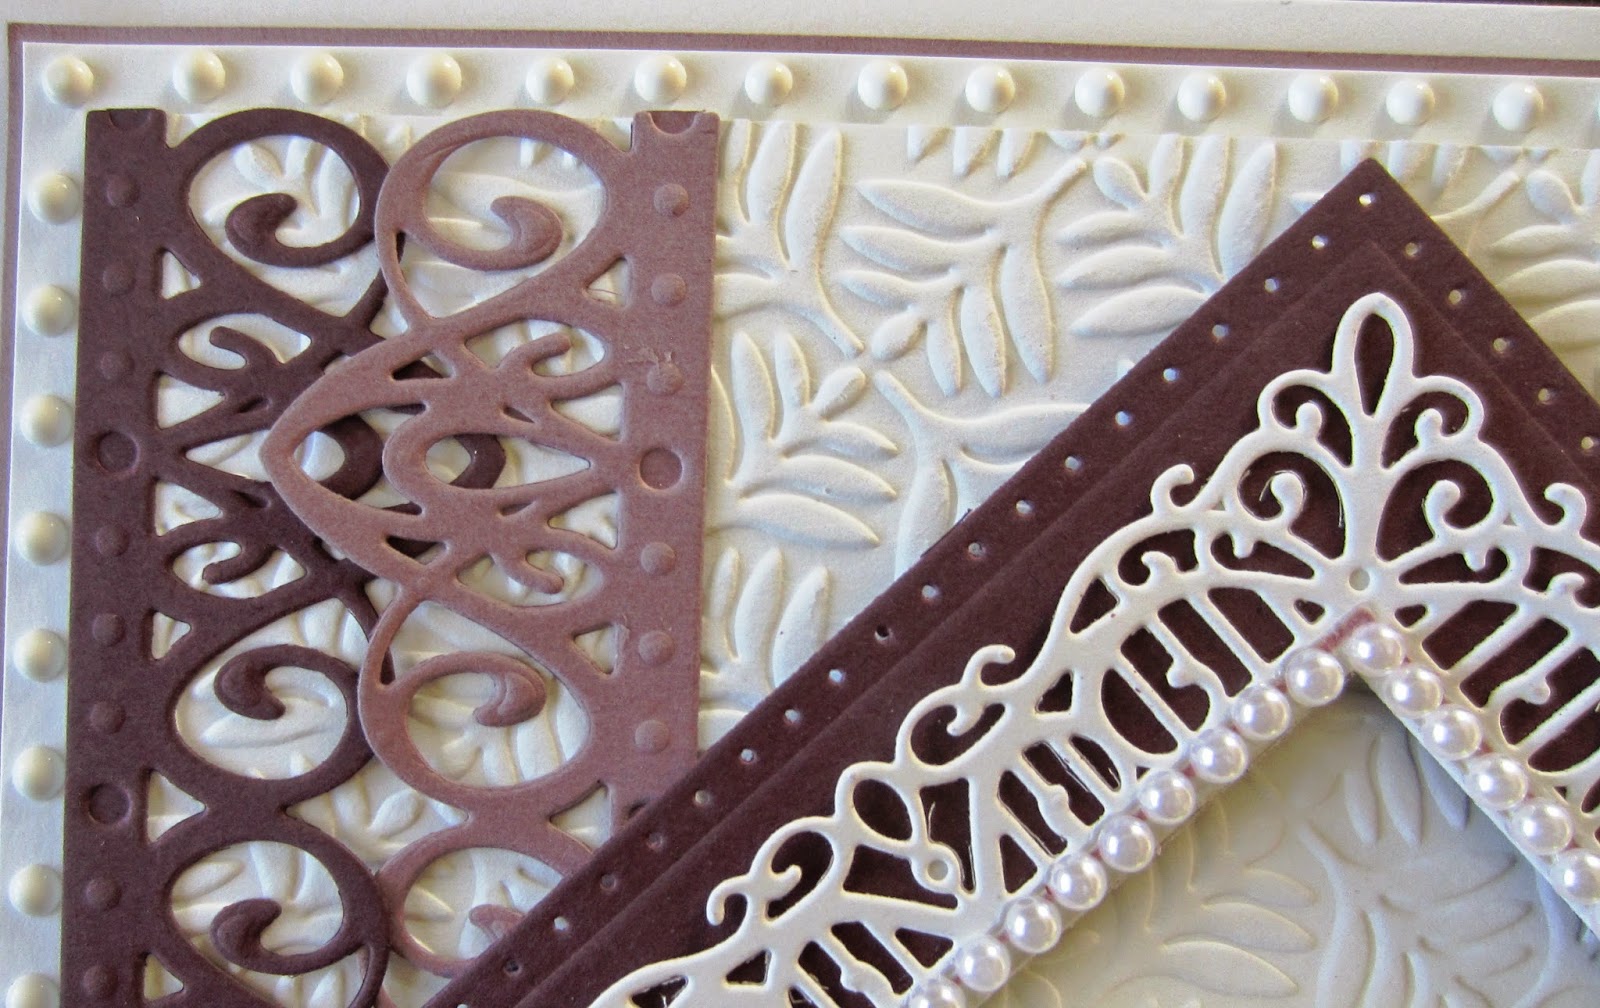
Hello crafters!  I love this card, the colours were just so pretty together in real life.  I started by embossing the coconut white background with a new embossing folder (it will be on my next shows in April) called Leafy Quad.  Next, I cut the New York border die four times, twice out of rich plum card and twice out of a dusty lavender card (from my stash)  I glued them to the edges of the card so they were slightly overlapping and interlocking each other, but with the straight edges outward to create two columns.  I cut the Herald Square out of Rich plum card.  I then cut the Madison Square out of coconut white card and glued them together.  I used a smaller square to cut the inside of both of them to create a frame.  I added mounting foam to the back and attached it to the centre of the card in a diamond orientation.  I added our new adhesive pearl strips around the inside of the frame (I used just one row cut from the double row pearl strips.)  I stamped my sentiment and cut it out with the New York tag.  I inked it lightly with Seedless Preserves distress ink before removing it from the die.  I mounted it with foam in the centre of my frame.  I tied a double bow out of white satin ribbon and added it below the frame.  I made a ribbon rose from the Raisin satin ribbon and added it with a few Mosaic Leaves to the centre of the white satin bow.  I completed the card with Cosmic Shimmer white PVA glue dots all the way around the edge of a white mat.  I added a thin mat of the dusty lavender card then a final white mat to finish it off.  The finished dimensions are  8" x  8 3/4" in size.  All for now, Sue x


Follow my blog with Bloglovin

Sunday, 22 March 2015

Just For You

Good Sunday morning all!  A classic black and milk colour combo for today's card.  I embossed a piece of milk card using the Quilted Circles Pinpoint embossing folder to give texture to the background.  I matted it with a thin black mat to help define it and added some cream flatback pearls as accents.  Next I cut the Copenhagen die out of black card using the inside die to add a bit more detail. I cut it in half and glued the two halves to the sides of the background.  next I cut the Stockholm die out of milk card and backed it with a black one to show through the detail.  I cut the centre of the die out and added mounting foam to the back to raise it for dimension.  I stamped my sentiment and cut it out with the inside die from the Copenhagen set.  I inked it with Antique Linen before removing it from the die.  I mounted it vertically in the centre of my frame, using mounting foam to lift it.  The card was finished with a pierced milk mat, a thin black mat and a final milk mat.  The finished dimensions are 7 1/2" x  7 1/2" in size.

I'm afraid that I am still trying to get caught up from being away so I am only going to draw one set of winners for each of the three weeks away (I hope you will let me slide on it this one time).  The winners from the comment game are:

Linda28!!!
Karen M!!!
April Bryson!!!

Linda Graham!!!
Zena McCalmont!!!
Vick (arful codger)!!!

Jan on the Fosse!!!
Janice K!!!
Macky!!!

Congratulations all!  Please email me at americansue1@gmail.com to confirm your address and claim your prizes.  All for now, Sue x


Follow my blog with Bloglovin

Saturday, 21 March 2015

Just Wanted To Say Hello

Hello my crafty friends!  I just can't stop using this embossing folder!  I started by inking my Bed of Roses folder with a Peach Bellini pigment ink pad and letterpressing a piece of coconut white card through it.  The ink transfers to the floor of the design with a soft peach hue.  I cut the Madison Square and turned it into a frame for it, raising it for dimension over the letterpressed background.  Next I embossed a piece of peach card with it and used the opposite side of the embossing.  I used the same pigment ink pad to rub over the top of the design lightly.  I layered up the first embossed piece on top of this one and then added a wide white border, a thin peach border mat and a final white mat.  On the wide border, I used white Cosmic Shimmer PVA glue to create my Paved Pearl technique (tutorial at the top of my blog).  For the focal element I stamped my sentiment in black on white card.  I inked it with Peach Bellini, leaving a small white area in the centre for contrast.  I cut the smaller die in the Madison Square die set to create a frame over my sentiment.  I glued them together and added it in the centre of my card set in the diamond shaped orientation.  The finished dimensions are 8" x 8" in size.

As promised, the winners of the last three Wednesday Card Giveaways!  The first winner is:

Deborah Artliff!!! (for the card shown on March 4th)

The next winner is:

Elaine Sabey!!! (for the card shown on March 11th)

and the final winner is:

Nana on the Hill!!! (for the card shown on March 18th)

Congratulations all!  Please email me at americansue1@gmail.com to confirm your address and claim your card.   All for now, Sue x


                                                           Follow my blog with Bloglovin


Friday, 20 March 2015

Thanks For Everything

Hello there my crafty friends!  It's a long post today as I have included a bunch of pictures from my recent holiday in Norway.  I will give the card details first though.  I just love cutting into this background!  There are just so many ways to change it and they look really good.  I started with the bottom of the card by cutting the Ursa Gemini die twice in milk card.  Once with the bottom cutting edge, then I flipped it around so it was a mirror image but cut it without any of the cutting edges.  It creates a really pretty bottom border for the card.  I added a few pearls as embellishments.  I added a backing of periwinkle card so it showed through the die cut outs.  Next I cut the New York Background out of milk card.  I cut it in half (can you find the join?) and removed a bit of it then taped it back together so it formed a square shape. Flatback pearls hide the join areas nicely.  I backed it with Periwinkle card as well.  I added mounting foam to the back to raise it for dimension.  I stamped my sentiment and covered it with a sticky sheet then coated it with Diamond Sprinkles. I cut it out with the New York tag and added it to the centre of the background with foam.  I tied a double bow out of the Antique white (cream coloured) satin ribbon and topped it with a satin ribbon flower and some dried baby's breath (from my stash).  I paper pierced the edge of a piece of milk card, then added a thin periwinkle card and a final milk card mat layer.  The finished dimensions are 6 1/2" x  8 3/4" in size.  All for now, Sue x


Follow my blog with Bloglovin

 I thought you might enjoy seeing a few pictures from my trip to Norway.  This was taken on the day excursion from Stavenger.  We took a boat through the Lysefjord.  We wanted to see Pulpit Rock, but it was too foggy to see it clearly, but we did see some gorgeous waterfalls along the way.
 The view from the cabin as we entered the harbour at Stavenger.  My other half had these flowers delivered to our room prior to sailing, they were beautiful!
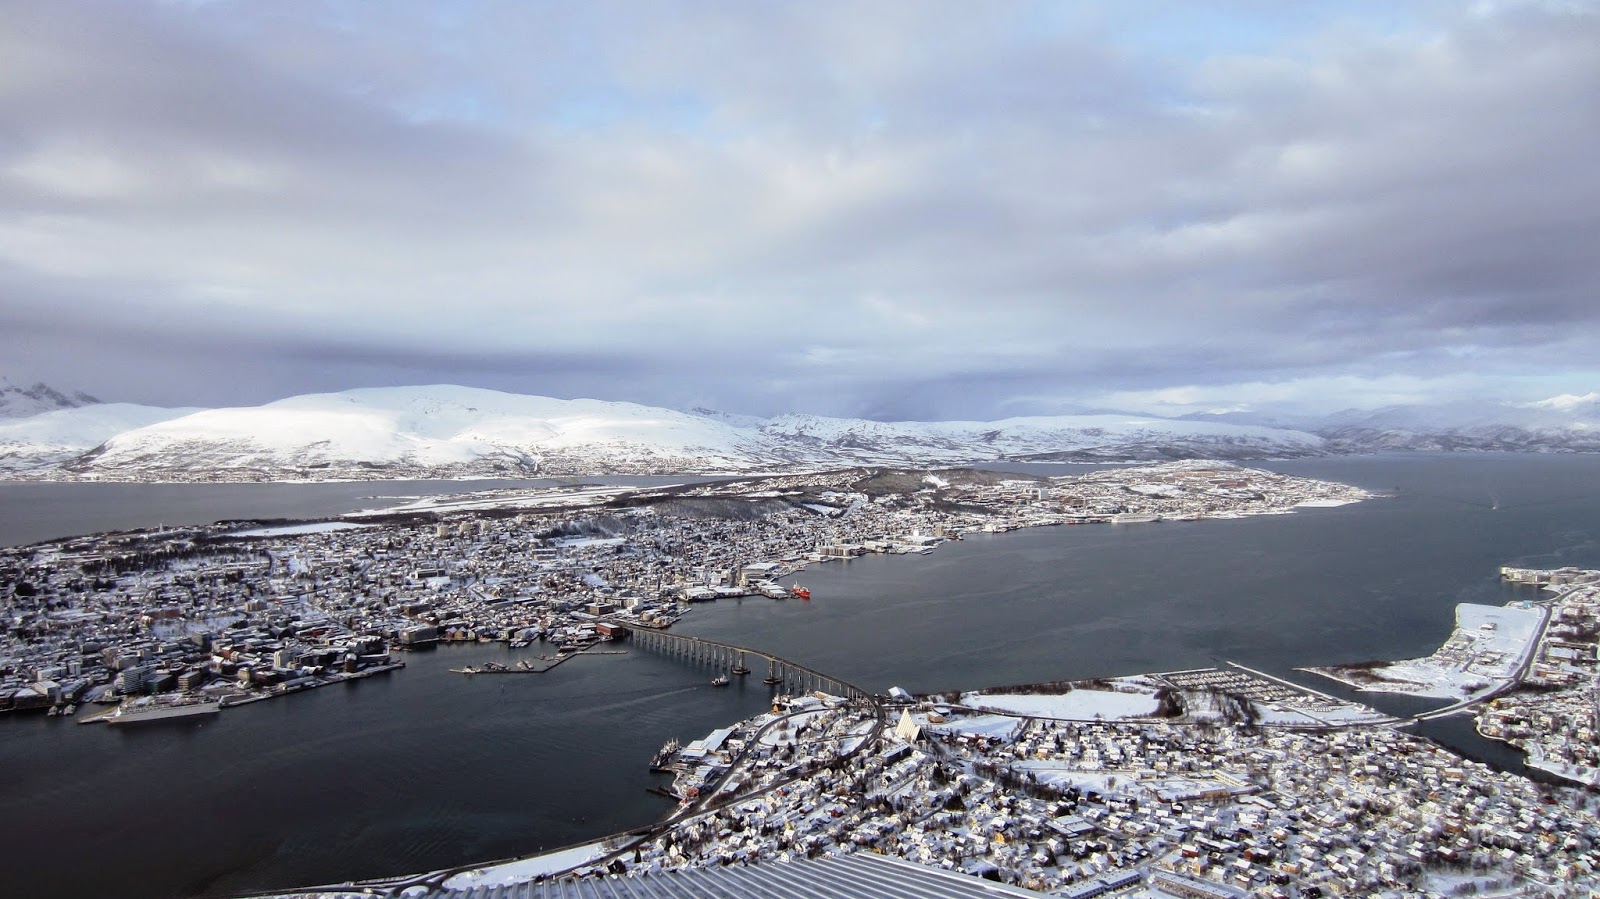
 We took a cable car to the top of the mountain in Tromso.  This was part of the view, it was spectacular!
 I managed to catch the other cable car as we were passing on the mountain on the way back down.  They only held about 27 people.
 Probably my most favourite day of the trip was in Alta.  We had a day excursion going snowmobiling inside the Arctic Circle.  What a blast!  They put you in a thermal suit and helmet so it was quite warm (yes that is me under all that gear!)  and the day was absolutely beautiful too (just look at that sky!)  We couldn't have asked for better weather.  It was a two hour trip up the mountain, where we were able stop a few times for photos.


After the ride, we were treated to a tour of the Ice Hotel.  It just looks like a large igloo from the outside, but inside is magnificent!  The theme was Norwegian culture and there were so many detailed ice sculptures and carvings.
 This is actually one of the beds in a "suite" in the hotel. It was round and you had to walk up the path on the left to get into the bed which was covered with reindeer hides for warmth.  You still have to sleep in all your gear inside a sleeping bag on top of the bed though.  We didn't stay the night, but I was surprised that it didn't feel colder than it did.  They keep it at -4C constantly we were told.
 This was carved into the side of one of the walls.  I thought it was a Yak, but was told it was not.  I cannot recall exactly what she said it was but it was the equivalent to a Norwegian buffalo.


It was hard to get this entire sculpture in the picture (it was about 10 feet long) of huskies pulling a dog sled.
 Check out the ice furniture!
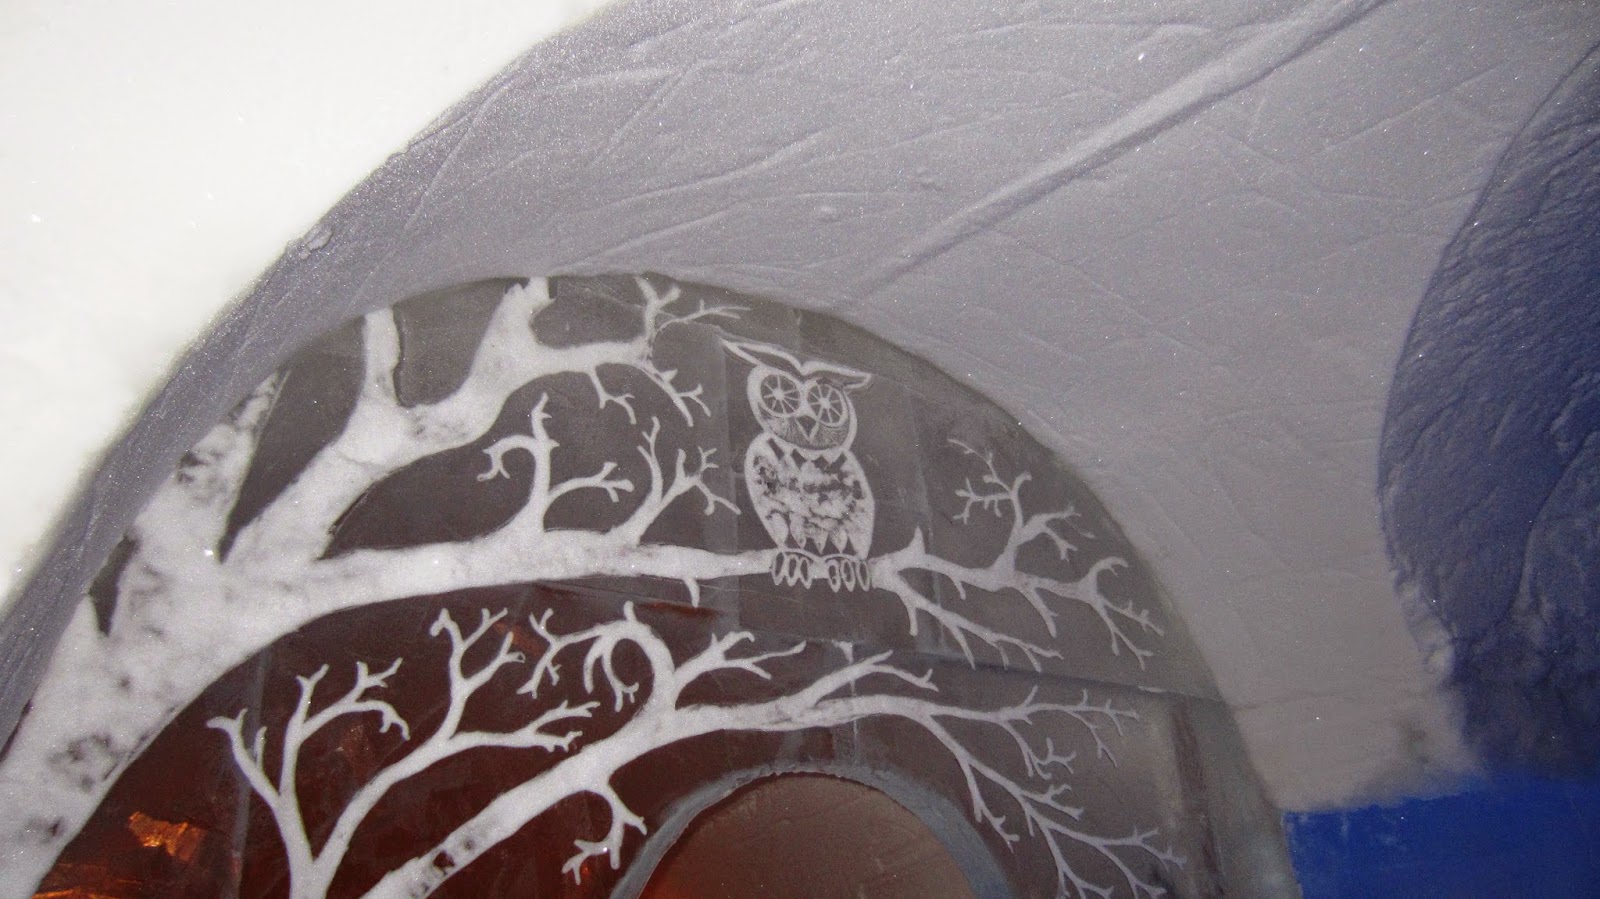
 There were etched ice arched panels going into the different areas of the hotel.
 On our second day in Alta, we took a tour of the city by coach.  This is the modern Northern Lights Cathedral.  Again, look at that gorgeous sky behind me.
 This church was the only remaining building in Alta at the end of the second world war.  It was a beautiful wood church building.


We went out to see the Northern Lights the last night in Alta.  A coach took us up in the mountains to a remote location so that the light from the city did not wash them out.  This photo was actually taken by the ships photographer with a proper camera, using an open exposure setting to really get the colour to come through.  It was taken from the same spot we were at when we saw the lights (my personal pictures did not come out very well without the open exposure setting).  We watched them dance in the sky for a couple of hours though, it was really amazing to see!

Our last post was Bergen and this pic was taken from the top of the mountain.  We took the funicular train up to the top and wandered around. There was no snow at all any where in Bergen, even the top of the mountain was sunny and warm!  You can see our cruise ship in the port below.

We had a really lovely time and I thoroughly enjoyed the whole trip.  I have an extra eight pounds on me to prove it too! LOL  I hope you have enjoyed the pics.  All for now, Sue x