Merry Christmas crafters! It has become a tradition now that on Christmas Day I post all the Christmas cards that never made it up on the blog for one reason or another. Had I realised that there were quite so many, I could have done triple Fridays instead of just doubles! I suspect I will even come across a few more that I have missed, but I promise no more until at least June next year (as that is when they seem to have me start doing more Christmas shows!) No write ups for each card, but if you have any questions about any of them, feel free to email me and ask. I hope you will find something in this bunch that you like. I would love to know which ones are right up your alley so to speak. My wish today is that everyone has a lovely day to reflect on the year, cherish our loved ones and really appreciate all that we have in our lives. It is a always a hectic month for everyone so hopefully we can take a minute to just relax too. I am so thankful to have my blog friends on a daily basis to keep me company and cheer me on. You are the best! Again, Happy Christmas 2013 to everyone! All for now, Sue x


A daily papercrafting blog which features my handmade cards showcasing Creative Expression's products including my own line of cutting dies and embossing folders, Cosmic Shimmer, Ranger and more which use various techniques and ideas to hopefully inspire the creativity in you.
Tutorials
- Home
- My Ribbon Flower Tutorial
- Fancy Nestie
- Blossoms Five Flower Bud
- Blossoms Five Full Flower
- Easel Tutorial
- Wax Paper Embossing Folder Tutorial
- Caught In Crystal
- Shaving Foam Tutorial
- Quilt Card Tutorial
- Paved Pearl Technique
- Faux Leather Technique
- Plaited Ribbon Wreath Tutorial
- Paper Rose Tutorial
Wednesday, 25 December 2013
Tuesday, 24 December 2013
Triple Stamping
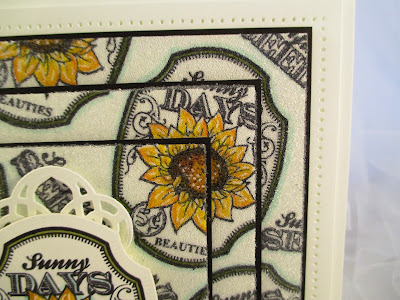
Hi crafters! Happy Christmas Eve! Hoping that many of you would be around today, I thought I would show you some triple stamping, but with a twist, a micro beaded twist, that is! I started with three pieces of coconut white card all cut into rectangles of stackable sizes. I put a piece of sticky tape between each layer then began stamping in black archival with the Sunflower stamp from the Vintage Labels Five Sunflower set by Justrite Stamps. Each stamp caught the different layers so it was only partially stamped on any one layer. Once I covered the entire piece, I disassembled it and coloured it with a combination of pencils and Distress Markers. I used an aqua pencil around each images to give it a shadow and added some accents to the flowers with a white gel pen. Once coloured, I covered each piece with a sticky adhesive sheet and hand trimmed the excess away. You can use a paper cutter if you are careful not to trim away any of the stamping. I peeled the backing paper off and micro beaded each piece for a lovely textural look. I cut thin black mats for each piece and taped them on the coordinating piece, then reassembled the card using mounting foam between each piece. The black mat gives a nice frame to each section, but covers the area where the stamp cannot get close enough to the edge because of the different layers. Your eye completes the image once it is reassembled because the void has been filled. I stamped one more Sunflower image and cut it out with Vintage Labels Five and coloured it. I cut a tag from the Filigree Bracket and Label die and snipped it in half to use it top and bottom to just peek out from underneath. No sentiment, just beautiful sunflowers today, easily used for anything you like! Finished dimensions are 7 1/4" x 8 1/4" in size. In case you don't get a chance to stop by the blog tomorrow, I hope that everyone has a wonderful Christmas filled with family, friends and food, among other things! If you are able to pop by tomorrow, then there will be loads to see! All for now, Sue x
Monday, 23 December 2013
Thanks So Much
Hi bloggers! It's the chalkboard technique or should I say "chockboard" as I do! LOL I will never live that one down, will I! I love this technique myself, especially when it is put together with a pastel sort of colour. I picked our mauve card for my background and used the Ornate Corner stamp from Justrite to give a random bit of interest to it. I stamped it with the Snow Cap Adirondack Pigment pad. No embossing, just let it dry naturally for a soft sort of ghost image. You can't really tell that it is an actual corner that was stamped when you turn it all different directions, you don't get that hard corner line. Next I stamped the Lavish Corner Background on black card using a clear Perfect Medium pad. I heat embossed it with True White powder. In order to get a sort of distressed look, I lightly rubbed it in spots before embossing it as you don't want it to look perfect. I used a piece of cut 'n dry foam and swiped across it with the Snow Cap ink to give it the appearance of chalk dust too. I matted it on another piece of black card that I drew a keyline around using a white pencil. I also used the edge of my scissors to do a bit of distressing along both the black card and the mauve card. I stamped my sentiment from the Bold Sentiment set by Creative Expressions. I cut the sentiment and mounted it on my acrylic block in two rows to fit the oval of the stamped image. I made some felt flowers from the mauve felt in the blossom felt pack and the smallest ones were die cut from the Heartfelt Creations Layered Scalloped Posy set. I seated my flower on a mauve seam binding messy bow and added some black tulle and black jute twine to dress it. I finished the card with a double layer black mat with a pierced inner mat. The finished dimensions are 7 1/2" x 8 1/2" in size. All for now, Sue x
Sunday, 22 December 2013
Thinking Of You
We have a double lot of winners in the Comment Game this week! I am so pleased that so many of you still take the time to leave comments this time of year. I know we are all so busy with preparations to attend to, so thank you so much, I really appreciate the effort!
This week's winners are:
Sue from Wiltshire!!!
Nancy D!!!
NannaPat!!!
From the extra qualifying post of Wed. Dec. 18th, the winners are:
Nicola Belshaw!!!
Steph from Lancashire!!!
Aspiring Crafter (Ruth)!!!
Congratulations all! Please email me at americansue1@gmail.com to confirm your address and claim your prize! All for now, Sue x
Saturday, 21 December 2013
You' Are So Sweet
Hi crafters! I decided to show one of the cards from the Vintage Sunflower set today. This is a beautiful set by Justrite. I embossed the top part of the white background first using the large polka dot mask. I matted it on a piece of tan card. I stamped the sunflower twice. I coloured the flowers on both and just the stem and leaves on one of them. I used the Tim Holtz distress markers to colour it and added a bit of Diamond Sparkles for bling. I used a white gel pen to add some highlights to the flowers. I cut out the flower on the second one and decoupaged it up using mounting foam. I cut a Filigree Delight die and mounted it up with foam so the flower showed through the opening. The second flower has been stamped so that the tip of the flower was under the frame so the decoupaged flower is actually lined up and placed above the frame. I stamped the sentiment from the Bold Sentiment set from Creative Expressions and added a thin yellow line by hand to the stamped sentiment. I cut it into a strip and added it below my focal element. I tied a messy bow of white seam binding. I added some yellow Bakers Twine and finished with an antique gold button. I finished with a double white pierced mat and some flatback pearls on the frame. I hope you like it! Finished dimensions are 7" x 8 1/2" in size.
The winner of the Wednesday Weekly card giveaway this week is:
Michelle Stanley!!!
Please email me at americansue1@gmail.com to confirm your address and claim your prize! All for now, Sue x
The winner of the Wednesday Weekly card giveaway this week is:
Michelle Stanley!!!
Please email me at americansue1@gmail.com to confirm your address and claim your prize! All for now, Sue x
Subscribe to:
Posts (Atom)