Friday, 22 March 2013

Welcome Home

  Hi bloggers!  A completely different looking card than my usual style for today, but I really liked it for just that reason.  I started with the background and used the Brick embossibility folder on dark grey card.  I extended the pattern for a larger background.  I used some sandpaper to distress it, removing some of the grey so it looks a bit like lighter coloured grout on the wall.  I added some black soot to further distress the background.  Next I stamped the palace entry from Heartfelt Creations.  I shaded  it with Pumice Stone distress ink and cut it out.  I used the scene from the Doorway Trimming set and stamped it over the centre of the wrought iron in the gate.   I inked the edge of the scene with Walnut Stain to give it a sort of sepia look.  The impression you get is that you are looking at the scene through the wrought iron. Next I stamped another Palace Entry gate, coloured it Distress markers and cut out only the very outside area of it.  I mounted it on foam and placed it over the first one I stamped.  I stamped, coloured and cut out two of the spiral topiary trees from the doorway trimmings set and added them to either side of the gate.  I stamped my sentiment (from JustRite stamps) and cut it out with one of the fancy tags two dies.  I lightly inked it while still in the die with Pumice stone distress ink and mounted it on an angle in the corner.  I used the two small vine dies from the Chateau Gate die set and cut a bunch of them in three shades of green card.  I glued them in place across the top of the card to look like vines growing on the wall.  I think this would make a great men's birthday card, you know, king of the castle sort of thing!  Finished dimensions are 6 1/2" x 8" in size.  Be sure to check the blog tomorrow for a sneak peek at one of the cards for Sunday's Tool Shed and 7pm shows!  I see we have hit another blog candy target too!  If you will allow me to do the drawing on Monday, I will post the winners in the afternoon.  All for now, Sue x


Thursday, 21 March 2013

Kindness Matters


 Hi bloggers!  Another card from the Die D-lite shows for you today.  This one is being posted as a special request by one of my blog followers, but I hope everyone else enjoys it as well.  I started with kraft card and used the inner die only from the Vines Of Passion D-Lite set to cut an aperture in the centre.  I cut a piece of red card, covered it with a piece of sticky adhesive sheet and covered it with Rock Candy Dry glitter and glued it behind my aperture.  I inked the edges of the topper lightly with black soot distress ink and matted it with both red and black.  I cut two of the floral corner D-lites in white and added them in opposite corners.  Next I cut a larger piece of kraft card and used the Damask Heart and stamped it all the way around the edge with a clear perfect medium pad.  You don't actually realise that it is a heart that is stamped, but rather it gives an interesting background pattern.  I heat embossed it with white powder and then lightly inked the edges with black soot again.  I like the smokey look it gives to kraft card myself.   I tied a piece of black seam binding around it before adding my topper.  I added a messy bow to the side.  I stamped the sentiment and cut it out with one of the petite labels one dies, inking it lightly while in the die with black soot also.  I tucked the sentiment under a black Dazzler on my bow.  I added a red mat then two black mats that were treated to an edge of Cosmic Shimmer black PVA glue dots for accents.  I added three black flatback pearls to my topper to finish off the card.  Very sultry, might make a good card for that special person in your life!   Finished dimensions are 6 3/4" x 8" in size.   If you are a heart person, I've put up another card for auction on the right hand side of the blog.  I hope you like it enough to make a charity bid on it!   All for now, Sue x


Wednesday, 20 March 2013

You Mean So Much To Me


Hi guys!  I thought that I would mix it up a bit today and show one from the 4 Day Deal shows.  I absolutely love this one myself.  These Asters are just simply exquisite dies and stamps, they look so real don't they!  I started by embossing the background using the small polka dot mask.  I only did the top of my card with it, then decided to use my score board on the bottom of the card.  I love the way it adds just a bit of interest without taking you away from the main feature of the card.  I cut a border from the scallop insert edgeability die and backed it with the matching sky blue card (part of the pastel card pack).  I tied a double bow out of white silky crush ribbon and dressed it up with a pearl embellishment and stick pins.  Next I cut one of the Decorative Oval windows from Heartfelt Creations.  I used a bit of 3D mounting foam on the back to raise it for dimension.  I cut several of the delicate Aster dies in varying sizes in the sky blue card, then placed them on the matching inked stamp to get more detail in them.  I find it easier to do these that way rather than stamping and then cutting them out.  You can cut two pieces of card at a time to make your flowers fuller too.  I added some centres that I inked with mustard seed and some leaves that I inked with Forest Moss to create my floral element.  I glued them to the side of the window and added a stamped sentiment on a strip coming out from them.  I matted my sentiment in blue and cut forks into the ends.  I use a glue dot to hold the strip in place with a bit of a curve to it.  I pierced the double white mat and added some flatback pearls to the corners to complete the card.  I am really trying to bring a bit of spring into our lives, even if mother nature isn't!  Finished dimensions are 6 1/2" x 8 1/2" in size.
I have had several requests for other cards to be auctioned and since I can really only hold the auctions while I am in the UK, I have decided to put up two cards at the same time.  You just need to specify which number card you are bidding on when you email me.  I will get another card loaded up sometime today for you so please check back mid morning.  Also, don't forget that if you would like to reserve a copy of the demo DVD that we will be filming while I am in Scotland in July, please email them at thepapeterie@gmail.com  All for now, Sue x


Tuesday, 19 March 2013

Floral Scene

Hi blog friends!  I had really hoped to demo this card, but one of the dies had sold out so I was only able to do a portion of the card.  I started by cutting the Elegant Labels Four out of white card.  I used both of the larger dies to create a frame for my flowers.  I matted the frame on some aqua coloured card and did some paper piercing around the edge as an accent.  I put 3D foam on the back of this piece to raise it for dimension.  Next I used the Pure Pleasures embossing folder from Couture Creations to emboss a floral background for my flowers..  I hand cut a scallopy piece of card and used it as a mask to create clouds in the sky behind the flowers.  I used an aqua Adirondack ink pad and sponged lightly, moving the mask around as I inked.  Next I cut the Asters, Bluebells and Lilly of the Valley flowers.  I inked through the dies using a clear perfect medium and heat embossed them with white powder for a bit of an accent.  I arranged the flowers in my frame so that you can see some of the embossed background flowers from behind.  I added white PVA glue dots around the edge of the double white mat to finish the card. Very springy, now if we can just have spring show it's head, we'll be all set! LOL   Finished dimensions are 6 1/2" x 8 1/4" in size. 
We just finished the first charity card auction yesterday.  It was a rousing success and was good fun too as there were several last minute bids submitted for the card.  I had so much fun!  I have put up card no. 2 for the auction which will go until Thursday the 21st at noon.  Feel free to submit your bids to me at americansue1@gmail.com   I will email you back to let you know if your bid is successful. Remember it is for a worthy cause! All for now, Sue x


Monday, 18 March 2013

On Your Special Day

 Hi my crafty friends!  Since we are still doing the POTW shows I thought that I would show a few more cards from it this week.  This one using the window D-Lite is one of my favourites.  I cut the inside of the window in the centre of a piece of coconut white card so I had an aperture.  I used the chicken wire mask and embossed the remaining part of the background around the window ( I left the insert in place so that portion did not get embossed)  Then I cut the window again in white but used both the dies to give me a complete cut out window.  I mounted the full window over the cut out by gluing it directly on top.  Next I cut one of the Gilded gates and nipped away the two end post parts and glued them to either side of my window for a more stately appearance.  I added a piece of striped silver pearl paper to the bottom of my card, with another strip of it cut to use as a border between the two sections.  I tied a double bow out of silky crush and added a pearl embellishment and stick pins and added it to the side of the card at the border.  I stamped my sentiment and embossed it with silver powder.  I cut it into a strip with a fork on the end.  Using just the dabber of the brushed pewter distress stain, I edged the forked strip.  I bent it to give it a bit of shape and added it to my card using glue dots.  I then cut a piece of decorative pearl patterned paper to use behind my window.  I matted the piece with a thin silver mat and cut a double white border and pierced the inner layer.  I added varying sizes of flatback pearls to the corners to complete my card.  Great for a wedding, anniversary card or even a christening card, don't you think!  Finished dimensions are 6 3/4" x 8" in size.  All for now, Sue x


Sunday, 17 March 2013

Floral Sunset


 Good morning!  I just love the bright background with the black die cut flowers.  This is a really easy quick card to make if you use the Matting Basics B die set for the frame.  I started with the background and I inked a piece of coconut white card with distress inks.  I used mustard seed, barn door and dusty concord and inked it in rows.  I applied the ink quite liberally, then I decided that I wanted it to be a bit more diffused but still quite bright so I used all three colours and laid a stripe of each on to my craft mat.  I spritzed it with water quite liberally then placed my inked card down into it.  I pulled the card along to sort of mop up the ink.  This allowed my background to blend, but still retain it's brightness.  I dried it with a heat tool and stamped my sentiment in the upper corner.  I cut several of the Asters and Poppies in black card.  I nipped them a bit and added in extra flower heads here and there and tucked the stems under the edge of the frame. For the frame I used two sizes of the Matting Basics B set to cut the frame, then I added in an extra die and just embossed it into the frame edge for a bit more detail.   I added a thin white mat to lift it a bit then did my final pierced mats to complete the card.  This will work for any occasion so you can simply change the text to suit.  Finished dimensions are 7" x 9 1/2" in size.

 Now for the Sunday Comment Game Winners.  We Had a few extra qualifying posts also this week so loads of winners. 

This weeks winners are:
 Carol Yates!!! 
Belinda Raven!!!
 Debbie Tinks!!!

For the qualifying post of Wednesday, March 13th, the winners are:
 Pat W Witney!!! 
Toni Galvin!!!
 Marion Bull!!! 

For the qualifying post of Tuesday, March 12th, the winners are: 
Joanne 2403!!! 
Christine Harrop!!!  
CMU!!!

Congratulations to all!  Please email me at americansue1@gmail.com to confirm your address and claim your prize.  Don't forget to tune in to the POTW shows today and the rest of the week!  All for now, Sue x


Saturday, 16 March 2013

Gilded Gate Frame


Hi guys!  I thought I should show you the card that actually gave me all the leftover bits that I used on yesterday's card.  I decided that I wanted to use the Gilded Gate to provide a sort of fancy frame for the hearts.  I thought that the arched shape would be very pretty if I nipped out the actual gates and put two of the gates together like this.  I rather like it, and it definitely gives you more options for using your gate in other ways.  I ended up with four gates from this card and the four more from the demo that I prepped to do this card, so that is how yesterday's card came to be.  I used the Crazy Daisy embossing folder to emboss the white background for interest.  I attached my two gates then cut two of the Vines of Passion in red for the centre.  I matted that piece in red then cut a larger piece of white card to go around it.  I used the beaded swirl accent stamp and a clear perfect medium and stamped around the edge of the white card.  Using white powder, I heat embossed for a tone on tone look.  I finished the card with a double mat of white and Cosmic Shimmer white PVA dots all the way around the edge as accents.  I added a double bow tied out of frilly edges white ribbon, stick pins and a heart Dazzler for the centre.  I was contemplating doing the entire card in white and micro beading the two hearts.  That might have looked very pretty two, but you can definitely see other options so there is great versatility here.  Finished dimensions are 7 1/2" x 8" in size.   Do tune in for Julia's shows today and I will see you on Sunday!   All for now, Sue x


Friday, 15 March 2013

Friends Forever Sneak Peek


 Hi bloggers!  I have a bit of a sneak peek for you of one of  the samples from today's POTW shows.  This card is my example of waste not, want not (or is it want not, waste not?) Anyways, I have used some bits that were leftover and laying around on my craft table from the new dies that are on offer today.  I'm not going to give away too much as I want you to tune in to see the launch show at noon.  I have shows at 3pm and again at 5pm today too.  Julia Watts will be in on Saturday to do the shows and I will be back on Sunday.  I will tell you though that we are premiering the new Die D-Lites today and you are looking at a segment of one of them.  What do you think it is?  No peeking at the website before you answer!  I have also used the Matting Basics B set for the frame around my sentiment as they are also on the show.  Finished dimensions are 6 1/2" x 7 1/2" in size.
  I would also like to say a huge thank you to all of you that have taken part in the charity auction!  I have been overwhelmed at the response so far.  Keep those bids coming in!  You guys are true stars!  All for now, Sue x


Thursday, 14 March 2013

Hearts In Lavender


 Hi guys!  Pastel and springy, just like I promised for today.  This card uses the Timeless Amour set from Heartfelt Creations.  I started by embossing a piece of my lavender card with the Floral embossing folder.  I cut it into three strips and used just the lattice heart insert to cut the decorative feature at the bottom of each strip.  I embossed a smaller piece of white card for the top of the card and matted it with lavender card.  I cut two of the large heart from the set and used both of the outer lacy edges across the top of the card.  I stamped my sentiment in one of the solid hearts and inked the edges with Dusty Concord distress ink.  I added tiny 3mm pearls around the edge to set the heart off and mounted it on foam.  I tied a piece of white tulle around the card and tied a bow with it.  I covered the naked knot with a heart Dazzler.  There is a pic of this below, but my computer won't seem to load all the pictures lately the right side up, sorry.  I pierced the edges and added a double white mat to finish the card.  Nice for an anniversary, wedding or any special occasion.  Finished dimensions are 7" x 8" in size.
  The first card in the charity auction went live on the upper right hand side of the blog yesterday afternoon.  I am sure that there will need to be issues worked out so it is a work in progress so to speak.  I have put an end date on it of Monday at noon so that will give everyone a bit of a chance to see it and make a bid if you like.  I ask that you put your bid amount in the subject line of your email so it will be easier to double check amounts (does that make sense?)  I should, in theory,  be able to just scroll down my email list to see who has the highest bid.  I am going to try to put the person's name up that has the current high bid each day.  If there is a particular card that you would like to see up for auction, please let me know when you email.  Here's hoping we can raise some money for the Archway Charity supported by The Papeterie in Aberdeen.  By the way, if you would like to reserve your copy of the DVD that is going to be made that day, please contact The Papeterie at 01224 802337 or email the at charlotte.mitchell@arjowiggins.com  All for now, Sue x


Wednesday, 13 March 2013

More Exciting News!

 Good morning all!  Card first, then news!  For those of you that don't like the dark cards, look away now!  There are a few of you out there like me that enjoy the dark contrast and this one is for you.  I really liked this one myself as I thought it had a real exotic feel to it.  I started by stamping my sentiment in the lower corner with a clear Perfect Medium pad.  I heat embossed it with gold powder.  Next I embossed just the top portion of the card using the Floral embossing folder from Creative Expressions.  I used my score board and made two lines to separate the areas and I pierced in between the lines.  Next I cut the Window Scene die from Heartfelt Creations in taupe card.  I stamped the stained glass window in black and applied Tim Holtz crackle to it and let it dry over night.  I cut the Chateau Gate window in black and glued it over the crackled window once it was dry.  I mounted the two windows a top each other and placed them in the centre of my embossed background.  I made several of the Vintage Floret flowers using varying sizes of the die.  I cut them first out of taupe card, then inked them in black.  I used a clear perfect medium pad to just tip the edges of them and then I sprinkled gold embossing powder on them and heat set the powder.  I added a flatback black pearl as a centre to each of the flowers.  I arranged them around the lower corner of my window and added a small bow of the striped grosgrain ribbon and some natural jute twine.  I matted the entire piece in taupe and pierced the inner mat as a frame to complete my card.  I promise something lighter for tomorrows offering so there is a nice balance!  Finished dimensions are 6 1/2" x 8" in size.
  I also have some more news to let you in on!  Do you remember my charity demo in Scotland on July 6th? Well, the wonderful people at The Papeterie have agreed to film the demo day and we are going to be selling the DVD for £6 with all the proceeds going to the charity (that includes free shipping in the UK!)  They have asked that if you are interested to get in touch with them to reserve a copy (so they know how many to make).  I have also been doing some thinking about how else I could improve on the charity proceeds and I am going to do a silent auction of some of my cards.  I will put a card on the side of my blog and if you would like to make a bid on it, then just email me.  I will let you know if you have the highest bid or not, but I won't tell you the bid amount (more fun that way!)  I will put a closing date on the auction, then notify the person that has won!  What do you think!
All for now, Sue x


Tuesday, 12 March 2013

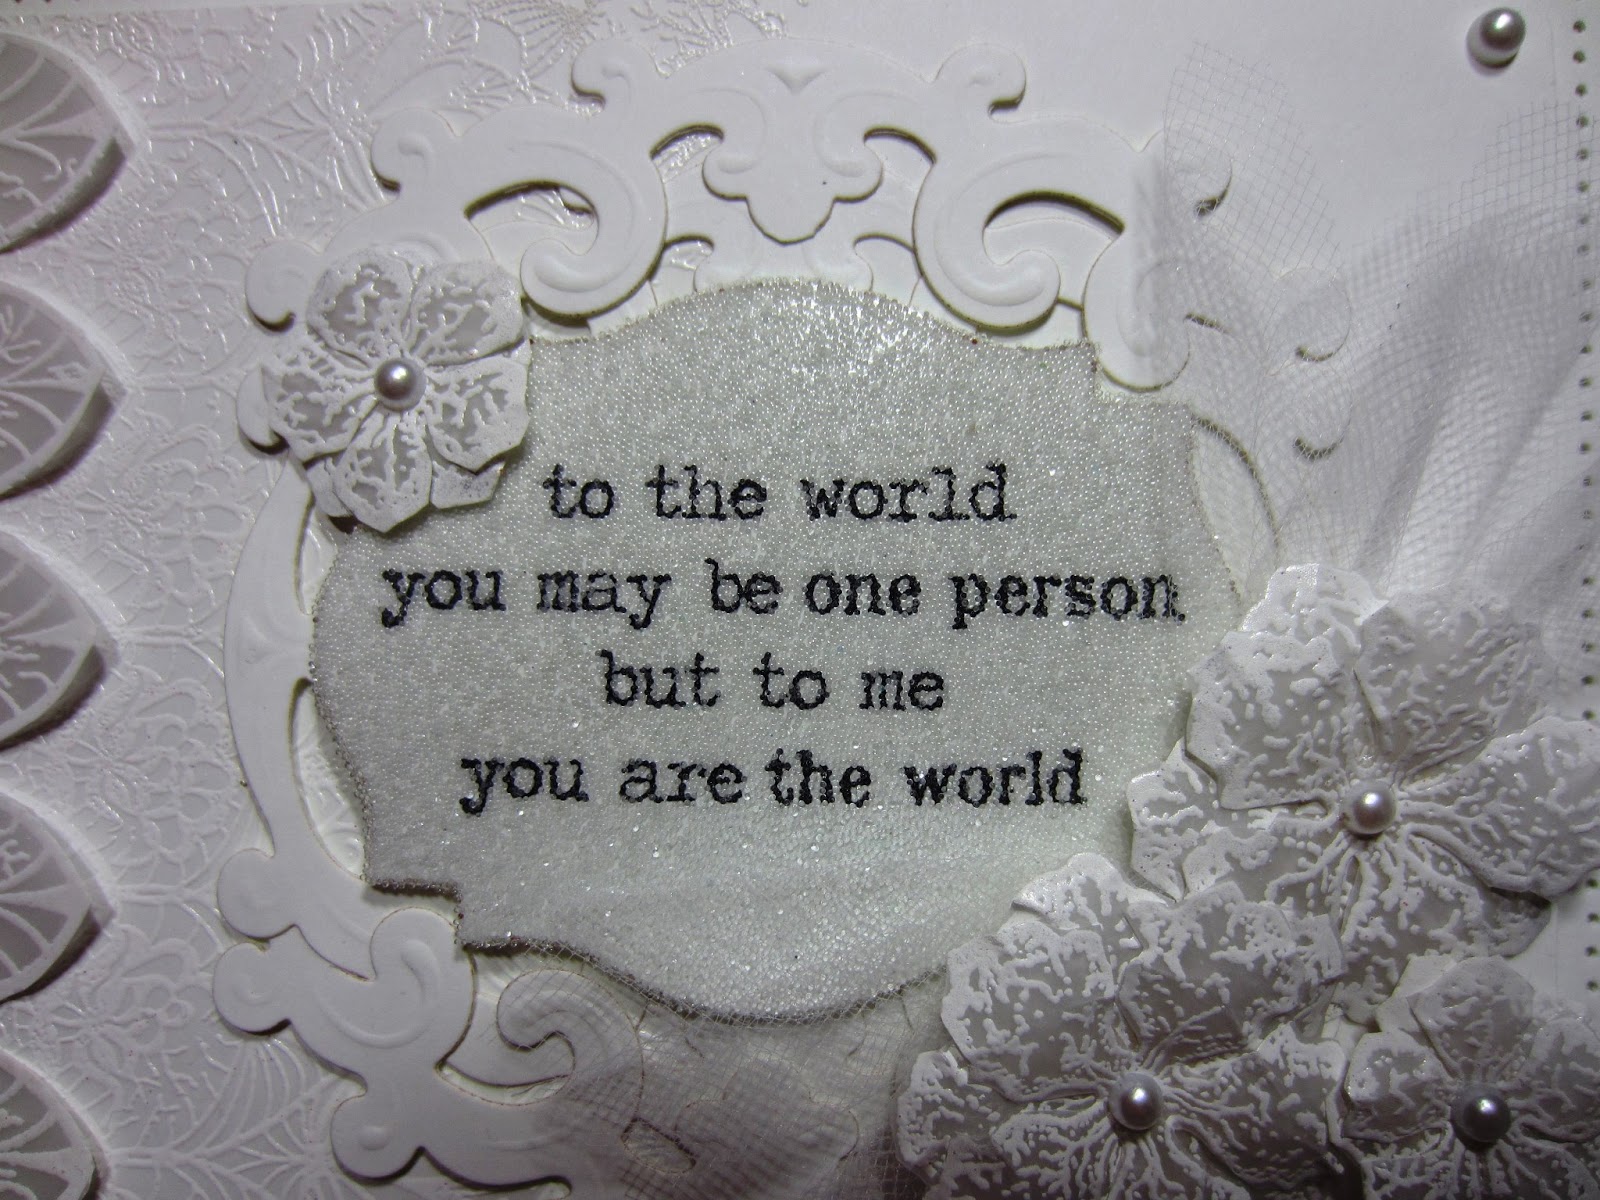
You Are The World


Hi guys!  One of my favourite colour combos to use, white on white!  This one is actually white on vellum to be accurate though.  I stamped the lace stamp on the left side of the card using a clear perfect medium pad and heat embossed with white powder for a tone on tone look.  I stamped it once more but this time on vellum.  I heat embossed it with white powder and cut the first set of pointed scallops out by hand.  I used my thumb and forefinger to put a bit of upward curl in the end of the scallops.  I glued it to the edge of the card and added flatback pearls to each scallop.  next I cut two of the Decorative Oval Window die out of white card.   One was laid horizontally and one vertically.  The swirls will slightly overlap to interlock and keep them in place.  I stamped my sentiment, then covered it with a sticky adhesive sheet, then covered it with clear micro beads for texture.  I just love that sentiment, don't you?  Using the Vintage Floret dies and stamps, I cut and stamped several pieces to create two larger and two smaller flowers. I used my stylus to give the flowers a bit of shape, then offset two pieces to form each flower.  I added a flatback pearl to each of the centres.  I glued my flowers in place and added some white tulle behind them for interest.  I pierced the matted white edge to complete the card.  Finished dimensions are 6" x 8" in size.  All for now, Sue x


Monday, 11 March 2013

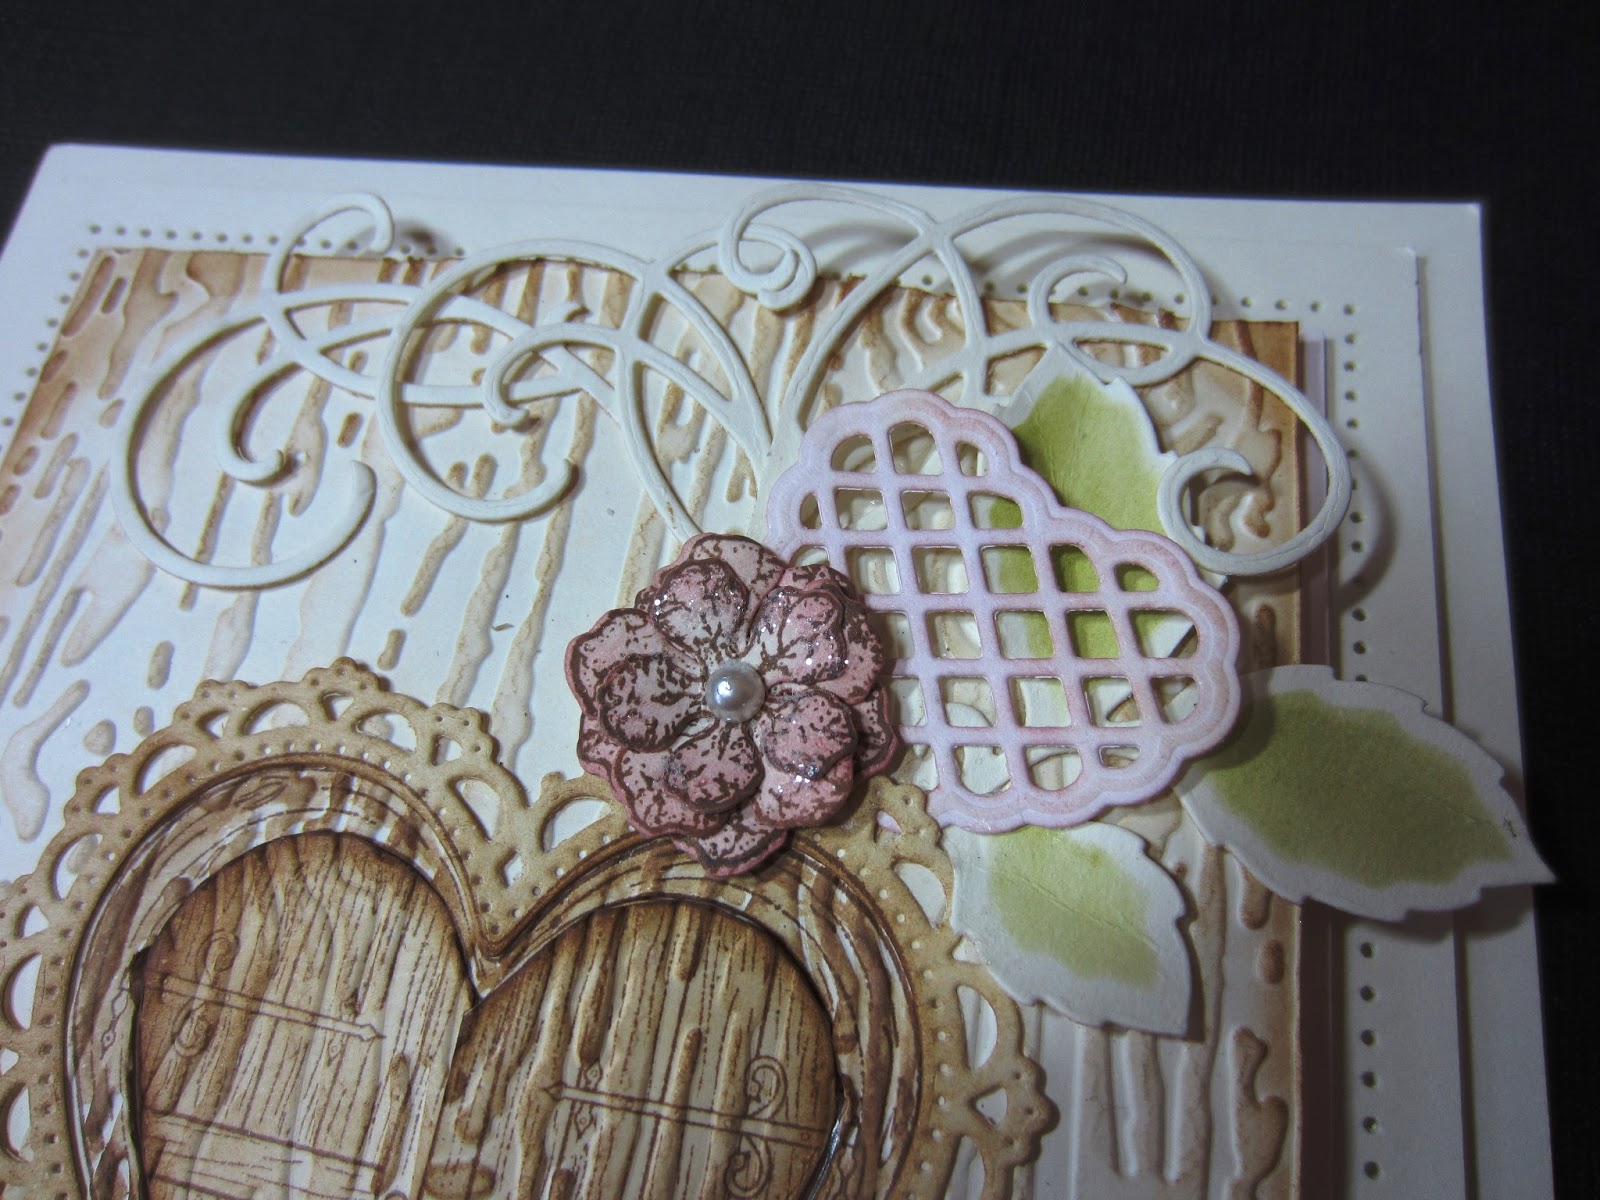
You Are Loved / Blog Candy Winners

Hi bloggers!  I was trying to get the feel of a heart shaped knot hole in a tree with this one.  A bit of a stretch, I know, but sometimes you just have an idea and the fun of it is seeing if you can pull it off.  I did have a little difficulty in that I wanted the heart to be recessed, but also have the doors open so rather than just cutting and folding them, I had to add a piece of paper between two doors that I stamped and sandwiched so they could fold open easier.  The doors are only connected at a small section rather than all the way to the tip part.  You can see this easily in the pic below.  I cut my aperture then embossed the rest of the piece with the Creative Expressions bark embossing folder.  I inked it with Tea Dye distress ink.  I stamped the heart with the flower in it to go behind my doors and coloured it with Distress markers.  On the heart cut out, I stamped the heart door using a coffee archival and inked it with tea dye also.  I cut, stamped and assembled several of the Vintage  Floret flowers for my card and inked them with Victorian Velvet.  By the way, since the Vintage Florets sold out so quickly, they are going to let me bring them back for shows in June that I will be doing, they are gorgeous, aren't they!  I cut several of the swirls from the Bella Rose set, inked the leaves and used them as accents on the top and bottom around my heart.  I cut one of the small lattice hearts from the Timeless Amour set and tucked it behind a flower.  I stamped my sentiment and cut it out with a small Labels 18 and inked it Victorian Velvet and added it to the bottom of my card with a piece of cream tulle.  I pierced the edges and added flatback pearls to the flower centres.  Finished dimensions are 6 1/2" x 8" in size.

Now for my second blog candy drawing this week!  Wow that has never happened!  It definitely has to be a record on that one.  The THIRD place prize goes to..................................................
.....................................................
..........................................
.................................
.........................
..............
........
....
Dawn Searle!!!

The SECOND place prize goes to........................
...............................................................
.....................................................
...........................................
..................................
.......................
...............
.......
Barbara Allcard!!!

And finally, the GRAND FIRST place prize goes to..........................
.....................................................
...................................
..........................
....................
...........
......
Debby Berry!!!

Congratulations to all!  Please email me at americansue1@gmail.com to confirm your address and claim your prize!  We will draw our next big candy when we reach our new goal of 4200 followers!  thanks for all your support!  All for now, Sue x