Monday, 31 August 2015

Just A Note

Hello crafters!  How's this for a change from last Monday's grungy shabby chic card! This one has a real clean and simple styled feel to it I think.  I just love the pop of the slightly different shades of aqua card against the white and black.  I started by using the Montreal die to cut an aperture in a piece of coconut white card.  I added mounting foam to the back to raise it and placed it over another piece of white card.  I cut the Just A Note die three times and layered them to add some thickness to the lettering.  I added it to the centre of the aperture.  By the way, this die has been designed with a tilt on both the "Just" and the "Note" so that you can place it in several different orientations.  I decided to give both words a slight tilt here.  I cut several of the Perfect Peonies Complete Petal die set out of varying shades of aqua card (from my stash) and rather than using them doubled up as I regularly do, I placed them around my aperture singularly, but with a small black Dazzler added to the centres.  I added this to a few larger white mats, keeping it fresh and simple, no embossing at all to complete the card (not even any piercing!)    I have to admit that it isn't easy to not add bits, but I do love the look of plain white card!   The finished dimensions are 7" x  8 1/4" in size.  I do like mixing it up from time to time to keep you on your toes.  Did it work!  LOL    

I also wanted to mention that JOhn Lockwood has shows on Hochanda today at 1pm, 3pm and 6pm.  They felt that since there were some technical issues on the launch day that were being ironed out, that they would like John to do few more shows.  I hope you will be able to tune in!  Don't forget that you can now watch the shows online on the Hochanda website if you are not able to see them on Freeview or Sky!  All for now, Sue x


                                                        Follow my blog with Bloglovin


Sunday, 30 August 2015

Just For You

 Good Sunday morning all!  I thought I would show off one of the matching stamps for my Caribbean Collection dies.  First off I created my background by using just the decorative insert from the Cygnus Gemini die set on each side of the background.  I raise it with foam and added it over another piece of white card for a tone on tone look that showed off the detail nicely.  For the focal element, I stamped the Island Garden Stamp To Die For stamp in black Archival ink.  I coloured it with Distress markers (Shaded Lilac, Forest Moss and Worn Lipstick)  I covered it with a sticky adhesive sheet and cut it out with the matching St. Barts die.  It is easy to line up through the sticky sheet if you hold it up to the light, the black lines will easily show through.  Once cut, I covered it with clear micro beads for a lovely texture.  I cut two Caribbean corners and added them to the top and bottom of the die cut before adding it to the centre of my background.  I cut the centre of the St. Barts die in white and layered it up in the middle with foam and topped it with my sentiment, which I cut out with the smallest die in the St. Barts die set.  I inked it with Shaded Lilac before removing it from the die.  I completed the card by piercing a white mat and adding another white mat for backing.  The finished dimensions are 8" x  8" in size.

The winners of this week's comment game are:

Chaffinch!!!
Berina RGA!!!
Linda Mitchell!!!

From the extra qualifying post of Monday Aug. 24th, the winners are:
A Happercrafter6!!!
Clare W!!!
Jackie Meechan!!!

For the extra qualifying post of Wed. Aug. 26th, the winners are:
Jan in Sheffield!!!
Rosemarie F!!!
Hazel Young!!!

Congratulations!  Please email me at americansue1@gmail.com to confirm your address and claim your prize.  All for now, Sue x


                                                         Follow my blog with Bloglovin


Saturday, 29 August 2015

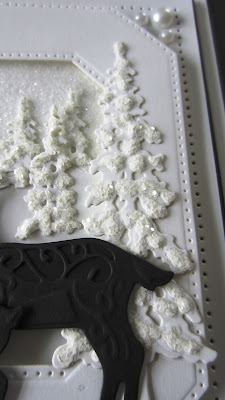
Winter Peace Scene

Hello bloggers!  I just love this frosty winter scene with the silhouetted deer and it is such an easy card to make, but it looks like it took you forever!  I hope you enjoy the video today.

The winner of this week's Wednesday card giveaway is:

Rach 83!!!

Congratulations!  Please email me at americansue1@gmail.com to confirm your address and claim your card!


 The finished dimensions are
6 1/2" x  8" in size.  All for now, Sue x
                                                       Follow my blog with Bloglovin

Friday, 28 August 2015

Christmas Double Day

Hello there my crafty blog friends!  I am showing off my Christmas 2015 Angel first off today.  This is one of those really simple cards, doesn't need any sort of detailed explanations, but I'll run through it so you have the names of the products I have used.  I started by embossing a piece of coconut white card with the Illusion Embossing folder.  It isn't a Christmas embossing folder per se, but it does remind me of snowflake swirls so I thought it would work nicely!  Next I used the smaller outside cutting edge from the Ornate Pierced Rectangle Noble die to cut an aperture out of a piece of silver card.  I used both of the cutting edges to cut a thin frame out of Sky Blue card and glued it to the silver aperture to create an edged frame.  I added mounting foam to it so that it was raised over my embossed background.  I cut the Christmas Angel out of the same silver card and added her to the centre of the frame.  I used the Peace word from the Dove of Peace die set and cut it in blue.  Lastly, I cut an assortment of the twinkle stars from the Angel set in both silver and blue and scattered them around her.  I completed the card with a white pierced mat, a thin blue and silver mat and another wider white mat.  The finished dimensions are 7" x  8 1/2" in size.  Scroll down for card number two.


Card number two actually made it's debut  recently during the mini Christmas die blog launch, but I thought you might enjoy a closer look at it with some walk through directions too of course!  I started by using the Lattice mask on a piece of coconut white and pulling Polar White Sparkle Texture paste through it and allowing it to dry.  I added another small piece of card to the bottom area and a very thin piece of red card to separate it.  I stamped my sentiment and cut it out with the snowflake tag, then spray it with permanent spray adhesive and glittered it with Diamond Snow.  I added the tag to the bottom of the card with mounting foam.  For the focal element, I picked out two shades of green card (from my stash) and cut multiple Filigree Holly dies.  I arranged them in the shape of a wreath using glue dots, then when I was happy with the shape, I added a bit of Cosmic Shimmer dries clear glue under the back edges of each of them, allowing the tips to remain unattached.  I added some red berries using the berry die cut then added Berry Sparkle PVA glue to them and allowing them to dry.  I completed the card with a simple white on white mat layer.   The finished dimensions are 6 3/4" x  8 1/2" in size.


                                                       Follow my blog with Bloglovin


Thursday, 27 August 2015

Letterpressed and Sparkled

Hi bloggers!  Letterpressing is a great way to add colour to a background.  It can be either bold or subtle, as I have chosen to do in this card, but it is sure to add so much interest to your cards.  The video will walk you through the letterpressing technique.

Please do not forget to tune in at 8pm today (and five more hours tomorrow too) to see John Lockwood's launch shows on Hochanda TV.  John will be showcasing some of my die designs and he always does such lovely demos too!  I can't wait!  It's on Freeview channel 39, Sky channel 663 and Freesat channel 822 and also on IPTV on the Hochanda website!!


  The finished dimensions are
7" x  8" in size.  All for now, Sue x

                                                    Follow my blog with Bloglovin


Wednesday, 26 August 2015

Wednesday Weekly Card Giveaway


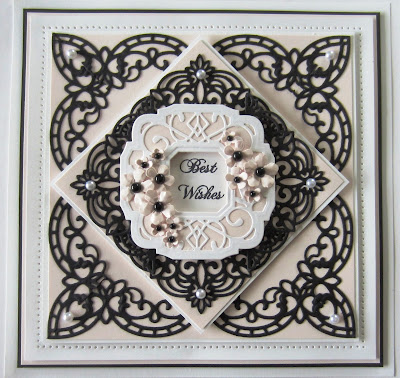
Hello there my crafty friends!  Time for another card giveaway .  Today's offering has been done in blush, white and black card.  I started with the background and cut a piece of blush card.  Next I cut four of the Portuguese borders in black card.  I glued them to the edge of the blush card and mitred the corners with my scissors, which created a pretty scalloped point in each corner.  Next I cut a smaller piece of blush card and added four of the Petite Arched Adornment dies cut in black.  I glued them into each of the corners, overlapping them on the sides.  I matted the piece with a thin white mat and attached it in a diamond orientation to the card.  For the focal element, I cut the inside of the Classic Adorned Design Noble die out of coconut white card.  I backed it with blush card, glued them together and used the smaller cutting die to cut the centre out of it.  Next I cut it in half and put the two halves together and trimmed it down further.  I reassembled the halves to create a sort of round shape for the centre of my card.  I stamped my sentiment and added the rounded frame over it with mounting foam.  I cut several of the small Peony dies and arranged them so they covered the cut lines in my frame.  I finished the card with some flatback pearls as embellishments and my usual pierced mat layers.  The finished dimensions are 8" x 8" in size.  Leave me a comment to be included in the drawing to win this one.  The winner will be announced on Saturday's blog post.  All for now, Sue x


                                                       Follow my blog with Bloglovin