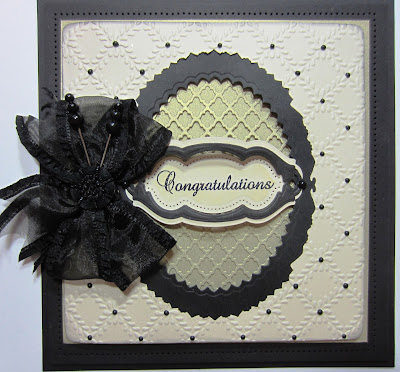
A daily papercrafting blog which features my handmade cards showcasing Creative Expression's products including my own line of cutting dies and embossing folders, Cosmic Shimmer, Ranger and more which use various techniques and ideas to hopefully inspire the creativity in you.
Tutorials
- Home
- My Ribbon Flower Tutorial
- Fancy Nestie
- Blossoms Five Flower Bud
- Blossoms Five Full Flower
- Easel Tutorial
- Wax Paper Embossing Folder Tutorial
- Caught In Crystal
- Shaving Foam Tutorial
- Quilt Card Tutorial
- Paved Pearl Technique
- Faux Leather Technique
- Plaited Ribbon Wreath Tutorial
- Paper Rose Tutorial
Wednesday, 31 October 2012
A First For Me!
Tuesday, 30 October 2012
Thank You
Just a little note before I go, I am taking a short trip up to Savannah Ga this morning for a few days. I'll post piccies on the weekend from it and tell you all about it. I have scheduled posts for each day, but I may not be able to answer emails while I am away. All for now, Sue x
Monday, 29 October 2012
Just Wanted To Say Hi
Sunday, 28 October 2012
Holiday Tree
It's Sunday so time for the comment game winners and since we had a post with over 200 comments this week, there are two sets of winners! This week's winners are:
Wendy Hewings!!!
Donna Jones!!!
"P" in Wales!!!
and from our post with 200 comments, the winners are:
June Fletcher!!!
Snowqueen62!!!
Carol Yates!!!
Congratulations! Please email me at americansue1@gmail.com to confirm your address and claim your prize! Thanks again for all your great comments left on the blog, I so enjoy reading all of them! All for now, Sue x
Saturday, 27 October 2012
Sweet Thoughts
Friday, 26 October 2012
Lavender Thank You
Sue x
Thursday, 25 October 2012
Girliness Today
Wednesday, 24 October 2012
You Are Pretty Amazing
Tuesday, 23 October 2012
So Kind
Now, as promised, the name of the winner of the Anniversary drawing for a set of the Vintage
Lace dies. The prize goes to:
............................................................
.....................................................
................................................
..........................................
...................................
..............................
.........................
..............
......
..
WillsNan!!!
Congratulations! Please email me at americansue1@gmail.com to confirm your address and claim your prize. A great big thanks to everyone that left comments. I was gobsmacked by all the amazing, supportive comments. We have a great crafty family here and that is MY favourite thing about the blog! All for now, Sue x
Monday, 22 October 2012
With Or Without?
Now for the winners of the Blog Candy Contest! Starting with THIRD place, the winner is......
......................................................................
................................................................
.......................................................
.................................................
.....................................
.........................
.............
......
Rebekah Foster!!!
The SECOND prize goes to:
..................................................................
......................................................
...............................................
....................................
.......................
................
........
...
Cathy Clowes!!!
And finally, the FIRST prize for the Blog Candy Contest goes to:
..............................................................................
................................................................
...............................................
.................................
.....................
.............
.....
...
Aggie Osbourne!!!
Congratulations to all! Please email me at americansue1@gmail.com to confirm your address and claim your prize! All for now, Sue x
Sunday, 21 October 2012
Faux Letterpress Ornament
Now it is time for the weekly comment game winners to be announced and since we had so many comments on yesterdays post, there will be two sets today. This week is all about winners in fact! I also cheated a tiny bit (we were just shy the goal of 3700 followers at that time)
and drew the winners for the Blog Candy Contest yesterday so you wouldn't have to wait for my return to do that! I will announce those on Monday and then Tuesday will be the Anniversary prize announcement. I have also arranged for the prizes to be posted out in my absence so no waiting there either!
Todays winners are:
Jill Liddle!!!
Mitsysue!!!
Chrissie J Lui!!!
and
Materialgirl!!!
Julie Mac!!!
Hilary Elder!!!
Congratulations to all of today's winners! Please email me at americansue1@gmail.com to confirm your address and claim your prize. Don't forget, the Grand Blog Candy Contest winners are being announced on Monday's blog and Tuesday is the winner of the Anniversary prize. All for now, Sue x
Saturday, 20 October 2012
Want Another Year?
I thought that I would do a giveaway today as a sort of anniversary present. If you leave me a comment today telling me what you have enjoyed most about my blog, I will draw a winner from among the names and give away a set of the Vintage Lace dies that I designed. I am flying on Sunday to the States and I want to be sure that everyone that comments is in the drawing so I will do the drawing on Monday and then post the winner on Tuesday. (I will post the comment game winners for the week tomorrow as usual though) How does that sound?
To recap today's card for you, I started with the background which was milk coloured card embossed using the Dainty Dots A4 size embossibility folder. I inked the edges with Antique Linen distress ink and matted it on taupe card. I cut the largest size of Decorative Labels 8 in taupe card as a backdrop for my focal element. Next I stamped my sentiment on milk card and cut it out using the next size down in the same set. I went down to the remaining two sizes in the set and cut a frame which I mounted on foam pieces over my sentiment. Using the Krinkly Kraft paper (twistwrap kraft paper as it is also called), I cut several flowers from the Jewelled Flowers and Flourish set and layered them up and put pearls in the centres. I cut another bunch of the flowers from milk coloured card and layered them up as well. I arranged them around my focal element for a real girlie card. I added some of the swirls from that set as accents. I pierced the edges of a double milk coloured mat and added some pearls to the corners to finish it off. I hope you like it! Don't forget to leave me a comment today to be in for a chance at the anniversary drawing. What do you say, should we try to make it every day for another year!!!! All for now, Sue x
Friday, 19 October 2012
Happiness Always
Morning all! I know, I know, another buckle card! But I just love doing them! I started this one with a background paper from Graphic 45. I covered it with a sticky adhesive sheet then peeled the backing paper off and poured my micro beads over the top to create a lovely textural background. Borders to decorate the top and bottom of the card were cut from my Vintage Lace Accent set. I added flatback pearls to them for a bit of the bling. I cut three frames from Labels 18, two small and one large. I then cut two of the large Chateau Gate out of milk coloured card. I nipped away the gate and cut the swirl so that it stopped half way around my label shape. I used one gate for the top and one gate for the bottom of my label so it created a lovely swirly accent all the way around. I glued them in place and then placed all three of my frames together. Using a strip that I had stamped my sentiment on, I wove it through the edges of my frames, leaving my sentiment centred over the large frame. I cut forks into both ends and added a single pearl. I pierced the edges using a piercing ruler, pokey tool and foam mat to finish and frame my card. I hope I won't have a buckle card revolt on my hands from this one! LOL All for now, Sue x
Thursday, 18 October 2012
Layered Elegant Swirl
Wednesday, 17 October 2012
Just For You
Hello everyone! Another Labels twenty card today from the 4 Day Deal shows (which were only really two days!) I started with a pale blue background that I embossed with the Mystic Embossibility folder. Since the background is larger than the folder, I needed to extend it which is easily done by moving the background along and matching the pattern in your folder before embossing a second time. Using black card, I cut two of the lovely scrolly corners from the Samantha Walker Botanical Swirls and Accents set and glued them in opposite corners. I cut the largest size of the labels 20 out of white card as a backdrop for my focal element. On pale blue card, I stamped the Justrite Kindness stamp using a clear perfect medium ink pad and white embossed it. I stamped the sentiment in the centre using a black archival ink pad. I cut it out with the matching die shape and then used the die to create a faux nestie as a mat. (A faux nestie is where you trace around the die shape with a pencil and cut the shape by hand. This gives you a slightly larger size to use as a mat). I tied a messy bow out of white seam binding and added a fancy black button (from my craft stash) to the centre. To finish off the card, I added a couple of black pearl stick pins, some black rhinestone swirls as accents and I paper pierced the edges of the mat. I just love the way the matching stamps just add that extra little bit to pull the whole card together, don't you? All for now, Sue x
Tuesday, 16 October 2012
JustRite Labels Twenty Paved Pearls
Hello my crafty friends! Thank you for the wonderful reception to my shows yesterday. Seeing the spotty potty overflowing like that really made me feel so special! Today's card is from the first demo of the launch. I started with the Tied Together folder and embossed the white background. I inked the edges very lightly with Tattered Rose Distress ink and attache it to a peach mat. I stamped the large labels 20 stamp from the JustRite Kindness set using a clear Perfect Medium pad and heat embossed it with white powder. I cut it out with the labels 20 die set and then used the Fancy Tags two die to cut the shape out of the centre. Once cut, I removed the fall away pieces and put the die back into place for a decorative look to my focal element. I stamped the small labels 20 die from the Fleur de lis set and embossed it in white also. I stamped the sentiment in the open area and then cut out the piece and foam mounted it in the centre of my card. I stamped one of the borders from the Justrite scallop border set, white embossed it as well and cut it out with one of the decorative cutting edgeability dies. I matted it on slightly darker card for a side border. I added a messy bow made from flesh coloured seam binding. I made a rose from vellum using the Button Floral stamp. You can find the tutorial for this one on the Creative Expressions website. I used my flower as a centre for my bow. I finished the card by using the pearl Cosmic Shimmer PVA glue around the edges in my Paved Pearl technique. The technique involves making random sized Cosmic Shimmer pearl glue dots all around the edge of the card. I start with random large sized dots, then add in smaller and smaller dots until the border area is filled up nicely. It is a fun and different way to finish off your cards, hope you will give it a try. All for now, Sue x
Monday, 15 October 2012
Happy Birthday
Sunday, 14 October 2012
Sneak Peek at A Show Sample
Happy Sunday Morning! A little sneak peek this morning at one of the samples for the 4 Day Deal shows that I am doing starting bright and early Monday morning. They have decided to make the launch a two hour show from 8am to 10am so hopefully more demos I can get to do. These shows are all about showing new ideas for some older dies stamps and new techniques. I have been able to get the Heartfelt Creations dies that sold out so quickly last April added to these shows. I am very excited to be able to work with them again as they are lovely designs. Today's card uses the Label 20 die set and the matching JustRite stamps. I started with my background and stamped the Labels 20 stamp using a clear perfect medium and clear embossed it on to black card. I love that this brings a nice texture for the eye. I then cut out the largest size of the set out of the soft gold card. I kept the die in place and embossed the rest of my background using the Tied Together embossing folder. Remember, you can't close the folder or your die will cut into it and damage the folder. You will need to add extra card to make up for the missing depth of the open folder to get a nice emboss. I mounted 3D foam on the background to raise it for dimension and over my matching stamped piece. I matted the entire piece on taupe card. I stamped my sentiment on taupe card and cut it out with a small Labels 20 die. I inked it very lightly with Black soot as an accent and mounted it in the centre of my aperture. I made three of the Bitty Blossom flowers by covering them with sticky adhesive sheets before cutting them. Once cut, I removed the backing paper and covered them in gold (Red Tiger) gilding leaf sheets. I used a stiff brush, rubbing in a circular fashion to remove the excess leaf. Then I rolled the flowers in the usual manner to assemble them. I cut several of my favourite swirl from the Dutch Iris set from Heartfelt and added them to my flowers top and bottom as accents. I also used a few leaves cut out of black card and some black tulle (from my craft stash) to complete my accent pieces. So this one is a bit of a twist on my black, taupe and soft gold combo as it has some coppery giding to it too, but I rather liked it since it was a bit different.
Subscribe to:
Posts (Atom)