Thursday, 11 October 2012

Always On My Mind

Good morning bloggers!  I may have to apologise for my use of this colour combo as I have been quite taken with it of late.  Taupe, black and soft gold.  I think it just makes such a statement.  There are a few more to come with this set of three colours too so apologises in advance if it isn't to your taste.  I used the Garden Lattice A4 embossibility folder on taupe card for the background on this one.  I matted it with the soft gold card.  I cut the Decorative Labels 8 using a couple of the dies from the Marvellous Squares in the centre to create a frame.  With the centre piece I cut out, I turned it so that it was square in orientation and mounted it with foam above my frame.  I stamped my sentiment using a clear perfect medium pad on black card.  I heat embossed it with Cosmic Shimmer Bright Gold powder and cut it out with one of the centre dies from the Marvellous Squares.  I nipped away the outside piece of the die, leaving a small label type shape.  I mounted that in the centre of my focal element.  I used a piece of black silky crush ribbon across the centre of my card from side to side.  I tied a double bow and attached it to the right.  I made a rose using the soft gold card and the Button Floral flower and added it atop my bow as a finishing touch.  You can see a close up below.  There is a step by step tutorial for the rose using this link http://www.creative-expressions.uk.com/greatideas/toptips/list.php?ttc=3

I used the black fall away pieces from my die as corner accents on my gold square.  I finished the piece by piercing around the double matted black edge.  I hope you like this colour combo as much as I do!  All for now, Sue x


Wednesday, 10 October 2012

A White Christmas

Hello friends!  I'm sneaking a few Christmas cards back in the mix (I still have loads to show!).  This one happens to be one of my favourites as I love a white on white design.  I started with the background, which I embossed using the Holiday Magic embossibility folder and plain vellum.  I glued the vellum to a piece of white card and rounded the corners.  Next I cut a frame using the two largest sizes of the Heirloom Ornament 2011.  I then covered a piece of coconut white card with a sticky adhesive sheet and cut out the Ornament again using just the largest size.  I cut the border from the Frosty Forms set out of white card also.  I peeled the backing paper off my ornament and carefully attached the ornament frame to it.  Next I laid the border across the widest part of the ornament, making sure it was straight.  The remaining area was still exposed sticky sheet so I micro beaded it for a lovely texture.  I cut a small white poinsettia using the smaller dies and layered them up as an accent for my bauble.  I added a flatback pearl to the centre of the flower.  I mounted the ornament on 3D foam pieces and tied a double bow out of white silky crush ribbon for the top of it.   I added a round Dazzler to the centre as an accent.  I completed my card by piercing the edges.  It is getting closer by the day and Christmas will be on our doorsteps before we know it!  I hope this one has inspired you to start your own cards!  All for now, Sue x


Tuesday, 9 October 2012

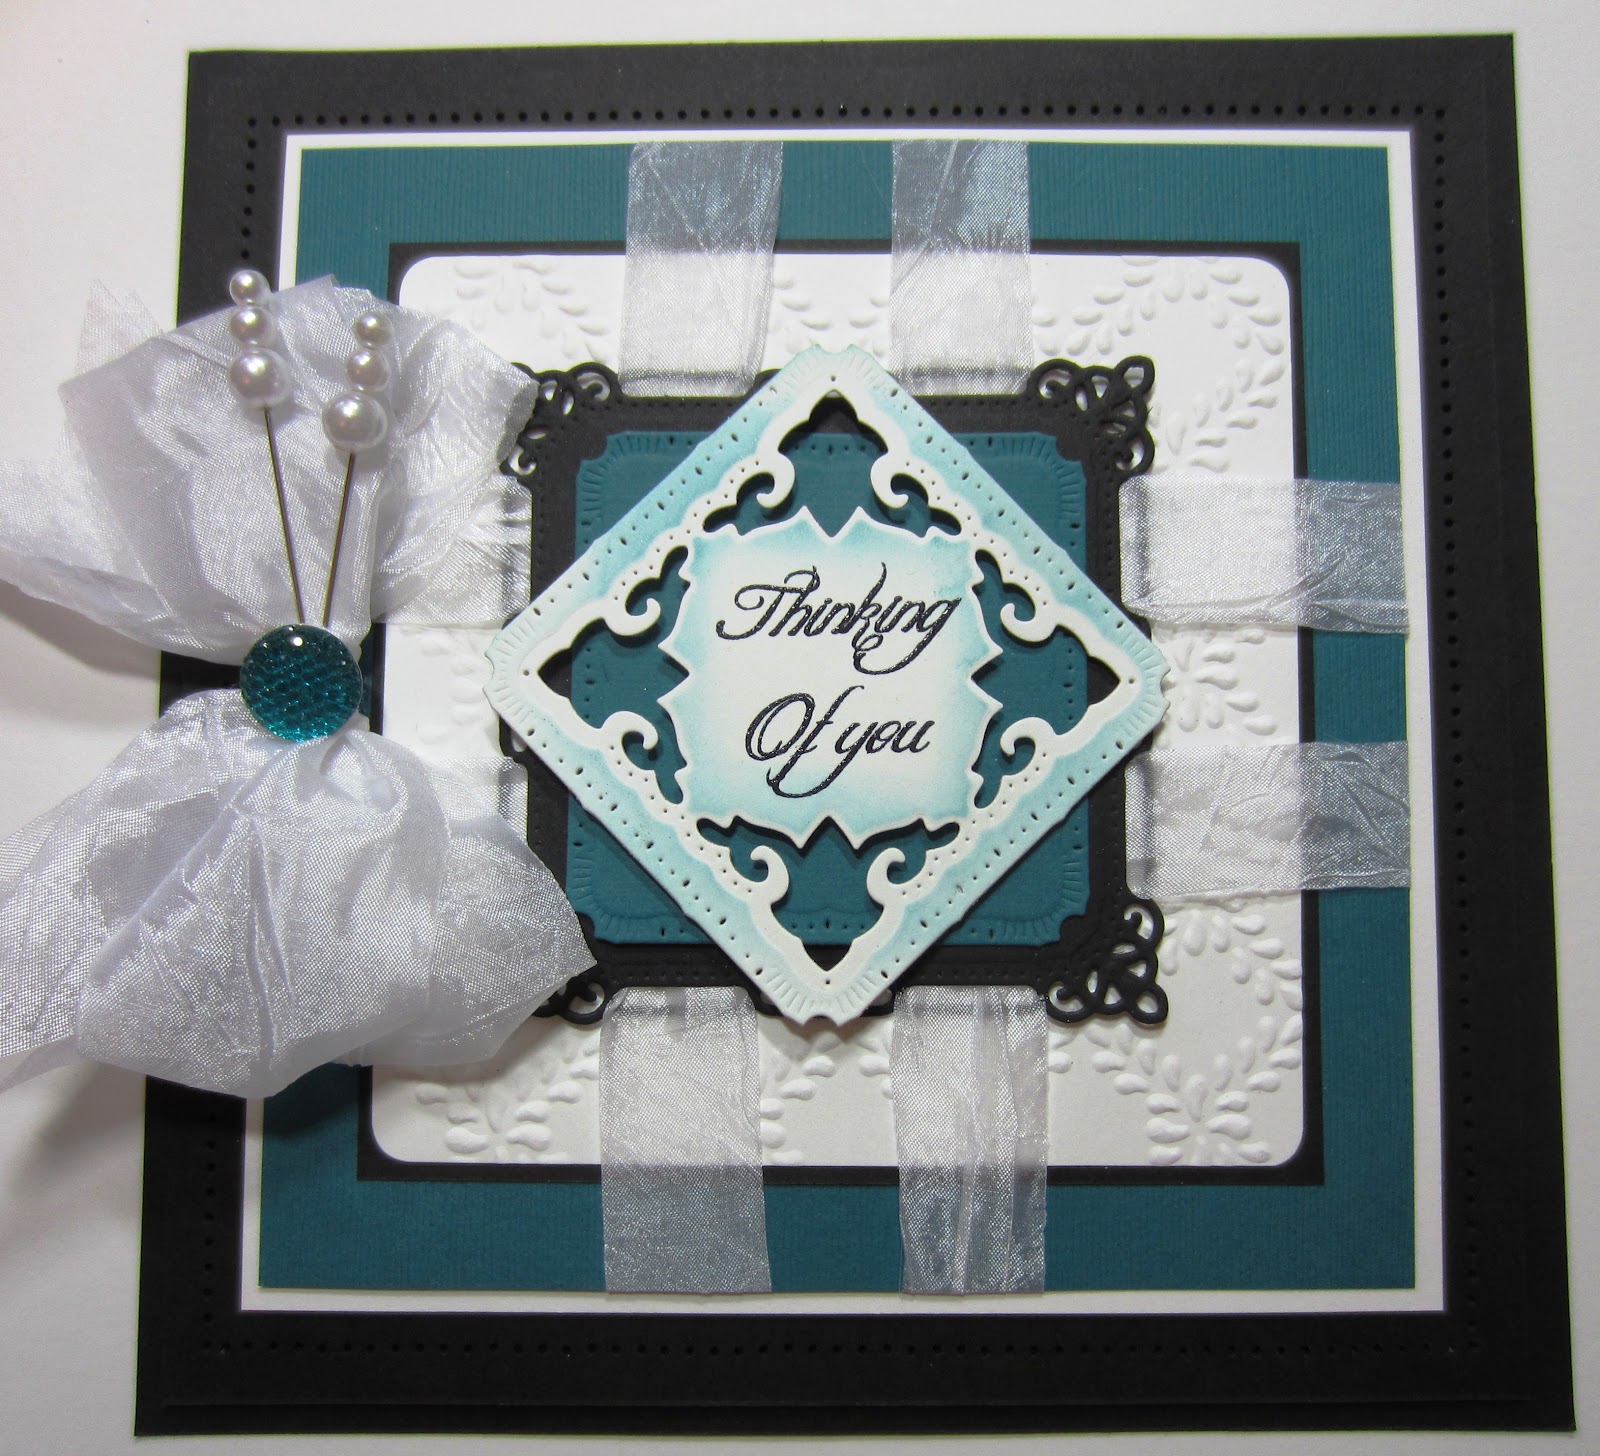
Thinking Of You

Hi bloggers!  Back to teal today (can't stay away too long!) I love the combo of black and white and teal so today's simple card appeals to my love of those colours.  It is a simple straight forward layout where I used a background of teal card, showing a wide border behind my square of embossed white card.  I used the Garden Lattice embossibility.  Even though it is A4 size, you can do a whole sheet and then just use small pieces like this as you need them, a real time saver!  I cut a black Marvellous square which has these lovely little pieces on the edge that I used to weave my white silky crush ribbon through.  I matted it with a teal piece cut from the set.  I stamped my sentiment and then cut it out with one of the other pieces from this set, using the larger outer die to cut the outer edge.  I inked it with Broken China distress ink while still in the die.  I turned it so it was a different orientation to the piece below it and mounted it using foam pieces.  This finished my focal element for my card.  I tied a double bow out of the white silky crush ribbon, added two stick pins and one of the new teal Dazzlers for the centre.  You can colour the clear Dazzlers, but you can't get them to the same colour intensity of these.  They come in a bunch of colours and they are lush, let me tell you!  They have just arrived at the Creative Expressions warehouse so local retailers should have them in stock soon.  I am trying to get them added to my next set of shows which are scheduled for the 15th through the 18th.  I will have them at the show in Kettering (at the conference centre) next weekend. I am trying to get this teal card to have on the stand too!   I am really excited about this show as it is brand new, close to home so no hotel for me and my stand is huge so there will be plenty of room!  There is a free shuttle bus from the Kettering train station that runs all day Sat. and Sunday to take you back and forth to the show too!   Please stop by and say hi to me at my "Rubbernecker" stand where I will be demoing both Saturday and Sunday!  All for now, Sue x


Monday, 8 October 2012

Happy Birthday Heather!

Morning all!  Today is my daughter's 26th birthday so I have posted this card in her honour.  Although I will be seeing her while on my next trip to the States, I miss not being able to be with her on her birthday.  So I will just have to celebrate it here on my blog with everyone!  Today's card suffered a little mishap, but I think I salvaged it alright.  I started the card by cutting the centre frame out of card with a sticky self adhesive sheet attached to it. I used the middle piece from the Resplendent Rectangles set for this.   I peeled the backing paper off and laid it on my Blue Tiger Gold leafing sheet (aren't those tones just luscious!).  Using a stiff brush and rubbing in a circular fashion, I burnished the foil to the frame and removed any excess leaf (Remember, don't throw it away.  Keep it in a plastic container as you can use the little leftover bits).  I used some Black Soot distress ink to tone down the brightness to the frame and that is where the mishap occurred.  I forgot to clean my craft sheet and the black soot got on my background piece!  I used the largest size of the Resplendent Rectangles to emboss the pattern and the next size down to cut the aperture in my teal card.  Since it was the last piece of card that I had of that colour,(and I had even gotten it on the back so I couldn't just turn it over) I decided to just add a bit more of the black soot and used it with my die in place to bring out the pattern.  I must say that I preferred the demo card without the inked die pattern, but they whisked that one away before I even had a chance to photograph it!  I mounted the background on foam pieces and recessed the gold leafed frame into the centre.  I had stamped my sentiment to put behind it first though.
 I used the lovely swirl from the Jewelled Flowers and Flourish set to cut several swirls of the teal and paler shade.  I used these as corner accents for the flowers that I made (using the six petalled stamp from the Button Floral set).  I matted everything on matching card and pierced the edges for a completed look.  Happy Birthday Heather, I hope you are checking the blog (but we'll skype later too!)  All for now, Sue x


Sunday, 7 October 2012

A Lavender Hello

Happy Sunday!  You know what that means, time for the comment game winners to be announced!  First a quick card rundown.  I used the new A4 sized Grand embossibility called Garden Lattice for my background.  No fiddling around with extending the pattern here.  One shot and it is done, love that!  I had a small piece of the fancy lattice die sitting on my desk so it became a little frill for the bottom of my card.  I cut the largest two sizes of Decorative Labels 8 out of lavender card with a sticky adhesive sheet attached to create a frame.  I then did exactly the same with the two smallest sizes in that set.  I peeled the backing paper off and micro beaded both of them for texture.  I mounted them together on my background in opposite orientations and stamped my sentiment to fit inside the smaller frame.  I added some lavender seam binding and a messy bow,  pearl embellishment and stick pins between the sections of the card.  Finally I added a small white butterfly from the Jewelled Flower set and some flat back pearls to my frame as accents.  I really like lavender and white as it always looks so fresh! 
Now for the names of this week's winners since you have been so patiently waiting!
The winners are:
Beachie (Audrey)!!!
UtilityGirl!!!
Snapdragon25!!!
 
Congratulations to all!  Please email me at americansue1@gmail.com to confirm your address and claim your prize! All for now, Sue x


Saturday, 6 October 2012

What's Black and White and Red All Over?

Hi my crafty friends!  It's an embossed snowflake card!  A very non traditional snowflake card, but just the same.  I used the JustRite Snowfall Background to create this card.  Now I find large background stamps a bit difficult to use sometimes, but I do love them.  So I had to figure out a way to stamp them so I could continue to use them (I have a bit of arthritis in my hands so I found I could not get enough pressure on them).  This stamp is set up in two halves with the centre of it empty so you can put your sentiment there.  For this reason, I found it quite the breeze to stamp half of it and then do the other half.  I wasn't worried about lining it up as I cut both halves out and mounted them on foam, recessing the sentiment area.  I stamped this with a clear perfect medium pad on to black card.  I then embossed with white powder so all the swirls and snowflakes show up in black, coming through from the card.  I stamped my sentiment the same way on the black card and white embossed it.  I cut the larger snowflake out of black glitter card.  The snowflake in the foreground was cut from white card that had a sticky adhesive piece attached to it.  I peeled the backing paper off after cutting it and covered it with clear micro beads for texture.  I tied a messy bow out of the lipstick red seam binding and mounted the snowflakes in the centre.  I matted the entire piece with a double mat of coconut white card and pierced the inside mat for a nice frame.  Roll on Christmas, I'm almost ready!  All for now, Sue x


Friday, 5 October 2012

Hello Friend

Hello bloggers! I love the simplicity of this card.  I had a couple of flowers leftover from another project I did awhile back and I decided to see what they would look like if I attached them to some white wrapped wire that I had.  I wasn't sure if they were too heavy for it but as it turns out, it was just about right!  I used the krinkly kraft paper to make my flowers out of.  I cut them out using the flower dies from the Jewelled Flower and Flourish set.  I added a bit of white paint from the Ranger Snow Cap Dabber to the tips of the flowers.  I layered up several of the small with the larger ones and put a brad through the centre.  I wrapped my wire around the brad before opening up the legs on them.   That secured my wire stem so no glue was even needed.  I made a background by cutting a Fancy Lattice die and gluing it to a piece of coconut white card.  I used the Grand Rectangles to cut a frame which I mounted with some 3D foam pieces for dimension over my lattice background.  I stamped my sentiment on kraft card using a clear perfect medium pad and heat embossed with white powder.  I used the two smallest sizes of the Resplendent Rectangles to cut a frame for my sentiment.  I put a bit of mounting foam on the back edges and used the sentiment to cover my flower's wire stems.  I curled the wire at the ends for a whimsical look.  The flowers are not attached so they are free to move about when you hold the card up, which also gives the entire card a sort of whimsical feel as well.  I added a double white mat and pierced the inner layer to give the piece a framed and finished look.  A really fun card, I hope you will give it a try! All for now, Sue x


Thursday, 4 October 2012

All Things Wonderful

Morning all!  I thought I would mix it up a bit and I found this card that I never posted.  It was from the shows that I did in August I believe.  The background card I started with is from Canvas Corp.  It is a white printed kraft card.  I cut two pieces, one larger than the other and added the Asian border to the edges of both pieces.  I added foam mounting strips to the backs of both of them, then mounted them on a piece of black card, but left a gap between them (about an inch and a half).  I used the chalk white American seam binding to lace up the gap using the scallops of the border for the ribbon to go through.  I went up skipping every other hole, then came back and laced through the skipped scallops.  I tied the ends into a bow and added a clear Dazzler and stickpins as accents.  I stamped my sentiment on kraft card and cut it out with the Asian Motif die.  I cut another one out of black card and offset it as a mat for my sentiment.  I made two flowers out of the krinkly craft paper (twistwrap kraft paper it is also called) and them with black soot distress ink.  I used the swirl from the Venetian set as an accent for my flowers.  I added a black rhinestone swirl radiating from my sentiment across the top of the card.  Piercing the black mat added my final touch.  A card au naturalle today, I hope it suits you.  I also forgot to mention that Julia Watts will be on C & C today at noon and 6pm with some of my new Rubbernecker stamp designs (available through Creative Expressions).  Don't forget to tune in and see Julia's fun demos!  All for now, Sue x


Wednesday, 3 October 2012

True Friends

Hi everyone!  Today's card is sort of a shabby chic type with a mixture of different elements that I love.  I started with the background of wine coloured card and the Dainty Dots A4 embossibility.  I never got to demo this one on Sunday as it sold out right before my demo of this card.  I did want to say, though, that I use a piece of cardstock as a shim with this one.  The reason being is that the design is so delicate that it needs more embossing to really show up I think.  Place your card in the folder and then put one piece of card(around 200 to 215 gsm) between the folder and the raspberry plate, it works a treat.   I stamped my sentiment  (from the Creative Expressions Friends Sentiment Stamp set) on milk coloured card then cut it out with the largest size of Decorative Labels 8.  Before embossing, I added in the next size down in that die set, then embossed them, leaving a lovely pattern surrounding my sentiment.  I used both of those dies again to cut out a frame.  I mounted the frame with 3D foam and sat it over my sentiment.  I added a strip of cream triple scalloped lace to the edge of the card, then added my frame with some mounting foam.
Next I made the flowers by tearing a length of the cotton hemp ribbon down the centre.  You need to start it with scissors, then grasp it tightly and pull apart.  The pieces will naturally curl as you rip.  I punched a circle out of the sticky self adhesive paper and applied it to a piece of milk card.  Peel the backing off and start from the centre and twist as you wrap the cotton hemp ribbon around in a circle.  Finish with a bit of Cosmic Shimmer glue at the very edge and tuck the end under and secure with tape.  I made three of these flowers of varying sizes for my card and added a few of the faux suede leaves (which I split by pulling them apart).  I finished by piercing around the edges.  What do you think, is it a keeper?  All for now, Sue x


Tuesday, 2 October 2012

Wings of A Butterfly

 Hi everyone!  Pink and soft brown, one of my favourite colour combos for today's card.   I picked a soft brown and cream striped paper for my background and added an embossed top and bottom using the Valour Embossibility for texture.   I cut one of the Resplendent Rectangles out of brown card and cut it in half length wise and just tucked it behind my striped card for a pretty edge peeking out on the top of the card.  On the bottom of the card, I used a bit of cream teardrop lace for a soft romantic feel.  I used the Resplendent Rectangle again to cut the back piece for my focal element.    Next I stamped my sentiment in a lighter shade of brown and heat embossed it.  I then cut a frame from the inner piece of the resplendent rectangles.  I glued it on top of my sentiment then trimmed the excess away.  I mounted it with 3D foam for dimension.  I used the Spiral Flower four to make a couple of pale pink flowers.  I added a pearl to the centre and some of the swirls from the Jewelled Flower and Flourish set.  A tiny pink butterfly was added from the set also. thin strip of the card matching my sentiment and added them to the sides and top of the card.  I used this piece as a border for my Cosmic Shimmer pearl PVA glue dots.  I pierced the outside edges of my mats as a final border for my card.  I just love the romantic feel to this card.  All for now, Sue x


Monday, 1 October 2012

Blog Candy Winners!

Hello everyone!  It has taken a bit longer than I expected to get the blog candy drawing done today, but I am finally back with the names of the winners!

The THIRD place prize goes to...................................
............................................................................
.......................................................................
..............................................................
......................................................
................................................
.........................................
....................................
................................
...........................
........................
.................
........
Pam Pope!!!!

The SECOND place winner is....................................
................................................
.................................
........................
....................
..............
...........
......
....
Tracey Tucker!!!

The FIRST GRAND prize winner is.................................................
..................................................................................................
........................................................................................
..............................................................................
............................................................
......................................................
...............................................
............................................
....................................
..............................
......................
...............
............
........
......
....
Elaine Briggs!!!!!

Congratulations to all!  You must email me at americansue1@gmail.com to confirm your address and claim your prize.   We will be rolling over the game with the next drawing taking place when we reach 3700 followers!  All for now, Sue x

Rust And Black Foiled Card

Good morning bloggers!  Thank you for all your lovely support with yesterday's shows!  I so enjoyed doing  them and it was really nice to see the spotty potty overflowing like it was!  For today's card, I have cut a five inch square,  rounded the corners and embossed it with the Garden Lattice embossibility folder.  Isn't the emboss lovely with that folder!  Next I cut the Marvellous Square die in black card using the largest piece which is actually a very thin edge die with some piercing on it.  Then, I added in the next two sizes in the set and simply embossed the design onto it.  This piece is the back to my focal element.  For the next two layers, I used other permutations of the Marvellous Squares and cut black card covered in sticky adhesive sheets.  I first cut a frame with the larger die and then skipped down a size and cut a second piece using  the inner square piece.  I peeled the backing paper off both of them and covered them with the copper leaf.  I used an old brush and rubbed in a circular fashion to remove the excess foil.  The circular fashion also helps to burnish the foil and bring out the beauty.  I turned the back piece to a diamond orientation and tucked the edges of the smaller piece into the lovely edge of the larger piece.  Lastly, I stamped my sentiment on rust card and cut it out with the smallest die in the set.  I used a tiny bit of black soot to ink it before removing it from the die.  I layered all the pieces up to form my focal element.  The fall away pieces from the centre were then used in the corners, but because they already had sticky back adhesive on them, I simply peeled the backing paper off and used that side to adhere them to the corners (couldn't just waste them, could I? LOL)  With my focal element finished, I decided to make a flower as an accent.  I used Sam Poole's Button Floral stamp for these.  I won't go into detail on these, but I have done a step by step tutorial that can be found on the Creative Expressions website under workshops.  I used a bit of black glitter on it for bling and added a couple of swirls and some leaves from the Jewelled Flower and flourish set.  I finished the card with a bit of paper piercing around the edges.  I hope you enjoy this set as much as I have!   
 On another note, I see that we have hit our latest goal and it is time for our blog candy drawing.  I promise to do the drawing later this morning sometime and I should be able to post the winners on the blog by the afternoon.  Please check back later to see if your name is drawn.  All for now, Sue x