Monday, 27 January 2025

Dear Friend

Hi there my crafty friends!  I cut the Floral Symphony Cover Plate die with two pieces of white card.  I used the bottom card to colour the design with alcohol ink markers.  I cut the die a second time out of black card.  I used the black die cut as an offset shadow behind the white die cut.  I glued it in place over the coloured copy.  I cut a larger piece of white card and covered it with a piece of sticky adhesive sheet.  I peeled off the backing paper and coated the edge with Frosted Sparkle Glitterbitz.  I attached the die cut to it so the edge showed.  I cut the Dear Friend sentiment in black and glued it the the left side of the card.  The card was completed with white and black mats and layers.  The finished dimensions are 6"  x  6 3/4"  in size.  


This is the last card that I have to share with you.  Sorry it is so similar to yesterday's card, I usually make sure to mix them with other releases but I did not have that opportunity here.   I have so enjoyed doing my daily blog for you, it has been one of the highlights of my crafting career.  Reading all of your comments along the way has been so amazing too.    Thank you so much for joining me on this incredible journey!  

All for now, Sue x


                                                        Follow my blog with Bloglovin

Sunday, 26 January 2025

Love You Always

Good Sunday morning all!  I started by cutting the Floral Symphony Cover Plate with two pieces of white card.  I used the bottom copy and coloured the design with alcohol ink markers.  I cut the die again out of black and offset it behind the white die cut.  I added those over the coloured design.  I cut the Love You Always sentiment out of cobalt blue card and glued it to the of of the card.  The card was completed with white mats and layers.  The finished dimensions are 6"  x  7" in size.  

 All for now, Sue x


                                                       Follow my blog with Bloglovin

Saturday, 25 January 2025

Wishing You All The Best

Hello crafters!  I cut a piece of white card for the base and added a strip of green "grass" along the bottom of the card.  I cut a hill using the Stitched Hills and Clouds and added it above the grass.  I cut the Book Shop out of ocean card and added the awning, door and windows in aqua card.  I cut the Fish Shop out of grey card with aqua accents.  The Flower Shop was cut from aqua card and the roof, awning, door and windows were added out of ocean card.  All three buildings were added to the hill with a lamppost and sandwich board next to them.  I cut several trees and added them to the grassy area as well as a few stamped images from the Cottage Scenes stamp sets.  I lightly inked the sky with Tumbled Glass ink and added three clouds.  I stamped the sentiment and cut it out with a Safari Tag die and inked it while it was still in the die.  I added it with mounting foam to the top of the card.  The card was completed with white mats and layers.  The dimensions are 6"  x  7 3/4"  in size.  


All for now, Sue x


                                                        Follow my blog with Bloglovin

Friday, 24 January 2025

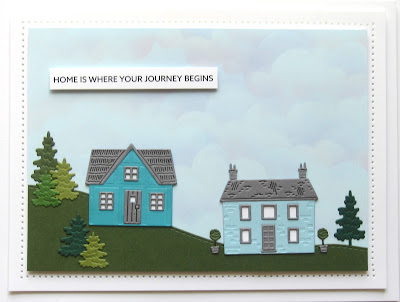
Home Is Where Your Journey Begins / A Note To My Bloggers

Hello crafters!  I started by lightly sponging some clouds onto the top of a piece of white card.  I hand cut a cloud shape and used it to ink with.  I cut a hill in green using the Stitched Hills & Cloud die set.  I cut the Bluebell Cottage in ocean card and added the door, windows and roof in slate grey.  I cut the Keeper's Cottage in aqua with a grey roof, windows and door in slate grey.  I added both cottages to the hill, then added several trees in different shades of green around them.  I added two topiaries around the Keeper's Cottage.  The sentiment was cut from Wordie sheets and added across the top of the card with mounting foam.  The card wad completed with white mats and layers.  The finished dimensions are ???? in size.  

Please scroll to the bottom, past the card samples, to read my important note to my bloggers and friends!

https://www.creative-expressions.uk.com/product/creative-expressions-sue-wilson-miniature-village-keepers-cottage-craft-die/


 Hello bloggers!  I have been getting a lot of emails about Creative Expressions.  I thought that I would let everyone know what is happening.  In case you have not heard the news, yes, Creative Expressions is closing its doors.  A number of things have contributed to this decision including the fact that the owner of CE and the Managing Director who runs the business day to day have decided that it is time to retire  The craft industry as a whole seems to be  struggling with many wholesale accounts closing, from the brick and mortar shops to the online customers.  It just seemed that the time was right for many reasons.  I do not know the exact date of the closing, but there are so many great offers on at the moment for you to take advantage of.  Don't miss out before it's too late!

I started my blog on June 1st 2009.  I posted a couple of times a week to begin with, then realised that I had enough cards to be able to post every single day and that is exactly what I have done since mid September of 2011 without missing a single day.  I said at the time that I would post a card every day until I ran out of cards.  That day is almost here.  I am down to the last couple of cards so my blog will be coming to an end sometime in the next few days.  It has been a great run and I am very proud of the blog and all the lovely Wilsonettes that have popped by over the past fifteen and a half years!  I have gotten to know so many of you over the years, through the blog and also from seeing you at Ally Pally every year.  It has been incredible.  While I do not know what lies in my future at this point, I would love to continue to design with another company should the chance arise, but I would also like to do some travelling too.  There is still a lot of this big beautiful world that I would like to see and explore (remember Japan is still on my list!)  I will leave the blog up so you can access it for inspiration or instructions.  If  things change, then I will post it on the blog.  Feel free to email me if you have any questions.  Thank you so very much for all your support over the years, it has really been an amazing run and I have loved every minute of it!  All for now, Sue x


Thursday, 23 January 2025

Hello Friend

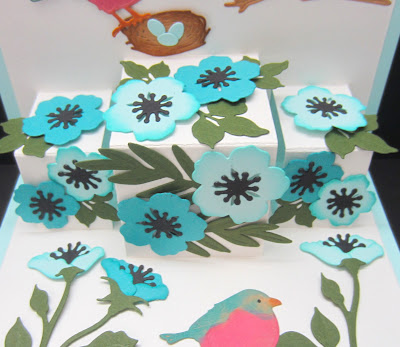
Hello bloggers!  I cut the Magnolia Cover Plate with a piece of black card on top of a piece of white card.  I cut the die again two more times, in green and in white.  I used the fall away pieces and paper pieced them back into the die.  When I did the flower petals, I inked the inside edge with Worn Lipstick distress ink before paper piecing them.  I cut the Hello Friend sentiment from Wordie Sheets and added it at the bottom of the card. I matted the card in white and pink.  I cut the 3D Card Marker in white and glued it to the inside of the card.  I used the Wild Birds die set and cut three birds.  I inked them with distress inks and the glued one to the branch and one to the nest on the top of the card.  I glued the last one to the bottom of the card.  I used the Wild Roses and filled in the pop up area with them in shades of aqua and ocean.  I added greenery from the Fabulous Foliage die set as accents.  I cut some stems and added the roses to them and glued them to the bottom of the card on either side of the bird.  I added the sentiment You Make My Heart Bloom cut in black to complete the card.  The dimensions are ???? in size. 


 All for now, Sue x


                                                            Follow my blog with Bloglovin

Wednesday, 22 January 2025

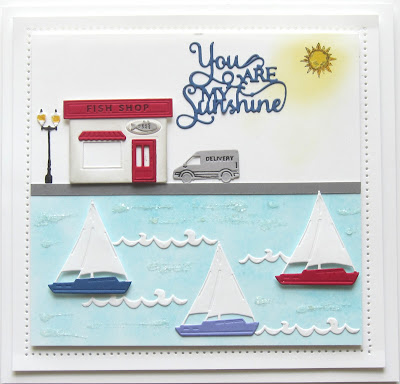
You Are My Sunshine

Hi there my crafty friends!  I started with a piece of white card and cut a half sheet of aqua card and taped it to the bottom of the white card. I added a thin grey strip between the two pieces.  I cut three sailboat, dark blue, iris and red and glued them to the aqua card.  I added white waves and some glitter to the water area.  I cut the Fish Shop out of taupe card and added a red roof, door and awning to it.  I added the fish shop to the top of the card with a lamppost and delivery van next to it.  I used a small smoothie and added some yellow ink to the top corner of the card.  I stamped the sun from the Cottage Scenes stamp set and coloured it yellow.  The You Are My Sunshine sentiment was cut in dark blue and glued to the top of the card.  The card was completed with white mats and layers.  The finished dimensions are 6 3/4"  x  7"  in size.  


All for now, Sue x


                                                        Follow my blog with Bloglovin

Tuesday, 21 January 2025

There's No Place Like Home

Hi there my crafty friends!  I started with a piece of white card and used a stencil to add some blue clouds in the sky.  I cut two green hills using the Stitched Hills and Clouds die.  I cut the Corner Cottage out of taupe card and added the roof, door, windows and awnings in brown.  I seated the cottage on the hills and added several trees of differing colours all around it and a few flowers.  I cut some clouds from the Twinkle Twinkle Cloud & Stars set and glued them into the sky.  I cut the There's No Place Like Home sentiment in brown and glued it to the card.  The card was completed with white mats and layers.  The finished dimensions are 7"  x  8 1/4"  in size.  


All for now, Sue x


                                                       Follow my blog with Bloglovin