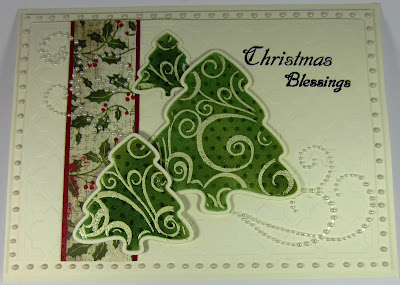
Hi guys! It's Sunday morning so that means a card, some CHA pics and some comment game winners! Now that should be worth getting out of bed for, huh! LOL Today's card is a nice Christmas card using the Holiday Tree set from last year. These are so simple of shapes that they allow you to dress them up in any manner you chose. I decided that I would start with milk coloured card and cut three trees, all different sizes. Once cut, but while still in the die, I stamped my swirl stamp all over them using a clear perfect medium pad and clear embossed them. I inked them with Forest Moss distress ink while still ink the die too. Then I transferred them (while still in the die) atop an itty bitty polka dot mask design and ran them through to emboss the design on them. I inked them once more to highlight my polka dots. I cut a piece of milk card and stamped my sentiment in black in the corner. Then I embossed the piece with the fretwork mask. I extended the pattern by lining it up and doing a bit more. I cut a strip of holly Christmas paper I found (that was about all I had too!) and added it to the side of my background on top of my embossed background. This added a bit of colour and interest to my card. I mounted my trees on foam pads and placed them on my background in a pleasing pattern. I added pearls swirls on both sides of my trees for a bit of bling. Using the Cosmic Shimmer pearl PVA glue, I added glue dots around the edge to frame and finish my card


Here is a pic of Claudine Helmouth at the Ranger stand early Wednesday morning for the private invitation demo. She was showing us a lovely transfer technique using her Matte Medium products. Sorry I cut off her head (I didn't have my glasses on!)
Here is Tim showing us all his fun new products. He played with his new metallic stains (heavenly) and his new clear rock candy dry glitter (absolutely gorgeous), as well as old favourite distress inks and marker pens. He is such a good demo artist and so entertaining to watch.

Dyan Reavesley showed us her amazing journaling techniques. I wish that I could work as freely as she does! It is just fascinating to watch her work. The colours are so bright and cheery.

One of the booths that always takes my breath away is the Graphic 45 paper stand. Their new releases had a decided Oriental feel to one of the collections and they used the paper to "dress" these dolls. Yes their kimonos are made of paper!
As are these shoes!
Here is one of Wendy Vecchi's new sample boards. I love her style, it is so interesting. We are now carrying Studio 490 and Art Parts and even her Blossom Bucket embellishments. We ordered all the new images, Art Parts and embellishments to add to our range too. Wendy is one of the most gracious people I have ever met too. I am trying to get her to come over and do workshops for us, but no luck yet!

I met Teresa Collins in June when she and I were in the green room at C & C together. What a lovely lady she is! I just had to stop in for a chat and have our pictures taken together. She put a picture of us on her blog after our day at the studio in June so I wanted to return the favour. She is hoping to be able to come over several times a year for C & C, so maybe I will see her more often than just twice a year at CHA.
The summer CHA show is never as large or well attended as the winter show in January and this one was no exception. It was a very quiet show and there wasn't as much really fun stuff in the way of displays, but I did like this dress that was made entirely of craft foil. It reminded me of something you might see Madonna wear on tour!
And finally, my pic with Tim that was taken at the end of the private demo at the Ranger Ranger booth before the show opened on Wednesday. I hope you have enjoyed the pics. I didn't take as many as I usually do, but I enjoyed the show nonetheless.
Now for the Comment Game winners for this week. They are:
Vicki Maclean!!!
Sylvia-Anne!!!
jtcards!!!
Please email me at
Americansue1@gmail.com to confirm your address and claim your prize.
All for now, Sue x
 Hi there! This is a different look for me, but I was really pleased with the way it came out. I have tried very hard to photograph this card so you can see the debossing on it but it still looks embossed. I used a new That Special Touch mask called Meadow Mask and inked the mask itself with Clear Perfect Medium. I used a piece of milk coloured card, but I added some Scattered Straw distress ink to the base of the card first. Because the entire mask area was inked, I would not have been able to add that colour afterwards. The inked and embossed area would act as a resist. I then placed the card face down on the inked mask and ran it through my GC with the tan mat and pink embossing plate. That transferred the ink to the card and then I clear embossed the debossed area left by the mask. Even as I look at the picture, the mask area looks raised to me, but I assure you that it is the debossed area on this card. I used an anti static pad on the background then stamped my sentiment in the open area in the mask and clear embossed it. Next I used Tumbled Glass distress ink and worked my way in from the edges, making sure the ink was lighter in the centre. I then used Chipped Sapphire distress ink around the edges for a darker gradation of colour. Once I was satisfied, I used a tissue to remove any ink from the embossed area of my background. I matted the finished piece with a combination of dark and light mats and some piercing to help frame and finish it. Another very quick card (no bows or nesties either, can you believe it!), but a very pleasing result that can be used for any occasion by just changing the sentiment. All for now, Sue x


