A daily papercrafting blog which features my handmade cards showcasing Creative Expression's products including my own line of cutting dies and embossing folders, Cosmic Shimmer, Ranger and more which use various techniques and ideas to hopefully inspire the creativity in you.
Tutorials
- Home
- My Ribbon Flower Tutorial
- Fancy Nestie
- Blossoms Five Flower Bud
- Blossoms Five Full Flower
- Easel Tutorial
- Wax Paper Embossing Folder Tutorial
- Caught In Crystal
- Shaving Foam Tutorial
- Quilt Card Tutorial
- Paved Pearl Technique
- Faux Leather Technique
- Plaited Ribbon Wreath Tutorial
- Paper Rose Tutorial
Tuesday, 23 November 2021
Just Because You Are So Special
Hello crafters! I just love these Slimline All In Ones, they make card making so easy! I started by cutting the You Are So Special die out of black card and using it as my base. I glued a piece of white card with a sticky adhesive sheet added it as a backing to the die cut, then sprinkled Frosted Sparkle Glitterbitz on it. I cut the die two more times, once in blue dusk card and once in khaki green card. I nipped all of the leaves out of the green die cut and glued them to the black base card. Next I cut the three flowers out of the blue die cut and glued them to the base card. I used a white pencil and a blue pencil to highlight the flowers and leaves. I cut a frame using the Slimline Double Stitched Rectangles out of blue dusk card and added the slimline to the centre of it. I embossed a piece of white card with the Rope Chain embossing folder and added the slimline die to the centre of it. The card was completed with white and black mats and layers. The finished dimensions are 5 3/4" x 9" in size. All for now, Sue x
Monday, 22 November 2021
Follow Your Heart
Hello bloggers! I selected a piece of Pixie Sparkled card from my stash to use as the background for today's card. It was made using Red Oxide and Coral Crush Pixie Sparkles. I used the Slimline Decorative Heart Trio and cut into it, leaving a wide margin around it. I added mounting foaam to the back and attached it to a piece of white card. I used the Slimline Essential Frames and added a thin white frame around the background. I used the Wedding Couple cut in black behind the centre heart aperture. I used some items from an older Wedding Shadowbox set. I cut the true love, wedding flutes from the set and added it to one of the other heart apertures. The Be mine is from the new Heart Accessories, but the rings, large champagne flute and the follow your heart are all from the Wedding Shadowbox. The card was completed with white and black mats and layers. The finished dimensions are 5" x 9 1/4" in size. All for now, Sue x
Sunday, 21 November 2021
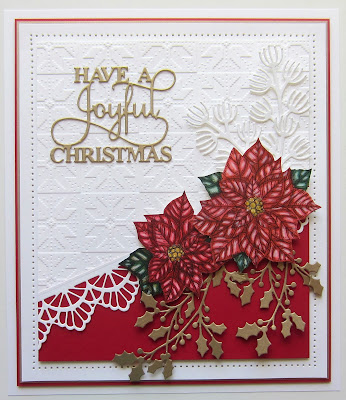
Have A Joyful Christmas
Good Sunday morning all! I started by embossing a piece of white card with the Nordic Tiles embossing folder. I cut a piece of ruby red card on the diagonal and attached it to the embossed card. I cut a border using the Chantilly Lace Edger and ran it along the diagonal. Using the Poinsettia Stampcut die, I inked and cut it a couple of times, then coloured them both using Distress Markers. I used Festive Berries, Pine Bough, Fossilized Amber and Forest Moss. I used a white pencil to add highlights to the flowers. I attched the two flowers along the top of the diagonal, then cut several of the Holly Accents out of antique gold card and used them as accents around the flowers. I cut some of the Pine & Holly Spray die set in white and used themat the top of the flowers. I cut the Joyful Christmas sentiment in gold and glued it to the top of the card. The card was completed with white, red, and antique gold card. The finished dimensions are 7" x 8 1/4" in size. All for now, Sue x
Saturday, 20 November 2021
All Things Grow With Love
Hi bloggers! I started today's card by embossing a piece of white card with the Moroccan Tile embossing folder. I cut it diagonally and added it to another piece of white card with a space between the cut area. Next I used the Floral Bouquet die set and cut six flowers in a variety of card colours. I used straw yellow, aqua, powder pink and wisteria card. I used a couple of shades of green card and cut a variety of leaves to use as accents. I attached the flowers in the diagonal area, assorting the colours, then I filled in with the different leaves around the flowers. I used the All Things Grow With Love sentiment cut in black and glued it to the top part of the card. The card was completed with white mats and layers. The finished dimensions are 7" x 8 1/4" in size. All for now, Sue x
Friday, 19 November 2021
Greetings
Hello bloggers! As we get closer and closer to Christmas, I am realising just how many Christmas cards I have left to share! LOL I selected a piece of cobalt blue card for this one. I used the Pearl Whisper Airless Mister across the blue card to create a starry backdrop and dried it with a heat tool. Next I used the Winter Pines and cut three large trees, two small trees and a couple of stars. I used Frosted Sparkle Glitterbitz and glittered all the trees and added them to the background. I cut the Greetings Big Bold Word die out of cobalt blue and black card. I used the black die cut as a shadow behind the blue one, then added a white backing piece. I added mounting foam to the back of the die cut and attached it in the centre of the card. The card was completed with white mats and layers. The finished dimensions are 7 3/4" x 9" in size. All for now, Sue x
Thursday, 18 November 2021
Heart Leaf Flower
Hello crafters! We have one final post in the November blog launch. This post is dedicated to the Heart Leaf Flower die set. This is a sweet flower die set with three different sized flower dies and two matching heart shaped leaves for a total of five dies in the set. They really compliment nicely all the heart themed dies in this release. For the final time, I will ask you to leave a comment on this post. Don't forget to make your name memorable in some way. I will be doing the drawings and posting the winners on the afternoon of Nov. 23rd, so don't forget to check back by the blog to see if your name is on the list1 I hope you have really enjoyed the final launch of 2021. All for now, Sue x
Wednesday, 17 November 2021
Follow Your Heart
Hello bloggers! We are at the penultimate post for this blog launch ( I forgot to mention that there are only 9 dies in this release). This is the final post for today and we have a single post left remaining in the morning. This post is dedicated to the last of the three mini expressions in this launch. Introducing the Follow Your Heart sentiment. I love that this sentiment can be used in a numer of different ways. If you might like to add this mini expression to your craft stash, then why not just leave a comment on this post and try to win it! Like I mentioned earlier, I will return tomorrow morning for the final post of the launch. All for now, Sue x
Follow my blog with Bloglovin
Noble Decorative Hearts
Hello there my crafty friends! We just had to have a noble set included in this launch and here it is! Showcasing the
Noble Decorative Hearts. There are five decorative hearts in this set so you can layer them and cut frames or do any of the heart shaped cards you would like to make! The smallest heart in the set works great as a background when cut and randonly added all over the background too. I think you might find this set singing your name! You just need to add your name to the comments and you will be entered into the drawing to win this die set. There is one final post today and it will be online at 6pm tonight. All for now, Sue x
Subscribe to:
Posts (Atom)