Tuesday, 22 October 2013

The Big Reveal! (Silver Ribbon Card)

Hi bloggers!  Today is the day for the big reveal.... finally!  When I was home in July, I filmed many videos that are going to be added to my blog a few times a week for you.  This first one is quite long (as compared to all the others) so you may want to get comfortable!

Since I am constantly being asked where the products I use can be purchased, we have started to work in partnership with Joanna Sheen (a fantastic online retailer and Creative Expression stockist) and they will be stocking all the products featured. Click on the button below the video that links to their website.  Without further interruption, here is the first video for you.  I do hope you like it!


Buy from Joanna Sheen

Just click on the button above if you would like to purchase any of the products used in this video.


A quick reminder that Julia Watts has shows today at 8am and 3pm with some new autumnal stamps and some returning favourite stamp sets too!  Tune in to see her great demos!  All for now, Sue x

Monday, 21 October 2013

Nature Gives To Every Season

Hi bloggers!  Guess what today is?  It is the official start of my third year of blogging every single day without a miss!  Yesterday was the two year anniversary of it (which I was kindly reminded of by one of our fellow blog followers, Patricia!)  It is a special day so  I have a special card, something very different than my usual sort of post.  I have last weeks demo card to share with you today.  I had several emails recently asking for this one to be posted, so as promised!  I started with a piece of coconut white card and then used a torn piece of copy paper to mask off a diagonal area across the card.  Using Peacock Feathers, Rusty Hinge and Mustard Seed distress inks, I sponged colour all over the exposed card area.  Make sure that you get the card very nicely saturated with ink.  Once you are happy with the colour, dust Burnt Marigold mica powder over the top.  You should see the shimmer in real life, I just couldn't seem to capture it on film!  This will stick to the distress ink because it stays wet for a long period of time.  Next remove the torn mask from the background.  Using the large Oak leaf from the Creative Expressions set called Fancy Foliage, ink the stamp with a Clear Perfect Medium pad and stamp it across the mica dusted area.  This is the mica removal technique that you may have seen me do on my DVD a few years ago.  Clean the mica powder dust off of your stamp, ink it again and restamp in another area.  Keep doing that from the bottom to the top of your card on the left side.   You will be able to see the leaf where you have removed the original mica powder.  Dust that area with the Mustard Green Mica and it will go into the leaf that you have just stamped.  Using the Sycamore type leaf from the Justrite set called Shabby Chic Autumn Leaves, ink it with a black archival ink pad and over stamp down the same side of the background.  Give your leaf a few twists and turns to make it look as if it is fluttering down the card.  Stamp the sentiment from the Creative Expressions set called Falling Leaves  in black on the right hand side of the card.  Add a thin black mat and then a double white pierced mat to complete the card.  As an accent (and to cover up where I had dropped the very last stamp!) I added a leaf that I stamped on black card and embossed then painted with the mica powders from the Golden Winter mica set.  Aren't leaves great!!  Finished dimensions are 7 1/4" x 8 1/2" in size.

Now, I'm not saying that I am excited, but there is now less than 24 hours to go until I reveal my big surprise!!!  Okay, I am excited about it! LOL   All for now, Sue x


Sunday, 20 October 2013

With All Good Wishes

 Good Sunday Morning all!  How are those Christmas cards coming along?  Have we made a good and proper start to them yet?  This is a really easy one if you are looking for something a bit different, non traditional and fun.  I started by embossing a piece of kraft card using the Wild Poinsettia embossing folder from Couture Creations.  I matted it with a piece of black card.  Next I stamped the Striped Holly Background by Justrite Stamps using a clear perfect Medium pad on to kraft card again.  I heat embossed it with white powder.  I trimmed and matted it with a piece of Rich Red card this time.  I matted it with foam onto my embossed background.  I stamped the large bauble from the Christmas Vintage Labels Four set from Justrite using a Black Archival ink pad on to kraft card.  I cut it out with the 2013 Heirloom Ornament die and inked it with Antique Linen before removing it from the die.  I coloured the top red for a pop of colour.  I cut one of the borders from the Frosty Forms set in red card and added it to the bottom of my background.  I added my bauble to the card next using some foam pieces for added dimension.  I stamped my sentiment from the set on kraft card and white embossed it.  I cut it out with a scalloped circle die and inked the edges with  Black Soot.  I mounted it in the centre of the bauble with foam pieces as well.  I made a small poinsettia out of the red felt and added a pearl to the centre.  I seated it with some red and white Bakers Twine bow on the side of the bauble as an accent.  I finished the card with a double white mat with a pierced mat layer as a frame.  Finished dimensions are 7" x 8 1/4" in size.

It's Sunday, you know what that means!  Winners!  Two sets this week.  The first names drawn are:
Marie Densley!!!
Jean Z!!!
Carol Edwards!!!

For the extra qualifying post of Oct. 16th, the winners are:
KP!!!
Tina Eldridge!!!
Rach 83!!!

Congratulations to all!  Please email me at americansue1@gmail.com to confirm your address and claim your prize!   I have just had word that this is the week coming!  It's official, only a few more days now!  I am very excited (still can't tell though!), you will just have to check back! LOL   All for now, Sue x


Saturday, 19 October 2013

Some Kind Of Wonderful

Good morning all!  I love my buckle cards so this one just had to be made didn't it!  I started with a piece of decorative paper with a small floral print from my stash.  I covered it with a self adhesive sticky sheet and micro beaded it for some lovely texture.  I cut two of my Vintage Lace borders in coconut white card and glued them along the top and bottom of the card edges to frame my buckle elements.  I added 5mm white flatback pearls to the holes in the border dies as accents.  I stamped three of the Happy Birthday Vintage Labels Four designs on white card using a clear perfect Medium pad.  I heat embossed all three with white powder and cut them into frames using the Vintage Labels four dies.  While still in the die, I inked them with Tattered Rose distress ink which allowed the white embossed areas to show up nicely.  I cut a white strip of card and stamped the ends with a filigree stamp before I wove it through the dies, the outside ones turned one way and the centre one turned the opposite way.  I added some mounting foam to the back of the strip and added them to the background.  I stamped my sentiment from the Justrite set called What I Like About You by Becca Feeken and cut it out with the Nobel Rectangle dies.  I inked it with Tattered Rose as well and mounted it in the middle of my buckle element.  I finished the card with a double white mat with my paper pierced inner layer.  Finished dimensions are 7" x 8 1/2" in size.

Now for the winner of this weeks Wednesday card giveaway!  The winner is:

Disco Queen!!!

Email me at americansue1@gmail.com to confirm your address and claim your card!

Just a few more days before I can reveal my big secret too, I promise!  I hope you will be sure to keep checking back!  All for now, Sue x


Friday, 18 October 2013

Believe

Hi guys!  Another not so traditional Christmas card today, I hope you won't mind two in a row!  I used some Graphic 45 decorative paper for the background on this one, paired with kraft card and Rich Red card to make it pop.  I used the Harlequin pattern with the script across it for my background.  Then I cut a strip of dotty paper and added a red and black mat.  I used the Lipstick Red seam binding to add a bit of ribbon across the card for another pop of red.  I tied a messy bow and added it to the left side of the card with some of those cute pine cones and berries I found on my last trip across the pond.  I seated my bow on a natural jute twine bow for some added texture.  I stamped my sentiment from the Holiday Magic set by Justrite on to kraft card with a black archival ink pad.  I cut it into a tag with a forked end, matted it in red and tucked the end under the edge of the strip below my focal element.  I stamped the leaping reindeer from the Peace On Earth stamp set from Creative Expressions on to kraft card with black ink.  I cut it out with the Marvellous Squares die and inked it with Antique Linen distress ink while still in the die. I added some gold embossing powder to the die edge for a bit of bling.   I stamped the reindeer a  second time on white card and cut out the body, omitting the antlers.  I paper pieced it on top of the first image.  Using an Antique Linen Distress marker, I added some highlights to the body.  I used a white pencil to highlight the antlers.  I cut a Fleur de Lis square die in red and used it as a mat for the reindeer.  I mounted it in the centre of the card on the diagonal and added two antique buttons in the upper right hand corner.  Finally, I finished the card with a thin red mat before adding my double black mat with the pierced inner layer mat.  Finished dimensions are 7" x 8 1/4" in size.  All for now, Sue x


Thursday, 17 October 2013

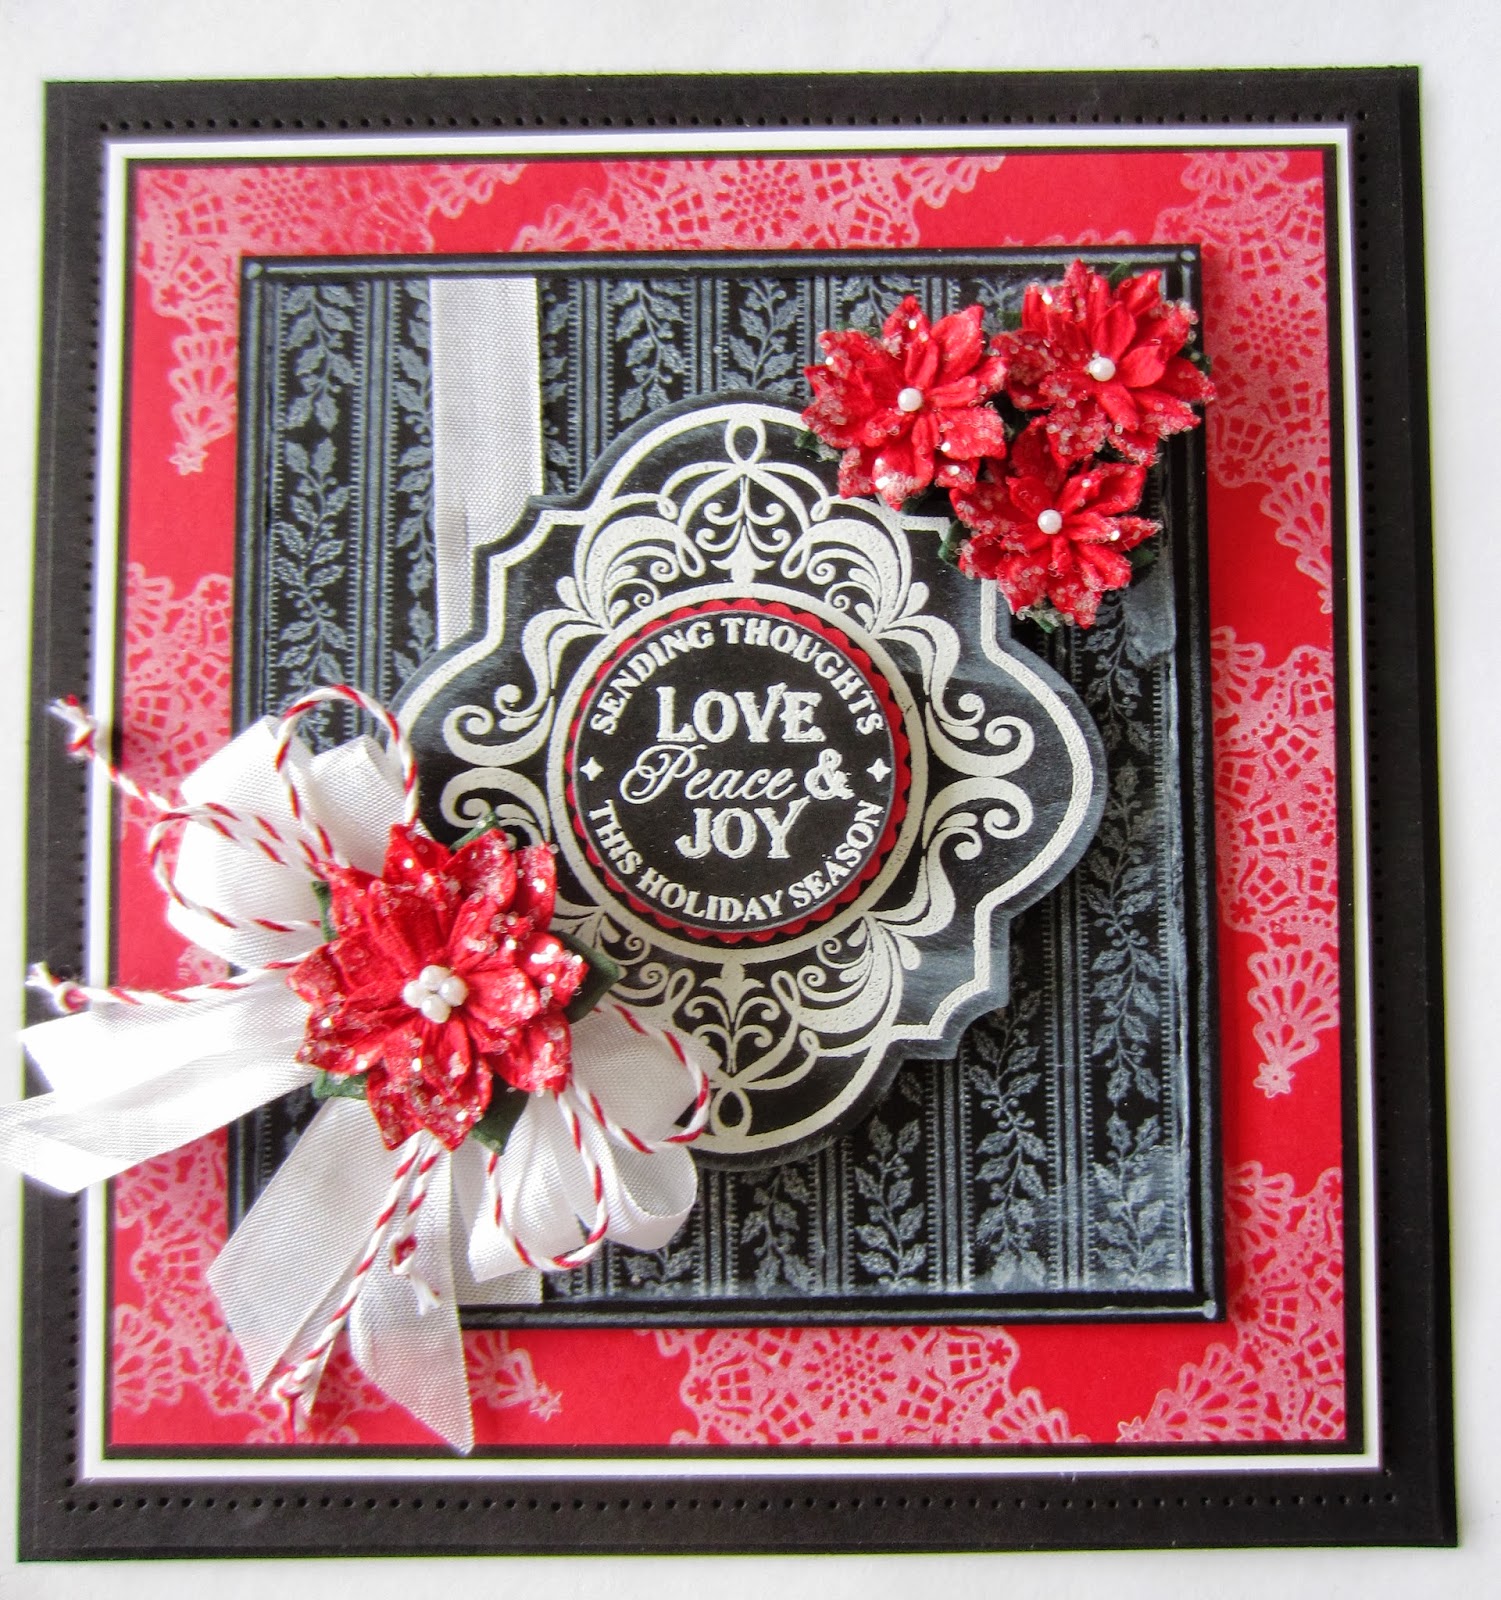
Love, Peace and Joy

 Hi crafters!  It's Christmas, chalkboard style!  I absolutely love this latest trend that  is all about now.  It's really fun to do too.  One of the things that I enjoy about it is that there are so many ways to achieve this look, you need not rely on having exactly the same products that I have used, but still can achieve similar looks.  I started by creating a background using Rich Red card and stamping the Holiday Magic stamp from Justrite all over the background.  I used an Adirondack pigment pad called Snowcap to do this and just heat set it (no embossing powder).  I matted it on a thin black and a thin white mat then proceeded to work on the focal element.  For that, I used the Justrite Holly Striped Background.  I stamped it on black card using the Snow Cap ink pad again.  Heat set it then added some "chalk" dust marks by swiping the card with a foam piece that I had tapped on the Snow cap pad.  I distressed the edges of the card with my scissors.  I wrapped a piece of white seam binding around the card and added a thin black mat to it.  I used a white pencil to draw a line around the edge of the mat.  Next I stamped the Christmas Vintage Labels Four stamp on black card using a clear perfect medium pad.  I heat embossed the design with white powder.  I rubbed this piece with some Snow Cap ink as well then cut it out with the coordinating die.  One of the things that you can also do is stamp the image again, just slightly offset to give it a shadow and that also adds to the chalkboard look.  I didn't do it with this one as the overall design was so busy as it was.  I stamped the sentiment from the set on black card and heat embossed it with white powder.  I cut it out with a circle die, then added a small scalloped red circle behind it.  I mounted the sentiment on foam pieces for dimension.  When I was last visiting my Mom in the States, I came across these small poinsettias at one of the craft stores, so I have added them around the focal element after adding a bit of Iced snow to the edges of the flowers.  I tied a messy bow out of white seam binding, added a small red and white Bakers Twine bow and seated the largest flower in the centre.  I finished the card with a double black mat with my signature pierced inner mat layer.  A great card for anyone who loves the more non traditional Christmas cards (or a teacher! LOL)   Finished dimensions are 8" x 8" in size.  All for now, Sue x


Wednesday, 16 October 2013

Wednesday Weekly Giveaway

Hi bloggers!  Although I do have an excess of Christmas cards to use for the weekly card giveaway, I thought I would mix it up a bit and show something else.  Today's card is on offer for the giveaway, if you would like to be entered into the drawing, simply leave a comment on the post today.  The winner will be announced on Saturday.  I started with a piece of coconut white card and simply stamped the two exposed corners with the Justrite corner from the Lace Vintage Labels Three set.  I used a clear perfect medium pad and white embossing powder for a tone on tone look.  Next I cut a wide panel out of the periwinkle blue card and used the larger stamp from the same set to "watermark" the background.  This is done by stamping using just the clear perfect medium pad.  I matted it on the chestnut brown card and taped it to the left side of my card.  I cut another panel out of the chestnut brown card, a bit more square this time and embossed it with the Basketweave embossing folder.  I matted this one on the periwinkle card and taped it offset from the first panel.  I cut a Filigree Delight out of white card and glued it to the centre of the last panel.  Using the same stamp that I watermarked my background panel, I stamped it using a coffee Archival ink pad on periwinkle card.  I used two of the Vintage Labels Three dies to cut it into a frame.  I stamped my sentiment on white card and used some Vintage Photo distress ink to put a soft frame around it before mounting the die cut frame over it.  I added some mounting foam to the back of the frame and centred it atop the Filigree Delight.  I tied a messy bow out of Mimi Brown seam binding and made some heated organza flowers to embellish the centre and around the frame.  I finished the card with some flatback pearl accents and a double white mat.  Using the white PVA glue from Cosmic Shimmer, I made dots all the way around the inner mat layer to frame and finish my card.  Finished dimensions are 8" x 8 1/4" in size.
I mentioned on air about something special happening soon on the blog.  I have been working on it for a while now and I am very excited about it.   It is going to take a few more days, so please bear with me, but I think you will really like it!  All for now, Sue x


Tuesday, 15 October 2013

Thinking Of You

 Hello crafters!  Chestnut brown and white are the colours of today's creation.  I love the shade of this brown card, it is very warm.  I have used the Autumn  Swirl Background from Justrite Stamps.  I inked it with the Flake and Glitter glue and stamped it onto the chestnut brown card. Remember to clean the residue off your stamp immediately. Allow a few minutes for the glue to go clear, then sprinkled the bronze polished silk glitter over the image.  I burnished it with my finger and tapped off the excess.  I cut a larger piece of coconut white card for my background and used the Curved Borders two to cut a decorative edge to the bottom of the card.  I mounted it on brown and white thin mats as accents.  I glued the glittered piece to the top of the card as a background for a Filigree Delight cut in white card.  I stamped my sentiment and cut it out with the tag from the set.  I inked it with Vintage Photo distress ink while still in the die.  I tied a double bow from the ruffled edge organza ribbon and added a pearl embellishment to the centre.  I finished the card with a double white mat with an inner pierced layer.  Finished dimensions are 7 1/2" x 8 1/2" in size.  All for now, Sue x