Hi Crafters! How's this for a clean and simple style? What's more, it's relatively flat (except for the flatback pearls, that is!) Can you believe it! LOL And yes, I did do this card. Every once in awhile I just like to get a little bit inky and have a good old fashioned play! For this card, I used the Vintage Labels Three from Justrite stamps and cut an aperture in a piece of copy paper using the largest size in the set. I taped my copy paper over a piece of coconut white card. Using several distress inks, Mustard Seed and Fired Brick, I carefully inked through my aperture to create a sunset sort of effect. I tend to pounce rather than rub with my cut 'n dry foam around the edges, that way I don't catch the edge of the copy paper and lift it accidentally. Once I was happy with the colour coverage, I removed the copy paper. I used the Floral Thank you silhouette flower and inked it with a black archival and stamped it off centre. I added my sentiment below in black and three flatback pearls in the opposite corner. A black mat to frame it, then a double white pierced mat to finish it off. Super simple and super quick and quite pretty, I think too! Finished dimensions are 7" x 7 1/2" in size. All for now, Sue x
A daily papercrafting blog which features my handmade cards showcasing Creative Expression's products including my own line of cutting dies and embossing folders, Cosmic Shimmer, Ranger and more which use various techniques and ideas to hopefully inspire the creativity in you.
Tutorials
- Home
- My Ribbon Flower Tutorial
- Fancy Nestie
- Blossoms Five Flower Bud
- Blossoms Five Full Flower
- Easel Tutorial
- Wax Paper Embossing Folder Tutorial
- Caught In Crystal
- Shaving Foam Tutorial
- Quilt Card Tutorial
- Paved Pearl Technique
- Faux Leather Technique
- Plaited Ribbon Wreath Tutorial
- Paper Rose Tutorial
Thursday, 22 August 2013
Happy Birthday To My Friend
Hi Crafters! How's this for a clean and simple style? What's more, it's relatively flat (except for the flatback pearls, that is!) Can you believe it! LOL And yes, I did do this card. Every once in awhile I just like to get a little bit inky and have a good old fashioned play! For this card, I used the Vintage Labels Three from Justrite stamps and cut an aperture in a piece of copy paper using the largest size in the set. I taped my copy paper over a piece of coconut white card. Using several distress inks, Mustard Seed and Fired Brick, I carefully inked through my aperture to create a sunset sort of effect. I tend to pounce rather than rub with my cut 'n dry foam around the edges, that way I don't catch the edge of the copy paper and lift it accidentally. Once I was happy with the colour coverage, I removed the copy paper. I used the Floral Thank you silhouette flower and inked it with a black archival and stamped it off centre. I added my sentiment below in black and three flatback pearls in the opposite corner. A black mat to frame it, then a double white pierced mat to finish it off. Super simple and super quick and quite pretty, I think too! Finished dimensions are 7" x 7 1/2" in size. All for now, Sue x
Wednesday, 21 August 2013
Live, Laugh, Love
Hi bloggers! This card set on my craft table for over a week, unfinished. I had a vague idea in mind when I started it, but it didn't pan out. So I set it aside until something else creative took hold and this is what I ended up with. Sometimes you just have to do that! I started by cutting two apertures in my background using the outer die from the
Exquisite Circles. I used the large swirl stamp from the Beaded Elements set to add some interest to the remaining areas on the white background. I heat embossed it with white powder for a tone on tone look. In the upper aperture, I cut a Basic Lattice piece to sit in the opening and in the lower aperture area, I used the next size down in the Exquisite Circles to emboss the detail into the deep purple background card. I stamped my sentiment inside the embossed area and embossed it with white powder. I found some coordinating papers in my stash and decided to use them for my butterflies. I cut three pieces that were large enough for each of the butterflies and covered them with a piece of sticky adhesive sheet. Using one of the butterflies from the Wonderful Wings set, I cut each one. I peeled the backing paper off once cut and covered each of them with micro beads for texture. One butterfly was adhered in the upper aperture and the others were adorning the white stamped swirls. I added flatback pearls to each of the bodies as accents. Finally, a double white pierced mat was added to complete the card. It took a while to finish it but I think it was worth the wait (too bad the white is so hard to photograph!) Finished dimensions are 7" x 9" in size. All for now, Sue x
Tuesday, 20 August 2013
3D Bauble
Morning all! Christmas in all its glory today with a 3D bauble card. I had a good time with this one once I figured out how to make it work! I cut an aperture using the 2010 Christmas Ornament. I embossed the remaining background with the Holiday Magic embossibility folder. Next I cut three of the ornaments with the Heartfelt Ornamental Add- On piece inside so they created frames. Now the trick in doing this card is since you have to cut them separately and the inside die might not be in exactly the same position each time, so to "hide" that, I used the smaller ornament die size to emboss the pattern into the frame between the outside and inside edge. The reason being is so your eye will pick up any differences in the frames as the extra embossed line. It will become evident as you begin to fold each of the pieces to tape them back to back, that the inside cuts may be slightly different. I taped a piece of red card behind my aperture opening then assembled my ornaments so they were folded then taped back to back. I glued the back halves of the ornaments to the red card within the aperture, then holding the ornaments open, I glued the Ornamental Add on piece in the centre so you can see it from between the ornaments (that is hard to explain so I hope it made sense!) I cut several of the holly pieces from the set and added flatback pearls to them and Iced Snow to all the leaves. I arranged them at the bottom of the card. I tied a double bow from the white frilly edged ribbon and added it at the top of the ornaments. I added some pearls on a string (from my stash) and a red grosgrain ribbon rose to the centre. I finished the card with a double white mat with a pierced inner layer. Although the card is rather dimensional, it does fold flat for posting! Finished dimensions are 6 1/2" x 8" n size. All for now, Sue x
Monday, 19 August 2013
Celebrating You
Good morning everyone! One of my favourite colour combos today, black and white! I embossed a piece of black card with my Heart Lattice embossing folder (which, by the way, is finally back in stock after many months!) I cut a slightly smaller piece of coconut white card and used the Bracket Border die with a decorative insert to cut a large corner area off the card. I cut a diagonal cut across the opposite corner. I embossed this piece using the Interlocking Circles embossing folder while the Bracket Border die was still in place, then glued it to my background. Using the Delicate Aster stamps and dies (from Heartfelt Creations), I made several flowers of varying sizes. I stamped the flowers and heat embossed them with True White embossing powder. I did some of the leaves from the set as well in the same manner. I used the Snow Cap white alcohol ink to dye large micro beads and used them for the centres of my flowers. I used Cosmic Shimmer dries clear glue to secure them in the centres of the flowers. I mounted my flowers along the upper cut edge of my card. I stamped my sentiment (from JustRite stamps) and cut it into a strip with a forked end. I matted it with a slightly larger piece of black card and cut the end to match. I tucked the end under one of the flowers then used a glue got to secure it into place with a bit of a wave to it. I added a black rhinestone swirl as an accent below it. I finished the card with a double white pieced mat and some flatback pearls as embellishments. Finished dimensions are 7" x 8" in size. All for now, Sue x
Sunday, 18 August 2013
Merry Christmas
Good Sunday morning all! I guess there is no surprise as to what sort of card it is for today! I know you don't want to think about the "C" word just yet, but believe me, you will thank me later if you just get a start on those cards sooner than later. It is sort of like a public service that I am performing here (you aren't buying that at
all, are you? LOL) Oh well, I am trying! Today's card is really very easy to do but it does take a bit of time as it uses a re-insertion technique. This technique is incredibly easy to do with simpler dies, but does take a bit of patience when there is a delicate frilly edge to the die you are working with. Basically I used the Decorative Labels one die and cut an aperture in my navy blue card. I then used the New Year Dove embossing folder by Couture Creations and embossed the aperture for texture. I cut another one of the same die out of white card and used the snowflake die to cut an aperture out of the centre of the die. I replaced the white die in the opening of the blue card and from the back of the card, I taped it back into place, just catching the edge of the white die with my tape. I cut various smaller snowflakes and scattered them diagonally across the top of my card as accents. I stamped my sentiment (from the Justrite Elegant Christmas sentiment set) on a larger piece of white card and mounted my reinserted snowflake on foam pieces above it. I added some flatback pearls to my snowflakes and sentiment and finished the card with my signature pierced double mat. Finished dimensions are 7" x 9" in size.
A quick reminder that Julia Watts has shows today on Create and Craft. She will be on the ToolShed show at noon and then again at 5pm. Julia has new Heartfelt Creations stamps and dies and they are gorgeous! Be sure to tune in to see her lovely samples and demos.
Now for the weekly comment game winners! This weeks names drawn were:
Nanny Jo!!!
Holly Berry!!!
MacMable!!!
Congratulations all! Please email me at americansue1@gmail.com to confirm your address and claim your prizes. Don't forget to leave a comment to be entered into next weeks contest, remember you have to be in it to win it! All for now, Sue x
all, are you? LOL) Oh well, I am trying! Today's card is really very easy to do but it does take a bit of time as it uses a re-insertion technique. This technique is incredibly easy to do with simpler dies, but does take a bit of patience when there is a delicate frilly edge to the die you are working with. Basically I used the Decorative Labels one die and cut an aperture in my navy blue card. I then used the New Year Dove embossing folder by Couture Creations and embossed the aperture for texture. I cut another one of the same die out of white card and used the snowflake die to cut an aperture out of the centre of the die. I replaced the white die in the opening of the blue card and from the back of the card, I taped it back into place, just catching the edge of the white die with my tape. I cut various smaller snowflakes and scattered them diagonally across the top of my card as accents. I stamped my sentiment (from the Justrite Elegant Christmas sentiment set) on a larger piece of white card and mounted my reinserted snowflake on foam pieces above it. I added some flatback pearls to my snowflakes and sentiment and finished the card with my signature pierced double mat. Finished dimensions are 7" x 9" in size.
A quick reminder that Julia Watts has shows today on Create and Craft. She will be on the ToolShed show at noon and then again at 5pm. Julia has new Heartfelt Creations stamps and dies and they are gorgeous! Be sure to tune in to see her lovely samples and demos.
Now for the weekly comment game winners! This weeks names drawn were:
Nanny Jo!!!
Holly Berry!!!
MacMable!!!
Congratulations all! Please email me at americansue1@gmail.com to confirm your address and claim your prizes. Don't forget to leave a comment to be entered into next weeks contest, remember you have to be in it to win it! All for now, Sue x
Saturday, 17 August 2013
Something Just For You
Hi crafters! I think I will stick to that greeting today as it is safer! LOL I guess I shouldn't rely on spell check to catch all my mistakes! The card I have picked for today is a different sort for me but it has a nice playfulness to it. I created my background by cutting an extended version of the Basic Lattice die out of coconut white card. Using the Grand Squares, I cut a frame and used one of the dies in the size in between to simply emboss into the frame for an extra added detail to it. I mounted my frame on foam for dimension and mounted it over my lattice background piece. I cut a larger piece of white to sit behind the lattice too. I stamped several of the floral bunting stamp from Justrite (Buntings and buttons stamp set) on to an assortment of pastel colours and white heat embossed them. Next I cut them out using the matching bunting die and I also cut two white ones. I cut the pastel buntings up so each flag was individual. I glued them on top of the white bunting strip to create a bunting with an assortment of colours. I glued a flatback pearl between each flag to give them an elegant look. The two buntings were attached so they adorned the upper corner of my card. I stamped my sentiment on lavender card then stamped the Vintage Labels three frame around it and heat embossed with white powder. I cut it out with the matching die and mounted it in the opposite corner. I tied a messy bow with mauve seam binding and added a lavender Dazzler as an accent. A double white pierced mat completed the card. Finished dimensions are 7 1/2" x 7 1/2" in size. All for now, Sue x
Friday, 16 August 2013
Have A Fabulous Day
Hello my friends! Custard and soft gold teemed up with Decorative Labels One and matching JustRite stamps for today's card. I did add in a much loved piece of decorative paper (origin unknown) to help achieve the finished sample but other than that it is pretty much straight forward. I used the Bracket Border die to cut a decorative edge into my background paper. I added some custard coloured card underneath to help show off the pretty lattice pattern of that die. I cut a large Decorative Labels One in soft gold card as the back drop for my focal element. I stamped the Celebration Labels One stamp and embossed it in gold. I cut it out with a Scalloped Labels One die. I stamped my sentiment (Justrite) and cut it out with a smaller die in the Decorative Labels One set. I stacked and layered all the die cuts to form my focal element. I made a rose out of the custard card and "sugared" it with Diamond Sprinkles. I added some gold tulle (from my stash) and some natural jute twine and seated my flower on top. I changed my stick pins to gold by rubbing them on a clear Perfect Medium pad and sprinkling them with gold embossing powder and heating. (Be sure to put the ends into a foam mat before heating the ends. You do not want to be holding the pin part as it will get very hot!). I added some flatback pearls to the corners and a double pierced mat out of the soft gold card to finish a really easy card. What a nice way to wish someone a fabulous day, don't you think! Finished dimensions are 7" x 8" in size.
I wanted to let everyone know that The Papeterie has begun to ship out the DVD of the demo day in July. I am told they are painstakingly calling everyone that has reserved a copy to get their details, so please be patient. If you haven't ordered your copy, it isn't too late to do so by just contacting The Papeterie in Aberdeen. The DVD is a recorded version of the 20 demo cards that I did on the day for their charity auction. Just so that you are aware, it isn't a slick multi camera filmed version, it was a single static camera that was set up and unmanned. That being said, the cost is £6 and the proceeds go to a great charity they support called Archway. I haven't actually seen the DVD yet (it is just painful for me to watch myself, so I decided I would pass!), but I believe that some have already been received by some of the blog followers so maybe there will be some feedback in case you are interested. All for now, Sue x
Thursday, 15 August 2013
Life To The Fullest / Announcement
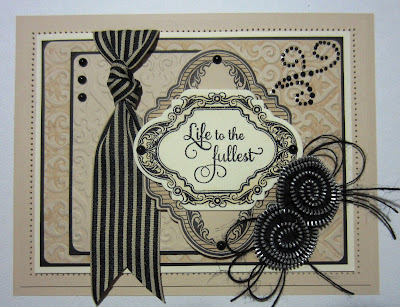
Hello crafters! I have a quick card for you today and an announcement for you too. First the card, which is a milk, taupe and black card that could be used for just about any I occasion I think. I started by letterpressing the background by inking the Venetian embossibility folder with Antique Linen distress ink on the negative side. I inserted my taupe coloured card and ran it through the machine to transfer the ink to the floor of the design. I matted this piece with a thin black mat and a slightly larger milk mat. On to the next section. I used the same folder but merely embossed it this time and a smaller piece of taupe card and matted it with black as well. I glued this piece to the side of my larger background and added a strip of black/ivory striped grosgrain ribbon across it. I tied a knot into the top as an accent and taped the end around the back of the card. I stamped the Justrite Labels two stamp from the Live, Love, Laugh set in black on taupe card and cut it out with the matching die. I mounted it with foam to the edge of my ribbon. I stamped the smaller Labels two stamp and added a sentiment this time on to milk card. I cut it out with the matching label die as well and inked it with Antique linen while still in the die. It was mounted horizontally across the other one to complete my focal element. I added two black zipper roses (I love the eclectic edgy look of these!) and added some black jute behind them. I added some black flatback pearls to the die cuts, a black pearl swirl spray and a final double pierced taupe mat to complete the card. The finished dimensions are 6 1/2" x 8 1/2" in size.
Now for the announcement! It is that time of year again!
CREATIVE EXPRESSIONS DESIGN TEAM CALL!
Creative Expressions is currently looking to recruit new passionate crafters to join the 2013/14 Creative Expressions Design Team!
Click on the link below to find out how to enter:-
BLOG
Would you like to be given fabulous Creative Expressions stamps every month absolutely free? Then we would love to hear from you...
We are currently looking to recruit new passionate crafters to join our 2013/14 Creative Expressions Design Team (CEDT) to make fabulous projects using our products and rubber designs!
What’s in it for you?
There are some fantastic benefits to being a member of the Creative Expressions Design Team! As a member, you will:-
We are currently looking to recruit new passionate crafters to join our 2013/14 Creative Expressions Design Team (CEDT) to make fabulous projects using our products and rubber designs!
What’s in it for you?
There are some fantastic benefits to being a member of the Creative Expressions Design Team! As a member, you will:-
· Receive a new set of Creative Expressions rubbers stamps every month (absolutely free) as well as a selection of other crafting goodies to work with to create your weekly projects.
· Receive a fantastic 25% discount on all products that Creative Expressions Supply (this discount applies only to RRP of products & is only applicable when ordering from Creative Expressions directly).
· Enjoy regular links to your blog through to the Creative Expressions website, blog and social media channels.
· Receive a CEDT 2013/14 badge to display on your blog &/or website.
· Have your creations showcased on the Creative Expressions website, marketing materials & social media channels.
· Be joining a fantastic new innovative & exciting Design Team!
To find out more information on how to become part of the Creative Expressions Design Team, click on this link: http://blog.creative- expressions.uk.com/
The closing date for entries is Friday, 6th September 2013 at 5pm GMT.
Good luck and we really look forward to seeing your projects!
The closing date for entries is Friday, 6th September 2013 at 5pm GMT.
Good luck and we really look forward to seeing your projects!
All for now, Sue x
Subscribe to:
Posts (Atom)