Tutorials

Sunday, 31 May 2015

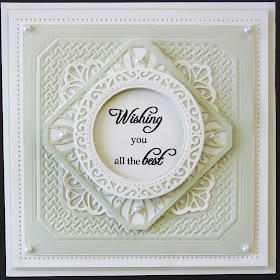
Wishing You All The Best

 Good Sunday morning all! Think a very pale sage green and white for this one as the photographs are not picking up the true colour.  It is a gorgeous green, very soft and pastel,  but from my stash I'm afraid.  I started by simply debossing the outer ring from the Classic Adorned Square Noble die set into my pale sage green card.  I used the outer ring also, but only with the embossing mat so no actual cutting was done.  I cut around it leaving a wide border and added flatback pearls to the corners.  Next I cut four of the Caribbean corners in white card using the outer cut ring as well.  I glued them into place on the inside of the debossed square.  Next I cut the inner design from the Classic Adorned Square out of the pale green card.  I backed it in white this time and mounted it in the centre in a diamond orientation.   I stamped my sentiment on white card and inked lightly around it with Bundled Sage distress ink.  I used the centre die from the Italian Decorative frames set and cut a frame for my sentiment.  I backed it in green and added mounting foam to the back of the frame.  I seated it over my sentiment and cut away the excess card.  I added my sentiment in the centre of the card to complete the focal element.  I finished off the card with my usual matting and layering.  I decided not to doll it up with flowers so you can see how it might be used for either male or female recipients, but you certainly could add some floral embellishments if you prefer to easily change it.  The finished dimensions are 8" x  8" in size.

The winner of this week's Comment Game are:

Yvonne H!!!
Cameeli of Richmond!!!
Melody!!!

Congratulations all!  Please email me at americansue1@gmail.com to confirm your postal address and claim your prize!  All for now, Sue x


Saturday, 30 May 2015

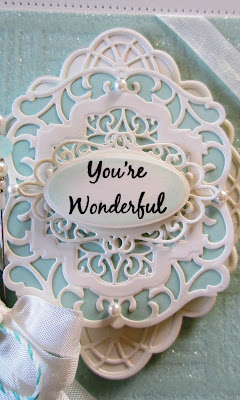
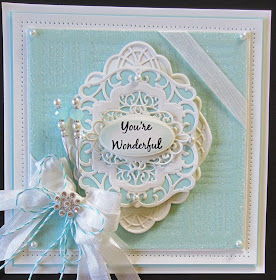
You're Wonderful

Hello all!  A tone on tone High/low technique background on today's card.    I started with an aqua piece of card and covered it with a sticky adhesive sheet.  I used the Tiles mask on this background.  I peeled the backing paper off  and then inked the mask with a clear Perfect Medium, which keeps it from sticking to the mask too strongly. Placing the mask with the inked side down to the sticky sheet. I coated it with Diamond Snow.  I peeled the mask up, exposing the remaining adhesive and then I coated it with clear micro beads, burnishing them down well.  I wrapped a piece of white seam binding from corner to corner and added a messy bow with a crystal sparkler and a Bakers Twine bow.  For the focal element, I cut the Lisbon in white card and backed it with a white backing.  On top of that I added the Porto die cut out of white card then backed with aqua card.  The Canadian tag cut in white was added next and I used the oval from the tag to cut out my stamped sentiment.  I added flatback white pearls to the corners and areas on the dies as embellishments.  I also added two matching stick pins to embellish the bow.  The card was finished with a white pierced mat, a thin aqua mat layer and then a wider white mat to finish.  The finished dimensions are 7" x  7" in size.

The winner of the Wednesday Card Giveaway is:

Ann without an "e"!!!

Congratulations!  Please email me at americansue1@gmail.com to confirm your address and claim your card.  All for now, Sue x


Friday, 29 May 2015

Friendship

 Hello blog friends!  I just love the simplicity of today's card offering.  I started by cutting the Canadian Background die out of coconut white card.  I just love this die and it has proven to be so useful (as I hope to show you on many later blog posts!)  I used it here in it's simplest form, just using the outside cutting die to create a rectangle border around my card.  I picked custard card to use with it and added mounting foam to the background and seated it over the custard card for a soft yellow creamy background.  I cut the Montreal die in white using both the inner and outer cutting edges to create a frame.  I backed it with a custard card cut out, gluing them together then reseating the inside die for a clean cut to my frame.  I added mounting foam to the back of the frame, then stamped my sentiment on another piece of white card.  I covered it with an adhesive sheet, then coated it with Diamond Sprinkles.  I added glue to my mounting foam on the back of the frame then seated in over my sentiment.  I cut away the excess from around the edge then glued it in the centre of the background. I added small white flatback pearls to the background as embellishments.   I completed the card with my usual paper pierced edge (by using my piercing ruler) and a custard mat and a final white mat.  The finished dimensions are 6" x  7 1/2" in size.  All for now, Sue x


Follow my blog with Bloglovin


Thursday, 28 May 2015

Ivy Trellis


Hello crafters!  Today's video shows how to use the Greek Island Background easily.  Part of the die is designed with a deboss feature to it and I show how to use it simply.   It really is a simple card, but with beautiful results that I am sure you will love.


Buy from Joanna Sheen


 The finished dimensions are 5 3/4" x  7 1/2" in size.  All for now, Sue x

                                                       Follow my blog with Bloglovin


Wednesday, 27 May 2015

Wednesday Weekly Card Giveaway

Hello everyone!  How about a pinwheel sort of card for today's card giveaway?  This was a demo I did back in Feb. but in case you didn't see it, here's a quick rundown.  I started by embossing periwinkle card using the Leafy Quad embossing folder.  I did it twice with two different sized squares so I was able to layer them up for a bit of interest.  I matted each piece with a thin black mat to frame it.  For the focal element, I cut four of the centre die from the Times Square out of coconut white card.  I cut four more out of black card.  I cut eight squares to back them with, all out of white card and glued them all together.  The four white on white pieces became the "square" part of the pinwheel while the black on white pieces became the "diamond" part of the pinwheel.  By inserting each piece but keeping the same orientation, you end up with a pretty pinwheel look to your card.  I recommend doing this with glue dots first then after getting all the pieces in place, use glue under the edges to secure them.  That was it allows you a bit of wiggle room until you are happy that they are all straight and how you want them (well it works for me that way at least! LOL)  Next I stamped my sentiment and covered it with a sticky adhesive sheet.  I coated it with Diamond Snow for a bit of bling.  I cut the centre die from the Madison Square set in white and glued it over the sentiment  I cut a thin black mat for it as well and mounted it with foam in the centre of my pinwheel.  Finally, I added five small Camellias in periwinkle with black pearl centre around my sentiment.  The card was then completed with a white pierced mat, a thin periwinkle and a thin black mat and a last white mat layer.  The finished dimensions are 7 1/2" x  7 1/2" in size.  If you would like to be included in the drawing to win this one, just leave me a comment.  The winner will be announced on Saturday's blog post.  All for now, Sue x


                                                            Follow my blog with Bloglovin

Tuesday, 26 May 2015

Inlaid Ivy


Hi bloggers!  A really lovely card today for your video treat using the Greek Island Border in a different sort of way.  It is a really useful die and this is just one more way to get the most out of it!  I hope you enjoy the video!

Buy from Joanna Sheen


The finished dimensions are 6 3/4" x  8 1/2" in size.  All for now, Sue x

                                                          Follow my blog with Bloglovin


Monday, 25 May 2015

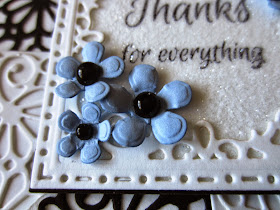
Thanks For Everything

Morning crafters!  A bit of a peachy one for today. Although peach isn't a colour that I use very often, I always really like it when it is finished.  The milk card looks a bit vintage with it as well.   I started by doing some faux leterpressing on my background.  I used the Peach Bellini Adirondack pigment ink to ink up my Rambling Blossoms embossing folder.  I used  a piece of milk card for the background and letterpressed it through the Grand Calibur, transferring the ink to the floor of the embossed design.  I cut the Kefalonia die out of milk card using both the inside and outside cutting edge to create a frame.  I inked it with the same Peach Bellini pigment ink before removing it from the die.  I added it to the centre of my background with mounting foam.  I stamped the sentiment and cut it out with the Caribbean Island tag.  Inked the edges of it as well before removing it from the die.  Using the Complete petal Camellia, I made six flowers of varying sizes out of milk card.  I inked the edges of all of them with Peach Bellini ink to tone them to the card.  I arranged them on either side of my sentiment as embellishments.  Finally, the card was finished with my Paved Pearl technique using Ivory PVA glue dots all the way around a wide border.  There is a tutorial for this technique at the top of the blog.  The finished dimensions are 7" x  7" in size.  All for now, Sue x


                                                         Follow my blog with Bloglovin