
Hi guys, today I am showcasing my quilt card using the Damask accents. There is another colour way that I did this card in and I will post it at the end of the tutorial for you.

Start with this die template which is from the new Damask Accents from Spellbinders.
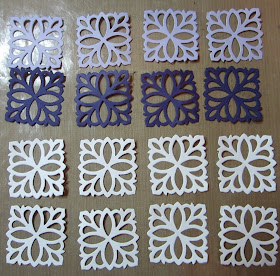
Cut 16 of these pieces, 8 from a neutral colour (I'm using white) and 4 from a light tone and 4 from a dark tone colour. You can cut these quicker if you do two at a time. There is no need to emboss these so it will save a bit of time there too.

Next step is to cut squares the same size. If you use a square die, your finished piece will fit together better than if you cut the squares on a guillotine. If there are any bits of the points that extend past the edge of the square, nip them off with your scissors. Glue each Damask piece to the matching square. You can change the look of your quilt by making the backing square a different colour too.

Next, you need to cut all the coloured squares in half and four of the white squares. You will need to leave four white squares uncut.

Next you will need to cut a piece of square card that is slightly larger than your four squares across. I use tape for this step to get the positioning right. The four squares will be the four corner pieces. If you want to be exact with this you canuse a ruler and mark it, but I find it is easy to place the squares in each corner then use the cut white pieces to get the spacing. They need to be layed out in this pattern. The edges should touch each other as it forms the perimeter of the pattern. You should be able to adjust the corners if need be if you haven't used glue on them. Once you get the pattern straight you can go back and glue the pieces down

Next go in and place the coloured halves in from the outside edge. You will alternate colours as you go around. You can see that the colours will continue to make the original sqaue shapes with the white pieces.

Continue to add your colours, this time placing the colours in the opposite directions to make the pinwheel shape for the centre. These have only been layed in place for the picture. Your lines should meet up seamlessly.

Adding the last remaining pieces will complete the pattern for your quilt card. I added a sentimenrt on mine that was cut from the Persian die templates.

Here you can see the same card done in a second colour way. This card shows the sentiment cut from the Persian die templates

The card to the left is exactly the same card except without the Damask accent piece attached to the squares. This card, once assembled using the above instructions, was run through the new Spellbinder Embossibility folder called Patchwork to give the card texture. It is a nice alternative to the first card but yields similar results. if you would like to see another tutorial on this card, Davy and Jackie, friends of the blog have done a version too. Just go to
http://davypainterman.co.uk/CardCrafting.aspx I hope you have enjoyed seeing how these cards were made. All for now, Sue x
 Hi guys, today I am showcasing my quilt card using the Damask accents. There is another colour way that I did this card in and I will post it at the end of the tutorial for you.
 Start with this die template which is from the new Damask Accents from Spellbinders.
 Cut 16 of these pieces, 8 from a neutral colour (I'm using white) and 4 from a light tone and 4 from a dark tone colour. You can cut these quicker if you do two at a time. There is no need to emboss these so it will save a bit of time there too.
 Next step is to cut squares the same size. If you use a square die, your finished piece will fit together better than if you cut the squares on a guillotine. If there are any bits of the points that extend past the edge of the square, nip them off with your scissors. Glue each Damask piece to the matching square. You can change the look of your quilt by making the backing square a different colour too.
 Next, you need to cut all the coloured squares in half and four of the white squares. You will need to leave four white squares uncut.
 Next you will need to cut a piece of square card that is slightly larger than your four squares across. I use tape for this step to get the positioning right. The four squares will be the four corner pieces. If you want to be exact with this you canuse a ruler and mark it, but I find it is easy to place the squares in each corner then use the cut white pieces to get the spacing. They need to be layed out in this pattern. The edges should touch each other as it forms the perimeter of the pattern. You should be able to adjust the corners if need be if you haven't used glue on them. Once you get the pattern straight you can go back and glue the pieces down
 Next go in and place the coloured halves in from the outside edge. You will alternate colours as you go around. You can see that the colours will continue to make the original sqaue shapes with the white pieces.
 Continue to add your colours, this time placing the colours in the opposite directions to make the pinwheel shape for the centre. These have only been layed in place for the picture. Your lines should meet up seamlessly.
 Adding the last remaining pieces will complete the pattern for your quilt card. I added a sentimenrt on mine that was cut from the Persian die templates.
 Here you can see the same card done in a second colour way. This card shows the sentiment cut from the Persian die templates
 The card to the left is exactly the same card except without the Damask accent piece attached to the squares. This card, once assembled using the above instructions, was run through the new Spellbinder Embossibility folder called Patchwork to give the card texture. It is a nice alternative to the first card but yields similar results. if you would like to see another tutorial on this card, Davy and Jackie, friends of the blog have done a version too. Just go to http://davypainterman.co.uk/CardCrafting.aspx I hope you have enjoyed seeing how these cards were made. All for now, Sue x
Wow Sue all gorgeous cards and fabulous idea,love this
ReplyDeleteHugs Dianne xx :)
Hi Sue
ReplyDeleteThank you for this. I loved this card when it was on C & C. Have a great time with your mum.
Sue
Great card Sue, shame C&c won,t help with the missing Damask Accents from my POTD, no matter will just give it a try with the m-bossing.
ReplyDeleteWoo Hoo!!! Can't wait to do this tonight after I return from work and put the my children to bed. So ingenious and yet so simple!
ReplyDeleteCelina-Waterford
A stunning card, you make it look so easy. Thanks for the tutorial, I'm going to give this one a try.
ReplyDeleteTake care.
Good Morning Sue,
ReplyDeleteHave been waiting for this, loved it when I saw you doing it on C&C.
Gosh!! no work done in this house again today..............
Have a great day.
Patricia xx
These are all gorgeous cards and love them. Will certainly be giving this a go. Thanks for the tutorial.
ReplyDeleteMags
x
Thanks for the ttorial its a great Idea hope you have a good time with your Mum .Melanie
ReplyDeleteHi Sue,
ReplyDeleteSaw this one on C&C and thought it looked wonderful.Brilliant idea.
And love the colour combos as usual
Hugs xx
WOW great to have a tutorial Sue and such a stunning card. Thanks.x
ReplyDeleteHi Sue, This tutorial makes it look a lot easier than i thought it would be , must have a go at making this card. Yvonne xx
ReplyDeleteGreat Card!! Thanks for tutorial! Have a great time, hope to see you soon on C&C with more amazing creations!
ReplyDeleteSuper card and thanks for the tutorial...caught your shows yesterday, the one with Martyn was great that we could enjoy following you 'play' a little more! Congrats and the official Spellbinders Design Partner status and have a wonderful time with your Mum, Carole Z XX
ReplyDelete'morning, great card, I used to do patchwork before I got the cardmaking "bug" I think I'll go down the Amish route and do a black background and a bright pinwheel. Fab, instructions. Full of good intentions.... just need to get on with it.Thanks again Sue, Mabex
ReplyDeleteLovely cards, Sue and such an interesting technique :)
ReplyDeletex
Hi Sue,
ReplyDeletesaw this one on c and c. Its a really wonderful idea must try it sometime. Thank you fro the tutorial today. I love all the other colours used as well. How did you stop yourself from putting one of your famous bows on it. LOL Still it doesn't need one its lovely as it is.
Lots of crafty love. Jenny L
Great Technique Sue! Love, Julia xxx
ReplyDeleteThank you so much for posting a tutorial on this card. I loved it when I saw it on tv and thought I would remember how to do it - but failed. Congratulations on the Spellbinders Design Team, you deserve it. You give so much inspiration to so many people.
ReplyDeleteThanks again, Elizabeth x
Morning Sue you are such a talented. Lady I adore this card it is Beautiful I can't wait to see what's coming next I've have only just got my grand calibur but I'm now hooked I'm just doing my mother's day card I will send you a pic when its finished. Debs xx
ReplyDeleteYippee, i loved this card when you demod it and have been waiting for it to appear on the blog. Thank you its fab.
ReplyDeleteIt is such a simple technique and yet so very stylish and looks as if you have spent hours making it.
TFS
Hugs
Amanda x
Great tutorial Sue, will try this.
ReplyDeleteChris
Good morning Sue I think this is such a clever card and I am definately going to try it out. Thanks for the tutorial. x
ReplyDeletewow lovely card angxx
ReplyDeleteHi Sue ,love the card as its ideal for male or female .Just love watching all your demo;s on C& C
ReplyDeleteFrom Val M
Hi Sue ,lovely card suitable for male or female ,i love watching all your demo,s on C & C and always record them .Have a lovely day.
ReplyDeleteI love this card in all the colour ways, it's really striking.
ReplyDeleteJo x
love this idea and it looks simple to do. thank you for all these ideas xx
ReplyDeleteKate xx
Just love this card Sue, it just looks so stunning and seems fairly easy to achieve the finished product. can't wait to see you back on C + C at the end of the month. Enjoy ur time with your mother xx hazel
ReplyDeleteMorning Sue THANK YOU you have made this soooo easy for me to follow with your easy instructions, i cant make my mind up on the colour way i like the best though as i like them equaly .I hope you have a nice time with your Mom and a well deserved rest Take Care Elaine H X
ReplyDeleteThis one looked so difficult thanks for the tutorial, you make it look much more achievable beautiful cards.
ReplyDeleteJane xx
Loved this card and wondered how it was done.
ReplyDeleteThis is great and tempted to get these dies even more
Good Morning Sue, I have been waiting for this card ever since I saw it on C & C. Thanks so much for posting it, I am now going to play - after the housework of course!!!!
ReplyDeleteHope you can now have a bit of a rest after your mamoth stint on C & C.
Love Rosemariexxxx
I loved this card when you did it on C & C. It's stunning.
ReplyDeleteXX
Hi Sue, Thanks for the tutorial. I'm off for a walk with the dog and then into my craft roomto try and copy this fantastic card.xxx
ReplyDeleteloved this card when you demo'd it on tv! Could be used for any occasion in any colour.
ReplyDeleteGenius as always Sue!
Crafty Hugs
Sandra x
Brilliant again sue. I copied one of these when I saw you make it on C&C. Turned out better than I expected first time but even better the second time around.
ReplyDeleteGreat inspiration as always, and always thinking outside of the box
luv n hugs xx
Thanks for the tutorial, I've been wondering how you did that card after seeing it on the shows.
ReplyDeleteClare x
Lovely cards - really different.
ReplyDeleteWow, what a fantastic idea. Time to dig out some old quilting books and see what other patterns might work too.
ReplyDeleteWow, looks just like they are quilted. Fab ideas.
ReplyDeleteHi Sue,
ReplyDeletethis cards look wonderful, thank you for the tutorial.
xxx
Anja
This card is so effective the way its made up. Just stunning x
ReplyDeleteWow Sue, You have such an amazing imagination, I dont know where you get all your ideas from, I never would have thought to do something like this, fantanstic, thank you for the breakdown, Helen O xxx
ReplyDeleteThank you for such a detailed tutorial Sue, love seeing the pattern in different colourways. Anne x
ReplyDeleteMorning Sue
ReplyDeleteThanks for the tutorial on how to do this card, I have admired it since seeing it on C&C and have longed to do it! Hope you have a lovely time with your mum. Looking forward to seeing you back on tv when you come back. Love Jean x
I love this, going to try it out today x thanks for your inspiration xx
ReplyDeleteI love this, going to try it out today x thanks for your inspiration xx
ReplyDeleteWow, what a great technique! You must have a lot of patience, lol. Looks wonderful! Love the different shapes you can create and the colors you used. Hugs, Hanneke
ReplyDeleteThis comment has been removed by the author.
ReplyDeleteWow Sue, love this one, thanks for the tutorial, have a great break from C&C gonna miss ya, come back soon
ReplyDeleteHugs Sioux xx
Sue this is wonderful, I loved the card when I first saw it and I am going to give this one a go tonight. I dont have the damask die but will try another die there is a square one in your lattice dies
ReplyDeleteSue xxx
Hi Sue having a blonde moment and pressing the wrong buttons love the card watched you do the demo ....thanks for the tutorial its so much easier than re running the video stopping and running upstairs to do the next bit LOL take care Margaret
ReplyDeleteGood Morning sue
ReplyDeleteThank you for showing the workings of this card ...I love it !
Enjoy your visit home.
Love Marg
love this card the possibities are endless goin to make this 4 a friends birthday thx Sue for all your inspiration
ReplyDeleteReally beautiful card here again today and I love this die. I made something a bit like this with the doily sets last year, but love how you made it into the star , that looks really cool.
ReplyDeleteHi Sue, I took extensive notes when I saw you demonstrate this card on air I love it so much. I am drawn to quilting patterns & own a few quilting books just for pattern ideas to use with my cards. Never thought of layering the paper to create texture. It's inspired. Like with the 2 sided embossing folders, I'm left asking 'Why didn't I think of that?' With Love & Light Theresa. H
ReplyDeleteHi Sue, this is fabulous and your instructions are so clear. I am certainly going to try it. You are such an inspiration to us all, thank you.
ReplyDeleteHave a lovely time with your mum.
Hugs Sue M
xx
Morning Sue,
ReplyDeleteWonderful card and a great tutorial
must have taken you a long while to suss this one out.
Hope I'll have the patience to give it a go.
Lydia
XX
This is such a clever card, I must try this.
ReplyDeleteCarolyn B
Oh, this is absolutely gorgeous. A fab idea and very, very effective.
ReplyDeleteLove it.
xx
Great card again Sue, I'm loving the Damask Dies will HAVE to have them.
ReplyDeleteLOL JanNxx
Wow Sue, the 'complete' SW version is sooooooooooo more detailed than Jackies, goes to show, watching you on C&C for a five minute demo isn't enough to grasp all the techniques. You should definitely bring out more dvd 'How to's for those of us that can't 'record' the C&C shows....Once again..STUNNING is the only word to describe both your cards and YOU..safe journey :) Davy xxx
ReplyDeleteThis one is already in my Sue file already, I liked it so much that I wrote myself instructions whilst you were on tv! It's a real winner for me.
ReplyDeleteHi Sue thanks for the tuturiol I was impressed with this card when I saw the shows its easy when you know how... rofl!! I have not got the dies you have used but will try embossing folder technique and look at dies I have and will hopefully get to make this today great colour combos on your cards and they all look so different :)
ReplyDeleteMaggie H
Wow Sue-such a simple card and yet so very effective. Your ideas are wonderful-thank you so much :)
ReplyDeleteI saw this card on C n C but did not realise it was separate dies put on to squares I thought that you had just embossed the squares then cut them. So in fact far more dimension that it looks. Great idea, I think I like th blue one best.
ReplyDeleteLovely card and thanks for the great tutorial.
ReplyDeleteThis is absolutely beautiful! I have a request for a quilted card. I was going to do a patchwork and sew it, but hanks to you and your wonderful tutorial I think I will be trying this one! Thank You! I love this one!
ReplyDeleteGorgeous card Sue , thank you for the info and diagrams really helpfull. Enjoy your time with your Mum.
ReplyDeleteHugs Elaine
Thanks, I wondered how you made this! Ger x.
ReplyDeleteLoved this card when I saw it on c&c love this tutorial more makes me want to get my dies and play ... housework smousework that can wait another day can't it lol x
ReplyDeleteLovely cards and with so much potential! All I need is the inspiration that you provide! Many thanks!
ReplyDeleteThe card looks amazing Sue!Thank you for the tutorial. =)
ReplyDeleteHi Sue
ReplyDeletegreat card will try this one when i have time put aside for crafting. Smashing colours. Like the thoughts of speed cutting. So little embellishment but seems a lot to look at, very strange but cheap lol. (not cheap looking cheap to make). Great fun to make.
Thank you for great week on spellbinders.
Born again spellbinder
Nadine x hug
nzillingworth@hotmail.com
Fabulous! I couldn't wait for the instructions for this, thank you, Sue, you are a gem!
ReplyDeleteI loved this card when I saw it on air, thanks for the great tutorial.
ReplyDeleteAnother great card Sue,thanks for the tutorial,will be giving this a go.x
ReplyDeleteMorning Sue - Love it Can't wait to get started later today!
ReplyDeleteX Val C
Another great card Sue,thanks for the tutorial,will be giving this a go.x
ReplyDeleteWow, saw you demo this on C&C, so pleased you have given the instructions. I am getting there, back to practicing Sue, as my hand is getting stronger, think I'm going to have to buy more dies and have a go at this one. Have a good time in the States, you deserve a rest after all your inspirational ideas. Thank you so much, have enjoyed watching all your demos. Alison
ReplyDeletewow again stunning cards and easy to follow tutorials
ReplyDeletecan you please tell me if you use justrite stamps and if i can get them in the uk
Thanks
kind regards
mary
Hi Sue. I am so pleased you have done this tutorial as this was one of my favourite cards from the c&c shows. Love it. Karen x
ReplyDeleteSUE LOVE THE DEMO THANKS
ReplyDeleteGood Morning Sue, Thank you for the tutorial,do you ever have a day off? thank you for all you inspiration. Many Blessings
ReplyDeleteWow, Sue
ReplyDeletethis is amazing.
I know how much work this was.
Fantastic job
hugs
So glad you have put this on Sue, I did have a go last week after I saw you do it live but I had lots of sizing/scaling issues, so going to set about following your instructions. Brilliant! Thankyou
ReplyDeleteHi Sue
ReplyDeleteVery good technique-could be used with other dies too. Love the colourway of the peach/brown.
Eileen x
Wow! Sue this is Fabulous, your tutorial is perfect, going to give this a go, Hugs May x x x x
ReplyDeleteLove this card Sue so glad you put the tutorial on here. I have ordered the dies you used for this card so can't wait to give it a go when they arrive, happy crafting x
ReplyDeleteAfternoon Sue, wow l loved this card when shown on c.c l am so pleased you have done a tutorial for us, you are such a generous lady to share your knowledge. Love all the different colour ways each one works.this is going to be a classic. Lol Ann
ReplyDeleteHello Sue, Loved this card when it was on C&C, simple and elegant. Thank you for such a detailed tutorial, you are the best. Watched the shows with Nigel and Martyn, it was great to see your ideas and tips. Congrats on the Official Spellbinders Design Team, you desreve it. Have a lovely time with your Mum.
ReplyDeleteHugs June x
Hi Sue
ReplyDeleteWhat an unusual card. Thanks for taking the time to put the very detailed explanation on your blog. Once you know how it does not look so complicated. Love it
Geraldine
Wow, the cards looks all so fantastic. I love quilted cards. Thanks for this little workshop.
ReplyDeleteHugs, Uta
just got round to looking at the blog ,thanks for the tutorial I can see endless colour combinations with this
ReplyDeleteHi Sue
ReplyDeleteThanks for the tutorial! now i can go do it and see if it turns out as good as all of your beaut cards
Thank you
Lizzie (Serial copycat)xx
WOW WOW WOW absolutely stunning, so pleased to have the tutorial
ReplyDeleteThank you so much for the tutorial - will definitely be trying this. Your cards look fab! xx
ReplyDeleteHi Sue,
ReplyDeleteIt is a fabulous card I liked it when you were on C & C.
A great tutorial as well,
just need to get these dies next.
Janet
Love this idea,actually so simple to do but sooooo effective. Will definately be making this one in so many different colours. x :)
ReplyDeleteYet again another 'FAB' design for a crad Sue. I love your new lattice designs which I just HAD to buy. I will be adding my 'feathers' some where along the way, I'm sure.
ReplyDeleteGod Bless Sue Good luck
xxx
Bernie
morning Sue, I am soooo pleased you have showcased this card as I love love love it - thank you for sharing x
ReplyDeleteWOW WOW WOW!..Loved this card when you did demo on CR&CR..Am so pleased you've put it on here so we've got the proper instructions..:)And it's so versatile....Another daily fix...:)..hugs xxxx
ReplyDeleteThanks Sue for the lovely card and the tutorial, you have made a difficult process LOOK easy!
ReplyDeleteThank you for the heads up about Jackie's site, I have put it as another favourite.
Wow, you girls are a hard act to follow,
Thanks again.
Very clever, and great tutorial
ReplyDeleteVie
x
Oh wow! I have been waiting for this card its fab. Thank you so much Sue for sharing the technique with us. Love all the colour ways they are great. Hugs Christine H x
ReplyDeleteThanks for the wonderfully easy-to-follow tutorial - these cards are all stunning but I esp. like the first one - very fond of purples - although perhaps it's shades of blue? Whatever, it is lovely.
ReplyDeleteGorgeous cards. I love all the different colour ways.
ReplyDeleteNikki x
Love these cards Sue, such a great idea. Lorraine x
ReplyDeleteBeautiful creation, I'll definitely give this a try, I just love all your cards
ReplyDeleteKim x
hi sue iv been waiting for this one as i loved it when i saw it on c&c it looks so hard to do but i know when i look at your directions it will be easy keep up the great work xx
ReplyDeleteHi Sue,
ReplyDeleteThankyou for posting the tutorial of this lovely card, I am going to have ago at it and see it I can get it as good as you.
carol x
Those are all so beautiful! Love the texture.
ReplyDeleteThank you for sharing the tutorial! :)
Thank you so much Sue a great card and the step by step instructions are wonderful. I so love all your cars one talented lady! Hugs Fiona P xxx
ReplyDeleteHi Sue
ReplyDeleteAll the different colours look great, and well done you for explaining how to make it so well too, as you do with all your cards.
Congratulations to the three blog candy winners.
Brilliant idea - I love patchwork!
ReplyDeleteTracy x
Just love this card, there are so many variations and possibilities on the theme. GREAT.x
ReplyDeleteJust love this card, there are so many variations and possibilities on the theme. GREAT.x
ReplyDeleteWhat a fabulous card Sue and with its own tutorial too. You know how to spoil us and I so appreciate it all. Hugs Rita xxx
ReplyDeletelove this idea Sue, looks like I have got to buy the Damask die now, oh well never mind just received my Grand Calibur today so I need something to use in it. hugs Tina xxx
ReplyDeleteOh yes I like and it's great to see it in stages.. Well done for all the shows over the last week you must have been shattered and buzzing and tired and elated and everything. But we loved seeing you. You are truly inspirational..
ReplyDeleteGreat tutorial and a stunning card- saw it on candc and hoped you would be teaching us how to do it! x
ReplyDeleteLove this idea of playing with shapes and colour.
ReplyDeleteHugs...Wendy
Really clever card good instructions how do you find your insperation
ReplyDeleteA very clever card idea... hum now do I own this die? n if not hell I need it.
ReplyDeleteTotally gorgeous, love this tutorial! Hugs, Frea
ReplyDeleteHi Sue a great card and many options,I do not have the dies or the embosser "yet" but i am going to try my version with what i have,It was fab., seenig you on c.C over the last few days ,you must be exausted.Thank god this time you got to do so mant demos, and lots of tips thank you very much
ReplyDeleteSmiles
Ita
Thank you for the comprehensive step by steps. Brill!!
ReplyDeleteThis is beautiful! I’m going to give it ago with tulip Shapeabilities pendants :)
ReplyDeleteBecci xxx
This is beautiful! I’m going to give it ago with tulip Shapeabilities pendants :)
ReplyDeleteBecci xxx
Great card Sue seen it on Create and Craft and lookinh forward to having a go at it, Thanks Inagh xx
ReplyDeleteSue love this idea, thanks for sharing always inspirational.
ReplyDeleteErika.
Oh my word Sue that is a fabulous card. Love the idea.
ReplyDeleteEdna x
I saw you do this on C&C very creative Sue, thanks for the tutorial :) lainey x
ReplyDeleteI love patchwork and this card looks like you've spent ages on it but without all the effort,
ReplyDeleteYou made a fabulous work with these cards! Cool idea!
ReplyDeleteHave a nice evening! :)
Lovely card Sue & thanks so much for the tutorial. Ann W
ReplyDeleteFantastic tutorial, thanks Sue!
ReplyDeleteI love the neatness of this card x
Hi Sue,
ReplyDeleteThank you for posting this, I have the demo recorded but it is nice to see it in easy stages. I'm a bit late today and so many comments already left - you are pne popular lady!!
Also, what a nice photo of you on the Paintermans webpage.
love from Jackie D
been waiting for this fab card know lots of quilters who would love this
ReplyDeleteHi sue, I loved this card on C&C and was surprised how easy you made it look to do!! I like the selection of colourways and that it's another way of using up all those scraps, you cannot bring yourself to throw away.Lol!! Hugs, Carol S.xx
ReplyDeleteThis is excellent, thank you so much for sharing I love this and must try it thanks sue
ReplyDeleteThis is a very clever idea. Loved it the moment I first saw it on the show. Thanks for sharing.
ReplyDeleteHi Sue, another WOW card, loved this when it was a demo on C + C
ReplyDeletemany thanks vanessa xx
Thanks for this really clever idea. I am a patchwork and quilter but for some reason it did not occur to me that I could use card and Spellbinder dies to achieve similar patterns.
ReplyDeleteHi Sue, thanks for the Tut, I will be making this card asap. Have a good trip home with your Mum. But come back soon. Linda x
ReplyDeleteWhat a fantastic idea Sue!
ReplyDeleteHi Sue, Wonderfully explained tutorial, this card would look great in any toning colour combo.
ReplyDeleteLove all of them, lol.
Best Wishes
Happy2craft
Thanks for tutorial Sue, missed this one on C&C, will be giving this a try. Enjoy the time with your mum.x
ReplyDeleteThank you very much for doing this which I requested a few days ago x x
ReplyDeleteVery pretty quilt cards! Love the color combinations you chose. Thanks for the tutorial.
ReplyDeleteI really love this card, it's so beautiful. It might even persuade me to buy the dies as I love that piece. Thanks for the step by step Sue.
ReplyDeleteWow! This is stunning - what a creative way to use the dies. I love the cream and brown version. Jx
ReplyDeleteThank you so much! I loved this card and I now have the instructions. More amazing inspiration. Have fun in Florida...wish I was going home too! Meg xxxxxx
ReplyDeleteYou make it look so easy, it's such a beautiul card x
ReplyDeleteHi Sue I hope this goes ok first time I have done this. I love this card and if you dont mind I would like to pinch the idea for a mothers day card Joan
ReplyDeleteLovely idea for a card!
ReplyDeleteI think I am going to try this one tonight! Thanks for the tutorial :)
ReplyDelete- JennyB
I am so glad you did a pictorial on this card I thought i'd be able to remember after seeing it on C&C but got all twisted up with my jigsaw puzzle
ReplyDeleteHi Sue
ReplyDeleteLove this card and the tutorial is fantastic will be having a go
Love Theresa x
Hi Sue, This is such a great card - thanks for the recipe, I always find your details so clear and easy to follow. Hope you have a good flight and a lovely time with your Mum. I've got my striped grosgrain ribbon ordered - thanks to Patricia who mentioned it yesterday. I hadn't noticed it at Sam's when I last ordered a week or so ago, but now I've got all the Create and Craft colours coming from her (already posted - her service is brilliant!). I've also got pink/cream,(paler)blue/cream,celery(pale green)/cream (looks lovely in the picture!)and pink/brown (I'm also quite excited about)coming from Sew Sweet, who also posted quickly. So shall have a stripey bow for any colour card! Congrats to the winners, Sue x
ReplyDeleteGreat card again Sue.
ReplyDeletePlease can we have a spellbinders DVD......Bean
Glad you managed to put tutorial on blog as it's a lovely card
ReplyDeleteLove
Sue
XXX
Thanks for a brilliant tutorial, it looked so complicated, but actually looks pretty easy to make. :)
ReplyDeleteThanks for sharing this :) xx
ReplyDeleteHi Sue
ReplyDeleteThat's one of the cards I loved when you did it on C&C, it's brilliantin all the colours, thank you for sharing.
Sue H. xx
Stunning card fell in love with it when I first saw it on C & C
ReplyDeleteI am a paper crafter and a quilter so this card ticks absolutely all my boxes. Cant wait to have a go using yours as inspiration. x
ReplyDeleteHi Sue
ReplyDeleteGorgeous card ive tried this with a different set of dies too and looks soo amazing Thank You for your fab tutorial you do amazing things with spellbinders dies cant wait to visit your blog every day
Hugs Fiona XXX
Hi sue
ReplyDeleteso glad you put this one up I saw it on c&c and wanted to have a go and like you say the concept is easy ONCE YOU KNOW HOW which we don't, without you to show us the way lol.thankyou xxx
love Nina
P.s have a great holiday!!!
Your tutorials are very clear and easy to follow and the finished result is lovely.
ReplyDeleteHave a relaxing holiday!
Loved this card when it was shown on C&C - I haven't got the dies you've used Sue but have another 'square' Spellbinder die so am going to see how it turns out using that!
ReplyDeleteThanks for the in-depth tutorial!
Su x
I love this card Sue, I've been hopeing you'd show the instructions. Hope all is well
ReplyDeleteSharon, Sheffield
that is awesome! Looks so difficult but the step by step makes it seem quite straightforward and achievable.
ReplyDeleteHi Sue,
ReplyDeleteThis will be very short for now I am sorry. I've been to the hospital for test today and being uncomfortable afterwards I have been back and forth pc doing my fave blogs. I usually leave yours to last so I have more time to spend writing something special. Wrong decision today, I have gotten worse and not better so have to go to bed.
I loved this card when I saw it on C&C, my favourite being the one without the Damask diecuts (even though I adore them). So kind of you to have done a step by step, they are so easy to follow.
Take care my friend. Catch up tomorrow. Hugs Linda
These are all lovely! Thanks so much for posting a tutorial on how they were created. Will have to give this a try.
ReplyDeleteThanks,
R/
Totally stunning! I love using the 3x3 or 4x4 pattern on my cards and when you start playing with the squares like you Sue did ....gosh, I can't find the words :D Awesome!
ReplyDeleteHugs from Finland, Eemeli
Dear Sue
ReplyDeleteThank you for the tutorial and sharing these lovely cards. It does put me in mind of when I used to sew pram and cot bedding when my grown sons were young.Vee xx
Ideal card for my quiltmaking friends. Will definitely give this one a try. Also looking forward to trying out my new Damask & Persian Accents dies and micro beads.
ReplyDeleteDoreen x
I am in love with this design, hoping to "Lift" it for a wedding card as soon as my dies get here.
ReplyDeleteThanks for the great tutorial will definitely try this one .
ReplyDeleteI totally love this idea!!! I loved all the cards made and have to go to work now and make this! Will give full credit to you of course but I just had to add a Thank you for the great idea! Big Hugs, Mimi
ReplyDeleteWow Sue.... these are amazing
ReplyDeleteFantastic card x
ReplyDeleteThis comment has been removed by the author.
ReplyDeleteLove the idea of using mbossabilities. Gonna try to make mothers day card using this!!!! will let you know how it goes.
ReplyDeleteThis is one of the coolest quilting cards i have ever seen!!! Love it!!! :)
ReplyDeleteI love this card it so stands out in bright colours will have to have a go at this one
ReplyDeleteI love this card it so stands out in bright colours will have to have a go at this one
ReplyDeleteGood Morning Sue, I have been waiting for this card ever since I saw it on C & C. Thanks so much for posting it, I am now going to play - after the housework of course!!!! Hope you can now have a bit of a rest after your mamoth stint on C & C. Love Rosemariexxxx
ReplyDelete