Tutorials

Saturday, 30 November 2024

Season's Greetings

Hello crafters!  I started today's card by using the Star stamp from the Santa Stamp set.  I stamped it repeatedly around the edge of a piece of white card with a black ink pad.  I used a silver paint pen to colour in all the stars.  Using the Double Stitched Squares I cut a small frame out of silver sparkle card.  I added mounting foam to the back of the frame and added it to another piece of silver sparkle card and then attached it to the middle of the card.   I cut the Season's Greetings sentiment in black and glued to the inside of the frame.  I cut a small poinsettia in white using the Stylish Poinsettia set and glittered it with Frosted Sparkle Glitterbitz and added it to the corner of the frame.  I cut two white leaves and added them as accents around the flower.  The card was completed with white and black mats and layers.  The finished dimensions are 7"  x  7" in size.  


Have you seen Creative Expressions amazing Black Friday Offers?

https://www.creative-expressions.uk.com/

If you haven’t had a chance to yet, visit their website to see the fabulous sitewide savings you can get!

See their offers page on their website for further details.


All for now, Sue x


                                                        Follow my blog with Bloglovin

Friday, 29 November 2024

Wishing You Peace, Love & Joy

Hello crafters!  I started by cutting the 3D Card Maker B out of white card.  I found some dotty paper in my stash so I decided to use it as a sort of wall paper for the scene, so I cut it using the same 3D Card Maker die and glued it to the white die cut.  Using the Cosy Fireside Christmas die set, I cut the fireplace out of slate grey card.  I added a brown mantle and a gold clock to it. I cut three stockings in red and added white tops to them and attached them to the fireplace.  I cut the firewood grate and coloured it and added it to the fireplace.   I cut the tree out of green card and coloured the ornaments with markers and added it to the right side pop up.  I cut an assortment of presents and bows in various colours and added them to the left side pop up and some extras to the area in front of the tree.  I cut a wreath and added a red bow and ribbon circling the wreath.  I added the wreath to a black and white frame using the Double Stitched Squares.  I used the greenery swag across the top of the card and added red bows at each join area.  I cut the Wishing You Peace, Love & Joy sentiment out of black and added it to a white shadow backing piece and attached it to the bottom of the card.  The finished dimensions are 5"  x  6" in size.  


All for now, Sue x


                                                      Follow my blog with Bloglovin

Thursday, 28 November 2024

Have A Paw-some Day

Hello bloggers!  I selected a piece of red card to use for the background.  I stamped the large pawprint from the Pet Pal Stamps all around the edges of the red card using a black ink pad.  I cut the Stained Glass Squares in black, then layered it with a Double Stitched Square frame cut in white.  I added mounting foam to the back of the frame and added it to a piece of white card.  I cut the Pet Pal Max out of tan card and used a fine tipped black felt pen to add in the detail from the face and body.  I cut a red neckerchief and added it to his neck as well as a white envelope with a red heart on it added to his mouth.  I cut several red glittered hearts and added them around his head.  I cut the Have  A Paw-some Day sentiment in red and shadowed it in black, then added it to a white shadow backing die.  I added the sentiment to the upper corner inside the frame.  The card was completed with white, black and red mats and layers.  The finished dimensions are 8"  x  8"  in size.  


All for now, Sue x


                                                         Follow my blog with Bloglovin

Wednesday, 27 November 2024

Officially Retired

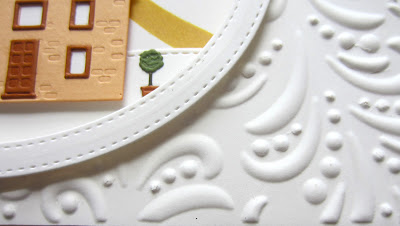
 Hello crafters!  I used the Dotty Flourish embossing folder and embossed a piece of white card.  Using the Double Stitched Ovals, I cut a thin white frame.  I added mounting foam to the back of it.  Using another piece of white card, I taped the Ray Of Light Stencil to it.  I used Fossilised Amber distress ink and inked through the stencil.  I used Spiced Marmalade in the sun area.  I removed the stencil, then cut a hill in white using the Stitched Hills and Clouds die.  I attached the frame over the stencilled image and added it to the middle of the card.  I cut the Keeper's Cottage die in peach and added a rust roof , windows and door.  I cut two topiaries and added them around the cottage.  I cut the Officially Retired sentiment from the Everyday Wordie sheets and added it above the framed image.  The card was completed with white mats and layers.  The finished dimensions are 7"  x  8 1/2"  in size.  


Have you seen Creative Expressions amazing Black Friday Offers?

https://www.creative-expressions.uk.com/

If you haven’t had a chance to yet, visit their website to see the fabulous sitewide savings you can get!

See their offers page on their website for further details.


All for now, Sue x


                                                        Follow my blog with Bloglovin

Tuesday, 26 November 2024

Love You

Hello bloggers!  I started by cutting the Floral Dream Cover Plate twice with a piece of black card on top of a piece of white card both times.  I used the white embossed copy and coloured the design with alcohol ink markers on both of them.  Once coloured, I glued the black die cuts on top of both of them.  Using a pair of sharp scissors, I cut away the mostly solid areas of the two die cuts.  I added mounting foam to the backs of both and added them to a piece of white card, facing each other.  I added clear glue to the centres of the flowers and sprinkled Black Onyx glitter on them and set them aside to dry.  I cut the Love You Shadowed Stacked sentiment in Azure Blue and shadowed it with a black die cut. The card was completed with white mats and layers.  The finished dimensions are 6 3/4"  x  7 1/4"  in size.  


All for now, Sue x


                                                       Follow my blog with Bloglovin

Monday, 25 November 2024

Happy Christmas

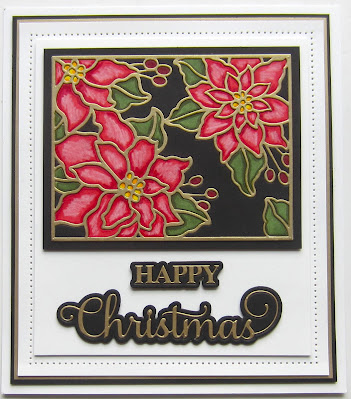
Hello bloggers!  I cut the Poinsettia Cover Plate with a piece of antique gold card on top of a piece of white card.  I used the white copy to colour the image.  I glued the gold die cut on top of the coloured copy.  I cut the die a second time out of black card.  I used the fall away pieces to paper piece the background into the die.  I added a black mat to it then cut a larger piece of white card and added it to the top of the card.  I cut the Happy Christmas sentiment out of antique gold card and added it to a black shadow backing piece.  I added the sentiment below the cover plate with mounting foam.  The card was completed with white, antique gold and black mats and layers.  The finished dimensions are 7 1/4"  x  8 1/4" in size.  


All for now, Sue x


                                                         Follow my blog with Bloglovin

Sunday, 24 November 2024

Season's Greetings

Good Sunday morning all!  I started today' card by cutting the cottage from the Winter Wonderland die set out of soft grey.  I added a slate grey roof and a pale yellow piece of card behind the windows and a fine black marker to add detail to the house.  I cut the fence several times out of white card and ran it across the front stoop of the cottage.  I added several trees out of Brunswick green behind the house.  I cut the deer family out of tan card and added them on either side of the cottage. I used Fluffy Stuff on the top of the cottage and the trees, then heated it to look like snow.   I cut a white frame using the Double Stitched Rectangles and added it over the scene with mounting foam.  I cut a larger piece of green card and covered it with sticky adhesive sheet, then coated it with Hunter Green Polished Silk Glitter.  I added the framed image to the centre of it.  I cut the Season's Greetings die out of red card and glued it to the edge of the white frame.  The card was completed with white mats and layers.  The finished dimensions are 7"  x  9 1/4"  in size. 


 All for now, Sue x


                                                        Follow my blog with Bloglovin

Saturday, 23 November 2024

Love You

Hello crafters!  I started today's card by cutting the Floral Melody Cover Plate with two pieces of white card.  The top piece cuts the entire die while the bottom piece gives a nice emboss of the design with just the outer cut line cutting all the way through.  I glued the two pieces together, then began cutting the die two more times.  Once in green and once in purple.  I used the fall away pieces and paper pieced them back into the design.  Once the paper piecing was complete, I glued the die to another piece of Soft Lavender card.  I cut the Love You die out of both Amethyst and black card.  I shadowed the sentiment with the black die cut then added them to white shadow backing pieces.  I attached them to the top of the card with mounting foam.  The card was completed with white and amethyst card.  The finished dimensions are 6"  x  7"  in size.


Creative Expressions amazing BLACK FRIDAY OFFERS are NOW ON!

https://www.creative-expressions.uk.com/

Visit their website to see the fabulous sitewide savings you can get!

There’s limited stock available, don’t miss out on your favourites!

See their offers page on their website for further details.


All for now, Sue x


                                                    Follow my blog with Bloglovin